
A true symbol of French baking tradition, the croissant is much more than just a pastry — it’s a masterpiece of craftsmanship, patience, and pure indulgence. Beneath its golden, flaky layers lies a soft, buttery heart that has captivated pastry lovers across the world.
In this article, we’ll unveil the secrets to making croissants at home, step by step. From preparing the delicate laminated dough to achieving that perfect, crisp bake, you’ll discover how to recreate the magic usually found only in the finest bakeries.
Each technique is carefully explained to guide you through the process, making what once seemed daunting an exciting and deeply satisfying experience.
Baking croissants at home is a true adventure — one that requires a little time and care, but rewards you with the incomparable joy of a warm, homemade pastry.
Whether you’re looking to elevate a breakfast spread, impress at a brunch gathering, or simply enjoy the meditative pleasure of baking, mastering the croissant will soon become a cherished skill.
Ready to dive into the flaky, buttery world of homemade croissants? Let’s get started!
To successfully make a dozen homemade croissants, every ingredient plays a crucial role in achieving the perfect result.
For the croissant dough:
- Fresh yeast: 12 gr, to ensure steady fermentation and develop rich flavors.
- Whole milk: 144 gr, to add softness and richness to the dough.
- T55 flour: 150 gr, for a supple, well-balanced dough.
- Strong flour (high-protein flour): 150 gr, ideal for giving strength and structure to support the lamination process.
- Fine salt: 6 gr, to enhance the flavor and control fermentation.
- Sugar: 35 gr, for a subtle sweetness and to promote beautiful browning during baking.
- Honey: 9 gr, adding a delicate aromatic note and improving freshness.
- Butter: 60 gr, incorporated directly into the dough for a tender texture.
For the lamination:
- Dry butter (or laminated butter): 150 gr, to achieve the light, airy, and melt-in-the-mouth layers typical of a perfect croissant.
For the egg wash:
- Whole egg: 50 gr, to bring shine to the croissants.
- Egg yolks: 50 gr, to deepen the golden color.
- Whole milk: 50 gr, to slightly thin the mixture and ensure an even glaze.
Essential equipment:
- Stand mixer: for kneading the dough efficiently and consistently.
- Whisk: to blend the egg wash smoothly.
- Bench scraper: to handle and cleanly move the dough without damaging it.
- Rolling pin: for evenly rolling out the dough during the lamination process.
- Pastry brush: for delicately applying the egg wash to the croissants
Homemade Croissants — Full Method
Work Time:
- Preparation: 2 hours
- First proof (pointing): 30 minutes
- Freezing: 30–40 minutes
- Chilling: 30 minutes
- Final proof (rising): 2 hours
- Baking: 14–16 minutes
- Storage: up to 24 hours
Method – Step-by-Step
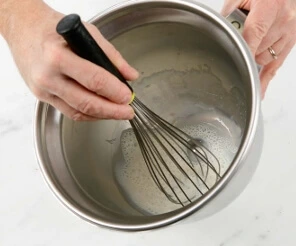
1.
Using a whisk, dissolve the fresh yeast in the whole milk directly in the bowl of a stand mixer.
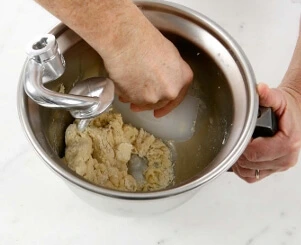
2.
Add the remaining ingredients (except the laminated butter) into the mixer bowl fitted with the dough hook. Knead for 4 minutes at low speed, then 6 minutes at medium speed.
At the end of kneading, the dough should be elastic and smooth.
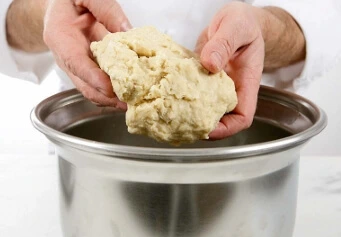
3.
Shape the dough into a ball, cover it with plastic wrap, and let it proof for 30 minutes (first rise).
4.
Once proofed, gently flatten the dough to release any gas produced during fermentation.
Place it on a tray and freeze for 30 to 40 minutes to chill thoroughly.Meanwhile, roll out the 150 grams of laminated butter into a neat square.
After chilling, place the butter square onto the center of the dough.
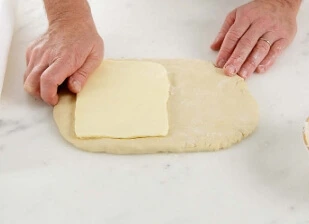
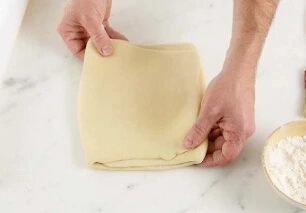
5.
Fold the dough over the butter and seal the edges carefully.
Roll the dough out into a rectangle approximately 60 cm long by 25 cm wide.
Give the dough a book fold (double fold) followed by a single fold.
Let the dough rest in the refrigerator for 30 minutes before proceeding.
Next Step: Shaping and Baking
6. Shaping the Croissants
- Roll out the dough to 4 mm thickness, forming a rectangle of approximately 50 cm × 24 cm.
- Using the tip of a knife, mark the edges of the dough every 8 cm along one side.
Repeat on the opposite side, but offset the marks by 4 cm to create perfect triangle shapes. - Cut the dough along these marks to form even triangles.
Each triangle should weigh approximately 50 to 55 grams.
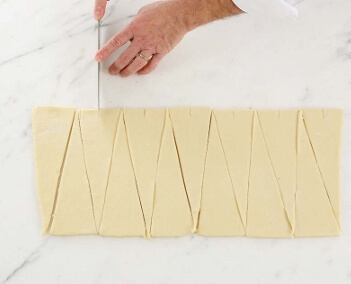
- Cut out the triangles neatly along the marks.
- At the base of each triangle, make a small slit with the tip of a knife.Gently stretch each triangle slightly before rolling to shape the croissants.
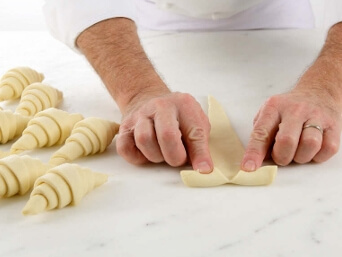
- Gently roll each triangle from the base up toward the tip, without pressing or crushing the dough, to preserve the lamination.
- Place the shaped croissants onto a baking tray lined with parchment paper.
- Using a pastry brush, apply the first coat of egg wash evenly across the croissants.
- Proof the croissants for 2 hours at 26°C (79°F).
You can create a homemade proofing environment by placing the trays in an off oven with a bowl of steaming hot water inside to maintain humidity.

7.Chef’s Tips & Tricks
- Be sure to separate the yeast from the salt and sugar at the beginning of the kneading process. This prevents the salt from deactivating the yeast, ensuring proper fermentation.
- To check if the dough is kneaded enough, press your finger gently into the surface of the dough. If it returns to its original shape, the dough is ready and properly kneaded.
- You can replace regular butter or laminated butter with an AOP butter (Appellation d’Origine Protégée). This gives your croissants an extra layer of flavor and a richer, more authentic taste
Conclusion
Making homemade croissants is as rewarding as it is delicious. While the process requires patience and attention, the result is undoubtedly worth it: golden, flaky croissants with impeccable layers, a rich buttery taste, and a melt-in-your-mouth texture. With each step, you can enjoy mastering an age-old French pastry technique. Whether for breakfast, brunch, or simply to impress your loved ones, these homemade croissants will delight your taste buds.
Through this recipe, you now have all the keys to preparing these little wonders at home, from preparing the dough to the final bake. It’s important to take your time, respect fermentation and resting times, and treat the dough with care. Croissants aren’t just a recipe; they are a unique baking experience, both technical and creative.
So, what are you waiting for? Get to work and enjoy!
Long-Form Q&A
Q1: Why does the croissant dough need to rest multiple times, and what is the importance of each step?
The resting times between each step are crucial for several reasons. First, they allow the yeast to ferment properly, making the dough light and airy. The rests between each turn also let the gluten relax, which makes it easier to roll out the dough. Each resting period allows the butter to solidify, creating layers of dough and butter that give the croissant its signature flaky texture. In short, each rest is a “pause” for the dough, giving the ingredients time to develop and balance, ensuring perfect flakiness at the end.
Q2: Why is it important to work with specific temperatures for both the dough and butter?
Temperature plays a vital role in the success of croissants. If the dough gets too warm, the butter will melt and mix with the dough, ruining the formation of layers. On the other hand, if the dough is too cold, it will be difficult to roll out. That’s why it’s essential to follow the recommended temperatures. The dough should be cold enough to keep the butter firm during the lamination process but not too hard to prevent it from being stretched easily. It’s all about finding the right balance.
Q3: What’s the difference between homemade croissants and those bought at a bakery?
Homemade croissants stand out because of their freshness, rich flavor, and incredibly light and flaky texture. Homemade dough is often made with higher-quality ingredients and without preservatives, ensuring a pure, authentic taste. Plus, by making the croissants yourself, you have the ability to customize them to your liking, whether it’s with the type of butter or the egg wash. Finally, the satisfaction of enjoying a croissant you made with your own hands is unbeatable – every bite carries the story of your patience and craftsmanship.
Q4: Can you prepare croissants in advance and freeze them?
Yes, you can! Once the croissants are shaped and before the final proof, you can freeze them on a tray. Once frozen, transfer them into a freezer bag. When you’re ready to bake them, simply let them proof in the fridge overnight before brushing with egg wash and baking as usual. Freezing doesn’t compromise the texture or flavor if done correctly.
Q5: Any tips for successfully shaping croissants?
Shaping is a delicate but essential step. Here are a few tips to ensure it goes smoothly:
- Don’t overload with butter: it should be evenly distributed but not excessive.
- Avoid stretching the dough too much when rolling it to prevent losing the layers.
- Mark the base of each triangle clearly to prevent tearing when rolling.
- Finally, roll tightly but without pressing too much, so the croissant keeps its shape and layers.