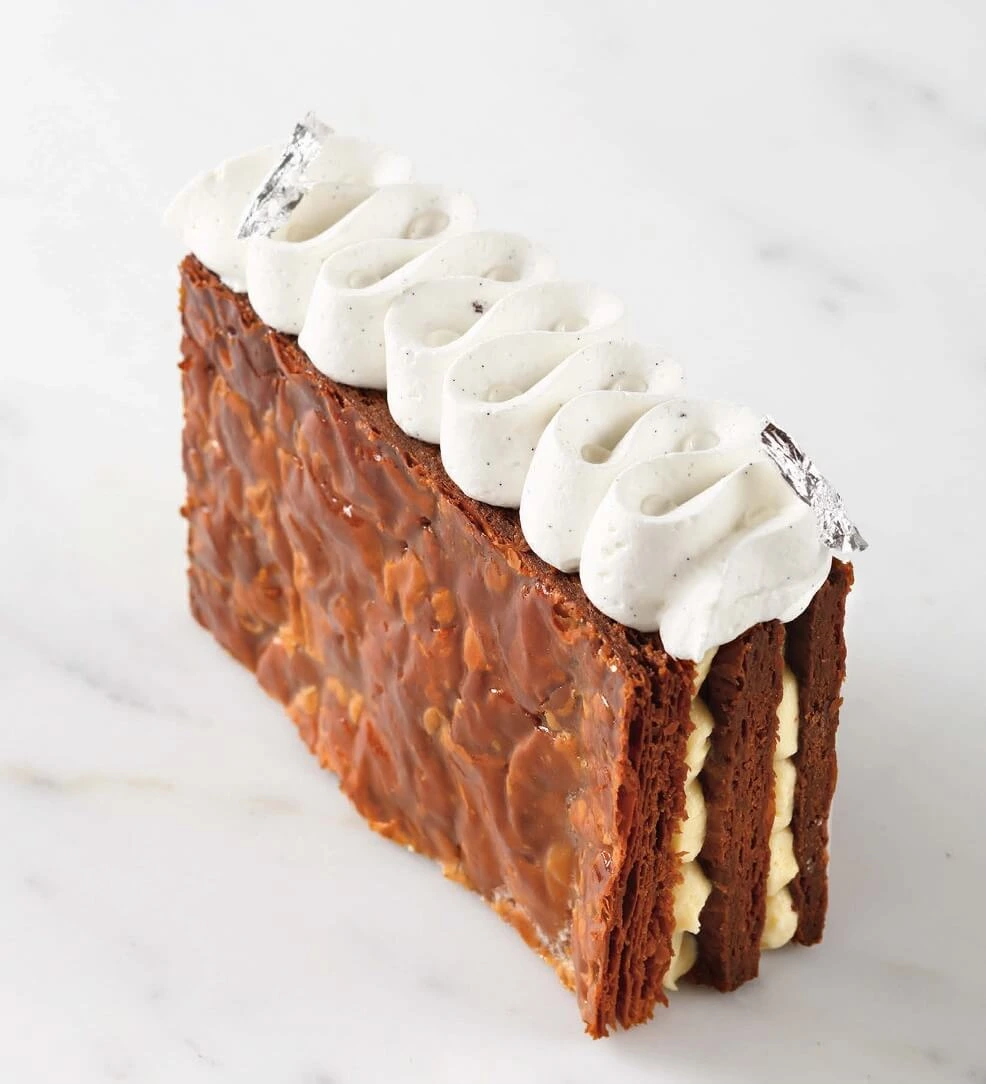
Just in 5 Minutes: The Chicest Appetizer Ever

Elegant duck breast crisps topped with mango chutney and crushed peanuts on thin tuiles, arranged on a white platter with microgreens.

5-minute chic appetizer

A refined fusion of textures and bold flavors, this canapé-style creation is designed to elevate your table and delight the senses.

Imagine a delicate, crisp tuile made from duck breast — thin, flavorful, and perfectly roasted — serving as the savory base of this elegant bite.

Each tuile carries a small spoonful of golden mango chutney, offering a burst of sweetness, acidity, and exotic warmth that complements the richness of the duck beautifully.

To finish, a sprinkle of crushed roasted peanuts adds not only crunch, but also a hint of earthiness that rounds out the entire bite.

The combination is harmonious: the umami depth of the duck, the bright tang of the mango, and the nutty, toasted finish from the peanuts — all balanced in a single, refined morsel.

Ideal for cocktail receptions, festive dinners, or amuse-bouches at elegant gatherings,

this dish is a celebration of contrast: crispy and tender, sweet and savory, bold yet balanced. It’s not just a recipe — it’s a statement of culinary sophistication in just one bite.Elegant Appetizers for Dinner Parties

Ingredients (Serves 2)

  • 1 packet of savory tuiles
    (Choose fine, crispy tuiles — either neutral or slightly salted. You can use ready-made aperitif tuiles or make them yourself for an artisanal touch.)
  • 90 g of smoked duck breast slices
    (Thinly sliced, ideally with a delicate layer of fat for flavor. Remove the rind if it’s too thick. Preferably use high-quality, artisanal smoked duck for the best taste.)
  • 2 tablespoons mango chutney
    (Smooth or chunky, according to preference. Choose a chutney that’s both sweet and tangy — homemade or from a quality store-bought jar. You can also slightly heat it for better spreadability.)
  • 1 tablespoon dry-roasted peanuts
    (Roughly crushed or finely chopped. Dry-roasted peanuts add a nutty crunch and balance the sweetness of the chutney and the richness of the duck.)

Method – Step-by-Step Instructions

Begin by carefully preparing your working surface and arranging your ingredients so each component is ready to assemble.

Lay the savory tuiles flat on a clean tray or serving board — handle them gently, as they are delicate and can break easily.

Using a small spoon or a palette knife, take a modest amount of mango chutney and gently spread it across the surface of each tuile.

The layer should be thin enough not to soften the crisp texture of the tuile, yet generous enough to provide that sweet and tangy punch of flavor that complements the richness of the duck.

If the chutney is thick or chunky, consider blending it lightly or warming it slightly to make it more spreadable.

Avoid overloading, as too much chutney can overpower the balance.

Next, take your slices of smoked duck breast. If they are large, you may cut them into smaller, refined strips or half-moons that will sit elegantly atop the chutney without spilling over the edges.

Gently place one piece of duck on each tuile, pressing it lightly into the chutney so it adheres.

The silky, smoky duck brings a luxurious mouthfeel and savory depth to each bite.

Finally, take your dry-roasted peanuts, which should be roughly crushed — not too fine, as you want to retain some crunch and texture.

Using your fingers or a small spoon, sprinkle a small pinch of the crushed peanuts over each prepared tuile.

This finishing touch adds not only crunch but a subtle nutty warmth that beautifully contrasts the sweetness of the mango and the saltiness of the duck.

Arrange the finished tuiles on a serving platter. For extra elegance, you may garnish the plate with microgreens.

a drizzle of reduced balsamic vinegar, or edible flowers to elevate the presentation.

Serve immediately to maintain the crispness of the tuiles, and enjoy the perfect balance of crunchy, creamy, smoky, sweet, and salty in every bite.

Conclusion (Long & Évocatrice)

This appetizer is more than just a simple bite — it’s a refined expression of contrast and harmony on the palate.

Each element plays a distinct role: the crisp tuile acts as a delicate canvas, the mango chutney brings brightness and complexity, the smoked duck delivers depth and umami.

and the crushed peanuts crown it all with a rustic, satisfying crunch.

Served as an amuse-bouche at a festive gathering, or as a delicate starter at a dinner party,

these Duck Breast Tuiles with Mango Chutney and Peanuts offer a sophisticated fusion of sweet, savory, and nutty flavors.

Elegant yet approachable, they’re the kind of dish that turns heads and sparks conversation.
A perfect harmony in just one bite — a chef’s secret weapon for effortless refinement.

Not sure what wine to serve with it? Wine Folly’s white wine pairing guide offers expert tips for perfect matches.


Q&A – Chef Tips & Common Questions

Q: Can I make these in advance?
A: You can prepare the components ahead of time, but assemble them at the last minute to keep the tuiles crisp.

If preassembled, the chutney may soften them.

Q: Can I replace the duck?
A: Yes — thin slices of smoked turkey, prosciutto, or even grilled vegetables (like zucchini) can offer alternative profiles while maintaining the refined structure.

Q: What kind of chutney works best?
A: A mango chutney with a balance of sweet and acidic notes pairs best.

Avoid overly spicy versions, which may overpower the duck.

Q: Can I serve this warm?
A: While the dish is typically served at room temperature, you can warm .

the duck slightly before assembly for a silkier texture — but be careful not to affect the tuile’s crispness.


Chef’s Tip

For an extra layer of flavor and finesse.

lightly brush the duck slices with a touch of maple syrup or aged balsamic glaze before placing them on the tuiles.

It adds a delicate sheen and a subtle sweetness that echoes the chutney and enhances the presentation.

3 Secret to Perfect Lemon Éclairs in Every Bite

Close-up of a lemon éclair topped with crunchy craquelin, filled with smooth lemon cream, on a white plate.

The lemon éclair with crispy craquelin is not just a pastry—it’s an experience. A refined collision of contrasts, this creation pairs the structured elegance of classic French pâte à choux with the bold brightness of citrus and the satisfying crunch of a golden craquelin topping. Each bite is a journey through crispness, creaminess, and tang.

At first glance, the pastry is sculptural. Its surface glistens under the light, textured by a thin crust of craquelin that bakes into an irresistible shell. Beneath it, the choux remains light yet stable, its hollow interior a perfect vessel for the lemon cream that awaits.

What makes this éclair stand out is its balance. The craquelin offers sweetness and crunch, a deliberate counterpoint to the vibrant acidity of the lemon filling. Silky and smooth, the cream bursts with freshness, evoking memories of sun-soaked orchards and spring mornings. It is both refreshing and indulgent, sharp and sweet, anchored in traditional technique but elevated by modern finesse.

Served chilled, with a delicate glaze or a whisper of zest on top, this éclair is perfect as a centerpiece in a pâtisserie showcase or as an elegant finish to a refined meal. It’s the kind of dessert that impresses not only with flavor, but with structure, precision, and charm.

Whether you’re a passionate home baker or a seasoned pastry chef, mastering the lemon éclair with craquelin is a statement. It says you understand nuance, you appreciate craftsmanship, and above all—you love pastry with character.

Yield: Approximately 20 éclairs
Preparation time: 2 hours
Chilling time: 2 hours
Baking time: 40 minutes
Storage: Best consumed within 48 hours

Essential Equipment

To achieve the finesse and structure worthy of a patisserie window, the following tools are highly recommended:

  • Stand mixer: For efficiently preparing the choux pastry and lemon cream with consistent aeration and control.
  • Rolling pin: Used for evenly rolling the craquelin dough to the perfect thinness before chilling and cutting.
  • Fine mesh sieve or sifter: To sift flour and dry ingredients for a smooth craquelin and lump-free pastry cream.
  • Piping bag with a plain 15 mm tip: For precision piping of both the éclairs and their filling. This size ensures uniform, professional results.
  • Digital thermometer: Crucial for controlling temperatures during the cooking of the choux paste, sugar syrup, or lemon curd base.
  • Chinois or fine straining cloth (étamine): Used for straining lemon cream to ensure it is perfectly smooth and free of zest or egg particles.

Workflow Overview

Creating these éclairs is a multi-stage process that combines technique, patience, and elegance. Here’s what to expect:

  1. Day One (Preparation & Assembly)
    You’ll begin by preparing the craquelin dough and allowing it to chill until firm. Then, you’ll make the pâte à choux, pipe it into uniform éclair shapes, and top each with a pre-cut disc of craquelin.
    While the choux is baking to golden perfection, you’ll prepare the lemon cream and allow it to chill and set completely.
  2. Day Two (Filling & Finishing)
    Once the éclairs are cool and the lemon cream has matured, you’ll fill each choux shell with the cream using the piping bag and finish with optional glaze, zest, or decorative accents.
  3. Serving & Storage
    These éclairs are best served chilled, ideally within 24 to 48 hours, while the craquelin remains crisp and the filling fresh. Avoid freezing once assembled to maintain texture integrity.

Ingredients for Lemon Éclair with Crispy Craquelin (makes approx. 20 éclairs)

Craquelin

  • 30 g all-purpose flour
  • 50 g unsalted butter, softened
  • 20 g almond powder (finely ground almonds)
  • 10 g candied lemon peel, finely chopped
  • 50 g brown sugar (cassonade)
  • Zest of one yellow lemon

Choux Pastry (Pâte à Choux)

  • 250 g water
  • 100 g unsalted butter
  • 3 g fine salt
  • 5 g granulated sugar
  • 150 g all-purpose flour
  • 250 g eggs (approximately 5 large eggs)

Lemon Cream (Crémeux Citron)

  • 200 g eggs (about 4 large eggs)
  • 100 g granulated sugar
  • 30 g lemon zest (yellow lemon)
  • 170 g fresh lemon juice
  • 6 g gelatin sheets (soaked in cold water)
  • 150 g unsalted butter, cubed and softened

Lemon Glaze (Fondant au Citron)

  • 600 g fondant (ready-to-use fondant icing)
  • 50 g fresh lemon juice
  • 5 g lemon zest (yellow lemon)
  • 5 g yellow food coloring (gel or powder)

Step-by-Step Method for Lemon Éclairs with Crispy Craquelin

Craquelin Preparation

Begin by placing all the craquelin ingredients into the bowl of a stand mixer fitted with the paddle attachment. Mix until the dough comes together into a smooth, pliable ball. Once combined, roll out the dough evenly between two sheets of parchment paper to a thickness of approximately 3 mm (about 1/8 inch). Transfer the rolled craquelin to the freezer to chill and firm up thoroughly—this step is essential to maintain its crisp texture during baking.

Choux Pastry (Pâte à Choux)

Prepare your choux pastry according to your preferred recipe or the one provided. Once your dough is ready, fit a piping bag with a plain tip and pipe éclairs approximately 12 cm (about 4.7 inches) long onto a buttered baking sheet. From the chilled craquelin dough, cut rectangles measuring roughly 10 cm by 2 cm (4 x 0.8 inches). Gently place one craquelin rectangle atop each piped éclair, carefully covering the surface. This layer will create the signature crackly crust once baked.

Bake in a preheated oven at 180 °C (350 °F, gas mark 6) for 30 to 40 minutes, or until the éclairs are golden and have risen fully. Avoid opening the oven door during baking to prevent collapse. After baking, remove the éclairs from the oven and let them cool completely on a wire rack.

Lemon Cream (Crémeux Citron)

In a saucepan, combine the eggs, sugar, lemon zest, and fresh lemon juice. Gently heat the mixture to 85 °C (185 °F), stirring constantly to avoid curdling—this process cooks the eggs while preserving the bright lemon flavor. Once cooked, strain the custard through a fine chinois or étamine to ensure an ultra-smooth texture.

Add the rehydrated and thoroughly squeezed gelatin sheets to the warm custard, stirring until fully dissolved. When the mixture cools to approximately 60 °C (140 °F), incorporate the cubed butter and use an immersion blender to emulsify until silky and homogeneous. Transfer the lemon cream to a container and refrigerate for at least 2 hours to set and mature the flavors.

Lemon Glaze (Fondant au Citron)

Gently warm the fondant icing in a saucepan over low heat until it reaches about 37 °C (98 °F), just enough to become glossy and pourable. Stir in the fresh lemon juice, zest, and yellow food coloring until evenly combined. If the glaze is too thick or stiff, adjust the consistency by adding a small amount of syrup or warm water to achieve a smooth, spreadable texture.

Assembly

Using a small, sharp tool or skewer, carefully create three small injection points on the underside of each cooled éclair—one near the top, one in the middle, and one near the bottom. Fit a piping bag with a small nozzle and gently fill each éclair with the chilled lemon cream, ensuring even distribution without breaking the delicate shell.

Finally, dip the top of each filled éclair into the prepared lemon glaze, coating it evenly. Use your finger or a small spatula to clean away any excess glaze around the edges for a clean, professional finish. Allow the glaze to set briefly before serving or storing.

Conclusion: The Art and Joy of the Lemon Éclair with Crispy Craquelin

Mastering the lemon éclair with crispy craquelin is truly a rewarding endeavor. This pastry captures the essence of French pâtisserie — balancing delicate textures with bold, vibrant flavors. The crackly sweetness of the craquelin contrasts beautifully with the light, airy choux pastry, while the lemon cream adds a fresh, zesty brightness that awakens the palate.

This recipe invites patience and precision, from chilling the craquelin dough just right to achieving the perfect bake on the éclairs and preparing a silky, balanced lemon cream. The process may be multi-stepped, but the results are undeniably worth the effort. Serving these éclairs will impress guests and elevate any special occasion, offering a refined yet approachable dessert experience.

Beyond technique, this éclair embodies a story — one of craftsmanship, passion, and a love for the intricate dance of flavors and textures that defines haute pâtisserie. Whether you’re a seasoned baker or an enthusiastic home cook, mastering this recipe will deepen your appreciation for pastry arts and bring a touch of elegance to your kitchen.


Frequently Asked Questions (FAQs)

Q: How can I ensure the craquelin stays crisp after baking?
A: Proper chilling of the craquelin dough before baking is crucial. Also, store assembled éclairs in the refrigerator uncovered for short periods before serving to preserve crispness. Avoid sealing them airtight, as moisture softens the craquelin.

Q: Can I prepare the lemon cream ahead of time?
A: Yes! The lemon cream benefits from at least 2 hours of chilling to develop flavor and firm up. It can be made up to 24 hours in advance and kept refrigerated, covered tightly.

Q: What if my éclairs collapse during baking?
A: This often results from opening the oven too early or inaccurate oven temperature. Use an oven thermometer to maintain consistent heat and resist opening the door until near the end of baking.

Q: Can I substitute gelatin with something else?
A: Agar-agar can be used as a vegetarian substitute, but it requires different preparation and setting times. Adjustments may be necessary for texture and firmness.

Q: How long can I store these éclairs?
A: For best texture and flavor, consume within 48 hours. The craquelin is at its crispiest fresh out of the oven, and the lemon cream retains its freshness best refrigerated.

Just 10 Minutes to the Perfect Chocolate Ice Cream Base

Homemade chocolate ice cream in a rustic ceramic bowl with a silver spoon.

Chocolate Ice Cream Base

Velvety, rich, and seductively smooth—chocolate ice cream is more than just a dessert. It’s a moment of pure escape. With every spoonful, it evokes childhood memories, cozy evenings, and the simple pleasure of tasting something deeply satisfying. Yet beneath its familiar surface lies a world of nuance and craftsmanship.

The texture is what sets it apart: perfectly churned to achieve a balance between creaminess and lightness, each bite melts gently on the tongue, releasing waves of cocoa warmth. Not too sweet, never too bitter—this frozen treat is a tribute to the complexity of chocolate in its most luscious form.

Chocolate ice cream carries a quiet confidence. It doesn’t need embellishments or elaborate presentation to impress. Whether served in a crisp cone, nestled next to a warm pastry, or savored slowly on its own, it commands attention and admiration. Its deep, glossy hue alone invites temptation.

Beyond its irresistible taste, chocolate ice cream is an emblem of universal comfort. From elegant Parisian salons to sunny boardwalks by the sea, it transcends age, culture, and season. It’s both everyday and extraordinary—a constant on dessert menus, and a highlight of gourmet creations.

Crafting the perfect chocolate ice cream is an art: a delicate interplay of temperature, technique, and timing. But when done well, the result is magic—a luxurious scoop that soothes, delights, and lingers long after the last bite.

This is not just frozen dessert. This is chocolate reimagined, made to melt hearts.

Chocolate Ice Cream – Recipe Overview

Serves: 6 to 8 people

Ideal for a dinner party, weekend treat, or gourmet gift, this quantity yields about 1 liter of intensely flavorful chocolate ice cream.


Preparation Time: Approximately 40 minutes

This includes making the custard base, melting and incorporating the chocolate, and properly emulsifying the mixture before maturation. This step is where precision and patience come together to ensure a silky texture and balanced flavor.


Maturation Time: 4 to 12 hours (preferably overnight)

Allowing the mixture to rest in the refrigerator is essential. This process lets the flavors deepen and gives the ice cream base time to stabilize. The result is a creamier texture and a scoopable consistency post-churning.


Storage: Keeps for up to 2 weeks in the freezer

Store in an airtight, freezer-safe container to prevent ice crystals and preserve the intense chocolate aroma. Though best enjoyed within the first few days, it retains its luxurious texture and flavor for up to 14 days.


Equipment Required:

  • Cooking Thermometer (Digital or Analog):
    Precision is everything in ice cream making. A thermometer ensures your custard base reaches the ideal temperature without curdling the eggs or burning the chocolate.
  • Immersion Blender (Stick Blender):
    Crucial for creating a perfectly smooth and fully emulsified base. It breaks down any remaining particles and ensures the fats, sugars, and chocolate are seamlessly unified.
  • Fine Mesh Sieve (Chinois):
    Used to strain the base before maturation, eliminating any lumps or cooked egg bits for a silky, refined finish.
  • Ice Cream Maker or Gelato Turbine:
    The churning process introduces air and gives the ice cream its characteristic lightness. A proper turbine ensures even freezing and optimal texture.
  • Ice Cream Storage Container:
    Preferably a shallow, rectangular container with a tight lid. Metal, silicone, or professional-grade plastic are all excellent choices for home freezing.

Ingredients – For 6 to 8 Servings (Approx. 1 Liter)

Dairy Components

  • 518 g whole milk (3.6% fat):
    Forms the base of the ice cream. The milk provides volume, natural lactose sweetness, and water content necessary for freezing. Choose high-quality, fresh whole milk for the best flavor.
  • 200 g heavy cream (35% fat):
    Adds creaminess and richness. The high fat content is essential to create that signature smooth mouthfeel and to support flavor release on the palate.
  • 32 g skim milk powder (0% fat):
    Also known as low-fat milk solids, this ingredient boosts the milk solids without adding extra water or fat. It helps improve texture, body, and prevents crystallization.

Sweeteners & Structure

  • 150 g sucrose (white granulated sugar):
    Provides sweetness and helps control the freezing point. It balances bitterness from the cocoa and enhances the overall flavor.
  • 45 g inverted sugar (e.g., trimoline or glucose syrup):
    A functional sugar that retains moisture, improves scoopability, and prevents ice crystal formation. It also enhances the creaminess of the final product.
  • 5 g ice cream stabilizer (e.g., Stab 2000):
    Essential in professional ice cream making. This reduces ice crystals and improves texture over time. Choose a neutral stabilizer specifically designed for frozen dairy applications.

Emulsifier

  • 40 g egg yolks:
    Serve as a natural emulsifier and thickener. They bring richness and help bind the fat and water phases, resulting in a smooth, velvety texture. Pasteurized yolks are ideal for precision and safety.

Chocolate Base

  • 40 g cocoa paste (100% cocoa mass):
    This pure form of chocolate adds deep, intense cocoa flavor and enhances color. It contributes richness without sweetness, ideal for creating a sophisticated chocolate profile.
  • 75 g dark chocolate couverture (Caraïbes 66%):
    A fine, balanced couverture from Valrhona, known for its notes of roasted nuts and gentle bitterness. Adds complexity, mouthfeel, and a refined finish to the ice cream.

Aromatic Touch (Optional)

  • 50 g chocolate liqueur (optional):
    Enhances the depth of the chocolate and adds a luxurious note. Also helps slightly lower the freezing point, resulting in a softer scoop. Optional but highly recommended for adult palates.

Tip: All ingredients should be weighed with precision using a digital scale. Accuracy is crucial in ice cream making to ensure a balanced mix of fats, sugars, and solids.

Method – Step by Step

  • Prepare the Dry Mix
    In a small bowl, whisk together the skim milk powder, sucrose (white sugar), and stabilizer. This step ensures even dispersion of the stabilizer and prevents clumping during heating.
  • Heat the Liquid Base
    In a medium saucepan, combine the whole milk, heavy cream, and inverted sugar. Begin to heat gently over medium heat, stirring regularly with a silicone spatula or whisk to prevent scorching.
  • Add Dry Ingredients at 35°C (95°F)
    Once the liquid mixture reaches 35°C, gradually add the prepared dry mix (milk powder, sucrose, stabilizer) while continuously whisking. Maintain a steady stirring motion to promote full dissolution and prevent any lumps.

Incorporate the Egg Yolks at 40°C (104°F)


  • When the mixture reaches 40°C, add the egg yolks. Whisk to combine. The egg yolks enrich the custard and serve as natural emulsifiers, enhancing the final texture of the ice cream.
  • Pasteurize the Base at 85°C (185°F)
    Continue heating the mixture until it reaches 85°C. Hold this temperature for approximately 1 minute to ensure proper pasteurization. Do not allow the mixture to boil. Stir constantly and gently to avoid scrambling the yolks.
  • Incorporate the Chocolate Elements
    Remove the mixture from the heat. Add the cocoa paste and the dark chocolate couverture (pre-melted gently over a bain-marie). Stir or whisk until fully blended and smooth. The chocolate should be fully integrated into the hot custard.
  • Blend and Strain
    Using an immersion blender, mix the base thoroughly for 1–2 minutes to ensure a fully emulsified texture. Then strain the mixture through a fine-mesh sieve (chinois) into a clean container to eliminate any curdled particles or solids.
  • Cool Rapidly and Mature the Base
    Immediately chill the strained mixture by placing the container in an ice bath, or transfer directly to the refrigerator. Once cooled to 4°C or below, let the base mature in the refrigerator for a minimum of 4 hours, ideally 12. This rest time allows the fats to crystallize properly and improves the final structure and flavor of the ice cream.

Optional: Add Liqueur and Re-blend

  • hocolate liqueur. Blend again with the immersion blender to fully incorporate the alcohol, which also enhances smoothness and aroma.
  • Churn in Ice Cream Maker
    Pour the matured base into your ice cream maker or gelato turbine. Churn according to the manufacturer’s instructions until the mixture reaches a soft-serve consistency. This usually takes between 25 and 40 minutes, depending on the machine.
  • Pack, Smooth, and Hard-Freeze
    Transfer the churned ice cream into a freezer-safe container. Smooth the surface using a palette knife or spatula for a clean finish. Place the container in a blast freezer or set your home freezer to –35°C (if possible) to harden the ice cream rapidly and preserve its texture.
  • Storage
    Once hardened, store the ice cream at –20°C. Allow to temper at fridge temperature (4–5°C) for 10 minutes before scooping for optimal texture and flavor release.

Pro Tip: For extra finesse, serve your chocolate ice cream with a pinch of fleur de sel, a few shards of dark chocolate, or a drizzle of warm espresso for a quick affogato twist.

Conclusion: A Scoop of Elegance

Crafting chocolate ice cream at home is more than following a recipe—it’s an invitation to slow down, to engage with texture, aroma, and precision. From the silky custard base to the moment it churns into a velvety ribbon of frozen delight, each step offers the satisfaction of mastery and the joy of indulgence.

What sets this version apart is its balanced complexity: not too sweet, never overpowering, with just the right depth of cocoa and cream. It’s a dessert that appeals to all ages, but carries the unmistakable signature of the artisan’s hand. Whether served in a coupe for a chic dinner party or simply savored alone with a spoon and a quiet moment, this chocolate ice cream offers a timeless kind of comfort—refined, familiar, and unforgettable.

So let this be your next kitchen ritual. Take the time. Temper the base. Taste as you go. And remember: the elegance of homemade is always in the detail.


Frequently Asked Questions

Can I make this ice cream without an ice cream machine?

While a turbine or professional ice cream maker yields the best texture, it is possible to make this recipe without one. Pour the chilled base into a shallow container and freeze, stirring vigorously every 30 minutes for 3 to 4 hours. The result will be denser and less aerated, but still delicious.

Can I use another type of chocolate?

Yes, but the final flavor will vary. Caraïbes 66% offers a balanced bitterness and rich cocoa notes. If you prefer something fruitier or more intense, try using Manjari 64% or Guanaja 70% from Valrhona. Always opt for couverture-quality chocolate.

Is the chocolate liqueur essential?

Not at all. It enhances depth and slightly softens the texture due to its alcohol content, but the recipe remains exquisite without it. You can also substitute it with a spoonful of espresso or a touch of vanilla extract.

How long should I mature the base?

A minimum of 4 hours is required, but 12 hours is ideal. Maturation allows proteins and fats to stabilize and flavors to meld beautifully. This rest time improves both scoopability and mouthfeel.

My ice cream is too hard out of the freezer. What should I do?

This is normal for low-overrun, high-quality ice creams. Let the container sit in the refrigerator for 10–15 minutes before serving. It will reach the perfect scooping texture and release its full bouquet of chocolate aromas.Sorbet Secrets Unveiled: Master Lemon Sorbet with Our Expert Q&A

http://Serious Eats: Understanding Ice Cream Science

Just In 2 Min : Sublimez Votre Apéro avec Nos Cubes d’Omelette Espagnole

Golden cubes of Spanish tortilla with visible layers of egg and tortilla, served on a wooden board with fresh herbs and toothpicks.

omelette espagnole apéro

Step into the sun-drenched kitchens of Spain with this refined take on one of the country’s most beloved dishes. These bite-sized cubes of Spanish tortilla omelette bring all the warmth and charm of a traditional tortilla de patatas, reinterpreted into elegant, portioned morsels perfect for sharing, entertaining, or savoring in quiet indulgence.

What makes these little cubes so special is the marriage of simplicity and sophistication. Traditionally prepared in rustic countryside homes and lively city tapas bars alike, the Spanish omelette is more than just comfort food—it’s a culinary symbol. Here, the familiar soft, layered textures and golden finish are preserved, but presented with a modern twist: neatly cut, visually striking cubes that are equally at home on a cocktail platter as they are in a picnic basket.

Each piece holds

the essence of slow-cooked tradition, where every slice reveals a mosaic of tender layers and a velvety interior. The taste? Rich and subtly complex, balanced between creamy softness and a satisfying, slightly crisped exterior. They can be enjoyed warm, at room temperature, or even cold—making them a versatile choice for any occasion.

Whether served as an appetizer, part of a brunch spread, or a midday snack, these Spanish tortilla cubes invite you to slow down and savor. They’re the kind of food that turns casual gatherings into cherished moments and brings a touch of Iberian flair to your table.

Rustic. Timeless. Irresistible. Let yourself be transported—one golden cube at a time.

Ingredients (Serves 6 to 8)

  • 1 packet of tortillas
    Preferably soft wheat or corn tortillas, medium size. These will be diced into small squares and provide the body and subtle chewiness to your omelette cubes.
  • 4 large eggs
    Fresh, organic eggs if possible, for a rich and creamy texture. They form the base of the omelette and bind all the elements together.
  • 1 tablespoon dried persillade
    A fragrant mix of parsley and garlic, traditionally used in French cuisine. It brings an aromatic depth and a herby lift to the preparation.
  • 1 tablespoon olive oil
    Extra-virgin if available. Used for cooking and enhancing flavor. It gives the omelette its golden edge and Mediterranean character.

Step-by-Step Preparation

  1. Prepare the Tortillas
    Begin by taking your tortillas out of their packaging. Using your hands, roughly tear them into irregular pieces—don’t worry about precision here. The goal is to create bite-sized fragments that will soak up the egg mixture while still offering a pleasant texture in the final dish. Once broken down, transfer the pieces into a large mixing bowl. The bowl should be spacious enough to allow for easy mixing later without any overflow.
  2. Beat the Eggs
    In a separate bowl, crack the four eggs. Using a fork or a whisk, beat them thoroughly until the yolks and whites are fully combined and slightly frothy. You’re aiming for a smooth, even mixture without visible streaks of egg white. This ensures that the omelette will cook uniformly and develop that signature velvety texture.
  3. Season and Combine
    Pour the beaten eggs over the torn tortilla pieces. Add the dried persillade directly into the bowl—this mix of parsley and garlic will infuse the omelette with a wonderfully fragrant Mediterranean aroma. At this point, grind some fresh black pepper over the mixture according to your taste; it adds a subtle kick and depth. There’s no need for additional salt if your tortillas are already seasoned, but you can adjust this to your preference. Gently mix everything together with a spatula or spoon, folding rather than stirring aggressively, so as not to crush the tortilla pieces too much. Let the mixture sit for about 5 minutes to allow the tortillas to absorb some of the egg and soften slightly.
  4. Cook the Omelette
    Heat a non-stick frying pan over medium heat and add the tablespoon of olive oil. Swirl it around the pan to coat the surface evenly. Once the oil is hot—but not smoking—carefully pour in the tortilla and egg mixture, spreading it out with the back of a spoon to form an even layer. Allow it to cook gently for about 2 minutes on the first side, or until the bottom is lightly golden and set enough to flip.
    Using a wide spatula—or by carefully sliding the omelette onto a plate and flipping it back into the pan—turn it over to cook the second side. Cook for another 2 minutes, ensuring that the omelette is fully cooked through but still moist and tender inside. Adjust the heat as needed to avoid burning.
  5. Cool and Cut into Cubes
    Once the omelette is cooked and both sides are beautifully golden, transfer it onto a cooling rack or a clean plate. Let it rest for at least 10 minutes. This cooling phase is essential: it allows the omelette to firm up slightly, which makes it much easier to cut cleanly.
    Using a sharp knife, trim the edges if desired, then slice the omelette into small, neat cubes. Each piece should be firm enough to hold its shape but still soft and moist inside, offering a delightful texture contrast.

Chef’s Tips

  • Customize the Flavor
    While the persillade gives a lovely garlic-herb aroma, feel free to adapt the seasoning to your taste. A pinch of smoked paprika or a touch of cumin can add a subtle Spanish flair, while a handful of finely chopped fresh herbs (parsley, chives, or cilantro) can boost freshness if using the cubes the same day.
  • Texture Matters
    For added richness, you can incorporate a small amount of grated cheese—like Manchego or mild cheddar—into the mixture before cooking. It melts into the egg and adds creaminess without overpowering the original recipe.
  • Perfect Flip
    If flipping the omelette feels risky, try this: once the bottom is cooked, slide the omelette onto a large plate, cover with a second plate or a flat lid, invert quickly, and then slide it back into the pan to cook the other side. This technique minimizes breakage and ensures even cooking.
  • For Entertaining
    Stick toothpicks into each cube and garnish with a tiny sprig of herb or a dot of spicy aioli for an elevated tapas experience. Serve them on a wooden board for rustic elegance or on a slate platter for modern chic.

Storage & Serving Suggestions

  • Storage
    Once the omelette has cooled completely and been cut into cubes, you can store them in an airtight container in the refrigerator for up to 3 days. Place parchment paper between layers to prevent sticking and retain the cubes’ shape.
  • Serving Temperature
    These cubes are extremely versatile. They can be served:
    • Warm – Reheat gently in a covered skillet or in the oven at low temperature (around 150°C / 300°F) for a few minutes.
    • Room Temperature – Ideal for picnics, brunch tables, or buffets.
    • Cold – Surprisingly delicious straight from the fridge, especially with a glass of chilled white wine or sparkling water with lemon.
  • Freezing
    While possible, freezing is not ideal due to the delicate texture of the eggs and tortillas. If you must freeze them, wrap each cube tightly in cling film, then place in a freezer-safe container. Thaw in the fridge overnight and reheat gently.

Conclusion

More than a simple reinterpretation of the classic Spanish tortilla, these savory omelette cubes offer a new way to enjoy timeless flavors—modern, elegant, and effortless. With just a few pantry staples and minimal equipment, you create a dish that feels at once comforting and sophisticated, humble yet refined.

Whether you’re preparing a casual apéro among friends, curating a brunch spread, or seeking a creative way to transform basic ingredients into something surprising, these cubes never fail to charm. Their versatility is key: they adapt to your rhythm, your table, your guests. Warm and golden for a cozy dinner, chilled and garnished for a chic cocktail hour—each version tells a different story.

Above all, this recipe celebrates the beauty of transformation. Taking something as ordinary as tortillas and eggs, and elevating them through technique and thoughtful presentation, is what home cooking at its best is all about. It’s not only about feeding—it’s about delighting.

So the next time you’re reaching for something quick, think of these tortilla omelette cubes. With just a little care, they become more than a recipe. They become an experience.


Frequently Asked Questions

Can I use fresh herbs instead of dried persillade?
Absolutely. Fresh chopped parsley and garlic make a wonderful substitution. Just be sure to finely mince the garlic and use about twice the quantity compared to dried herbs to match the intensity.

What type of tortillas work best?
Both wheat and corn tortillas are suitable, though they bring different textures. Wheat tortillas result in a softer bite, while corn tortillas add a bit of chew and a more rustic flavor. Choose according to your preference—or even combine both for a unique twist.

How can I prevent the omelette from falling apart when flipping?
Make sure the bottom side is fully set before flipping. If you’re not confident with flipping directly in the pan, use the two-plate method described above. This ensures a clean, intact flip every time.

Are these cubes suitable for children?
Yes, very much so. They’re soft, mild in flavor, and easy to eat with fingers. You can also add finely chopped vegetables or cheese to cater to younger palates.

Can I make these in advance?
Yes. These cubes are ideal for meal prep or entertaining. Make them the day before and refrigerate. Serve chilled or reheat briefly before serving—they hold their texture beautifully.

What can I serve alongside them?
They pair beautifully with a fresh green salad, roasted peppers, or a yogurt-based dip like tzatziki. For drinks, try a crisp white wine, sparkling lemonade, or a light sangria.

Besoin d’une idée rapide et stylée pour l’apéritif ? Ces cubes d’omelette espagnole prêts en 2 minutes sont votre nouvelle arme secrète. Servis tièdes ou froids, ils se marient parfaitement avec un bon vin blanc ou un vermouth sec.

Pour compléter votre apéro, découvrez aussi nos 5 idées d’amuse-bouches chic à préparer à l’avance.

🍷 Envie de bien les accompagner ? Jetez un œil au guide de l’accord tapas et vins sur La Revue du Vin de France.

6 Ingrédients d’Exception pour des Macarons Chocolat Noir Sublimes

Macarons au chocolat noir élégamment dressés, garnis de ganache onctueuse et surmontés de palets en chocolat brillant.

dark chocolate macarons

There is something undeniably enchanting about the dark chocolate macaron — a creation where French precision meets pure indulgence. These little gems, with their smooth domes and signature ruffled “feet,” are not just confections; they are the epitome of patisserie artistry, balancing elegance, texture, and flavor in every delicate bite.

The dark chocolate version carries a deeper, more seductive allure. Rich and intense, it speaks to the purist — someone who finds beauty in the bold. Beneath their fragile, crisp shells lies a soft interior, lovingly filled with a velvety ganache that melts on the tongue and leaves a lingering note of cocoa, earthy and sophisticated.

To make them is to engage in a dance of discipline and delicacy. The process demands focus: from achieving the perfect macaronage to timing the resting and baking just so. But for those who take the time, who honor the craft, the reward is transcendent — a treat that is as elegant to behold as it is exquisite to taste.

Dark chocolate macarons are more than a dessert. They are a statement — of refinement, of timeless French technique, and of the quiet luxury that only true craftsmanship can offer.

Dark Chocolate Macarons

For 12 macarons – a refined and intense cocoa creation


Timings

  • Preparation: 2 h 10
  • Refrigeration: 3 hours
  • Crystallization: 5 minutes
  • Conservation: 3 to 4 days in an airtight container in the refrigerator

Equipment

  • Cooking thermometer
  • Chocolate disc stencil (4 cm Ø)
  • Silicone baking mat
  • Offset spatula
  • Piping bag + plain round tip (8 or 10 mm Ø)

Macaron Shells (24 shells)

Prepare your preferred chocolate macaron shell recipe, and incorporate:

  • 0.6 g water-soluble brown powder food coloring
    This intensifies the visual depth and elegance of the shells.

Dark Chocolate Ganache

Ingredients

  • 115 g heavy cream (35% fat)
  • 12 g honey
  • 115 g dark chocolate couverture (65%)

Method

  1. Heat the cream and honey in a small saucepan until it just begins to simmer.
  2. Pour in three additions over the chopped dark chocolate, mixing slowly with a spatula after each pour to form a smooth, elastic emulsion.
  3. For optimal texture, blend briefly with an immersion blender.
  4. Cover the ganache with plastic wrap in direct contact with the surface and refrigerate for 3 hours, until thick enough to pipe.

Chocolate Palets (optional)

Ingredients

  • 250 g dark chocolate couverture (65%)

Method

  1. Temper the chocolate: melt two-thirds to 45–50°C, then add the remaining third to bring it down to 31–32°C.
  2. Spread into a stencil or onto a silicone mat using a spatula.
  3. Let crystallize for 5 minutes at room temperature, then place in the fridge to set fully.
  4. Unmold the chocolate discs and set aside.

Assembly

  1. Pair the macaron shells by matching sizes.
  2. Pipe a generous round of ganache onto half of the shells.
  3. Optionally, press a chocolate palet on top of the ganache.
  4. Place the remaining shells on top to sandwich.
  5. Let the macarons mature in the refrigerator for 24 hours before serving to allow the flavors and textures to meld.

Macaron Shells

Begin by preparing your macaron shells according to your preferred method — either the French, Italian, or Swiss meringue technique. Once your almond mixture (tant pour tant) is ready and the meringue has reached the desired consistency (firm, glossy peaks), incorporate 0.6 g of water-soluble brown food coloring during the macaronage stage. This ensures an even distribution of color and enhances the final visual appeal with a rich, cocoa-toned shell.
Pipe the shells evenly onto a silicone baking mat using a round 8–10 mm tip. Allow them to rest until a thin skin forms on the surface (approximately 30–45 minutes, depending on humidity). Bake according to your usual temperature guidelines until the shells have risen, formed their characteristic “feet,” and set without coloring.


Dark Chocolate Ganache

Ingredients

  • 115 g heavy cream (35% fat)
  • 12 g honey
  • 115 g dark chocolate couverture (65%)

Method – In Detail

  1. Heating the liquids
    Pour the cream and honey into a small saucepan. Heat gently over low heat until the mixture reaches precisely 35°C. This temperature ensures that the emulsion will be stable and the ganache will develop a silky, cohesive texture. Do not overheat, as it may cause fat separation or graininess.
  2. Melting the chocolate
    While the cream is heating, finely chop the dark chocolate and place it in a heatproof bowl over a bain-marie (double boiler). Gently melt the chocolate, also maintaining a temperature of 35°C. Stir occasionally to ensure it melts evenly without incorporating air.
  3. Forming the emulsion
    Remove both the cream mixture and melted chocolate from the heat. Pour the warm cream over the chocolate in three additions, stirring slowly and consistently with a silicone spatula or maryse after each pour. This gradual incorporation allows the cocoa butter and milk fat to bond smoothly, forming a fine emulsion with a glossy, elastic consistency.
  4. Cooling and setting
    Once the ganache is homogenous and smooth, pour it in a thin layer onto a tray or shallow dish lined with plastic wrap. Flatten slightly with a spatula to ensure even cooling.
    Cover the surface of the ganache directly with plastic wrap (film contact) to prevent any crust from forming.
    Place in the refrigerator for 30 to 40 minutes, or until the ganache is firm yet pipeable. Do not allow it to over-harden — the texture should be creamy and hold its shape when piped.

Chocolate Discs (Palets en chocolat)

Objective

To create perfectly smooth, shiny dark chocolate discs that will add an elegant layer of texture and intensity to the macarons.

Ingredients

  • 250 g dark chocolate couverture (65%)

Equipment

  • Cooking thermometer
  • Chocolate disc stencil (chablon) – 4 cm Ø
  • Silicone baking mat
  • Offset spatula or chocolate scraper
  • Bowl, bain-marie, or tempering machine

Method – Detailed

  1. Tempering the chocolate
    Begin by finely chopping the couverture chocolate if it is in block form. Use the seeding method for manual tempering:
    • Melt two-thirds of the chocolate over a bain-marie, gently heating until it reaches 45–50°C. Stir regularly and avoid overheating.
    • Remove from the heat and add the remaining one-third of chopped chocolate to the melted portion. Stir constantly to lower the temperature gradually.
    • Keep mixing until the chocolate cools down to 30–31°C, which is the ideal working temperature for dark chocolate.
    Alternatively, you may use a tempering machine if available, setting it to the dark chocolate curve.
  2. Molding the palets
    Place your chocolate disc stencil (chablon) on top of a clean silicone baking mat placed over a flat tray. Ensure it is level to maintain even thickness.
    • Pour the tempered chocolate onto the stencil.
    • Using an offset spatula or chocolate scraper, spread the chocolate across the chablon in one clean, fluid motion.
    • Ensure all cavities are fully filled.
    • Immediately scrape off any excess chocolate with a clean stroke to leave only the desired thickness within the stencil forms.
  3. Crystallization
    Let the chocolate rest at room temperature for 5 minutes to begin the crystallization process. You may place the tray in a cool, dry environment (16–18°C) or refrigerate it briefly to finalize the setting, but avoid moisture or temperature shock that may dull the surface.
  4. Unmolding
    Once fully set and hardened, gently lift off the chablon. The chocolate discs should release easily and have a smooth, glossy finish — a sign of well-tempered chocolate.
  5. Storage
    Store the palets in an airtight container in a cool, dry place (ideally 16–18°C) until ready to assemble. Avoid refrigeration unless necessary, as it may cause blooming (white marks) if not perfectly sealed.

Assembly – Final Composition of the Macarons

Goal

To achieve elegant, well-balanced macarons with a smooth, even ganache interior and a delicate chocolate disc crown that adds texture and visual sophistication.


Step-by-step Method

  1. Prepare the ganache for piping
    Once the dark chocolate ganache has rested in the refrigerator and reached a firm yet supple consistency (after at least 30–40 minutes of chilling), transfer it into a piping bag fitted with a plain round tip (8 or 10 mm diameter).
    This size ensures controlled precision and a generous, centered filling.
  2. Pair the shells
    Carefully sort your macaron shells into pairs of matching size. This step is essential for aesthetic symmetry and even pressure distribution when assembling.
  3. Pipe the filling
    On the flat side of half the shells (the bases), pipe a dome of ganache in the center. Avoid piping too close to the edges to prevent overflow when pressing the top shell on.
  4. Add the chocolate palets (optional finish)
    For an elevated presentation and a layered texture, apply a small dot of melted tempered chocolate to the underside (flat side) of each chocolate palet.
    Gently press one palet onto each of the remaining macaron shells (the tops), allowing it to adhere securely.
  5. Assemble the macarons
    Place the decorated top shells over the filled bases. Press very lightly and evenly, rotating slightly if needed, until the filling reaches the edges.
  6. Rest and maturation
    Arrange the finished macarons in a single layer in an airtight container and refrigerate for at least 2 hours, though 24 hours is ideal.
    This resting period, known as “maturation,” allows the moisture from the ganache to soften the interior of the shells, creating the signature texture contrast: crisp outside, soft inside.
  7. Serving
    Bring the macarons to room temperature about 15–20 minutes before serving to allow the chocolate and ganache to regain their full flavor and creaminess.

The Art of Assembly – Finishing Your Signature Dark Chocolate Macarons ✧

Once each component of your macaron is perfected — the delicate, evenly baked shells, the silky ganache, and the glossy chocolate palets — the final stage lies in the precision of the montage. This is where craftsmanship and finesse elevate a simple sweet into a refined pastry worthy of the boutique window.

✦ Step 1 – Prepare the Ganache for Piping

Retrieve the ganache from refrigeration. It should be firm but pliable, holding its shape without resistance.
Transfer it into a piping bag fitted with a plain round tip (ø 8 or 10 mm). Hold the bag vertically and apply steady pressure to ensure even piping.

✦ Step 2 – Match the Macaron Shells

On a clean work surface, lay out your shells and pair them by size and dome curvature. Select the most pristine ones for the top halves. This attention to detail is essential for uniformity in the finished product.

✦ Step 3 – Fill the Macarons

Pipe a precise, central dome of ganache onto the flat side of half the shells. The quantity must be generous enough to provide balance, but contained — avoid overfilling. A proper ganache should spread gently to the edges as you press down the top shell, without spilling.

✦ Step 4 – Add the Chocolate Palets

Take the tempered chocolate discs. On the underside of each palet (the side in contact with the shell), apply a dot of melted chocolate couverture to act as an edible adhesive.
Carefully position each palet on the top shell and press delicately to secure. The contrast between the matte shell and the glossy disc adds a striking visual finish.

✦ Step 5 – Assemble with Precision

Place the decorated top shells over the filled bottoms. Press gently with a slight rotational movement to distribute the ganache evenly between the shells. The final macaron should have a clean, filled edge, free from excess.

✦ Step 6 – Rest and Maturation

Arrange the assembled macarons in a single layer in an airtight container. Refrigerate for a minimum of 2 hours, ideally 24 hours. This step, known as “maturation”, allows the ganache’s moisture to gently permeate the interior of the shells. The result is a signature duality of textures: crisp exterior, tender interior — the hallmark of a perfectly executed macaron.


Final Word from the Chef

Let your macarons breathe at room temperature for 15–20 minutes before serving. The ganache will regain its suppleness, and the chocolate will reveal its full aromatic profile. A well-matured macaron doesn’t just delight the palate — it tells a story of balance, control, and elegant restraint.

Conclusion

The creation of exquisite dark chocolate macarons is a delicate balance of precision, patience, and artistry. From the perfectly executed shells with their iconic feet to the luxuriously smooth ganache filling and the elegant finishing touch of chocolate palets, each element must harmonize to achieve the ultimate sensory experience.

Mastering these macarons requires respect for timing—letting the shells rest, the ganache chill, and the assembled macarons mature—allowing flavors and textures to develop fully. The reward is a bite that offers a crisp exterior yielding to a moist, flavorful interior, punctuated by the bittersweet intensity of fine dark chocolate.

Remember, the process is as important as the final product; attentiveness to temperature, ingredient quality, and technique will elevate your macarons from simple confections to works of art.

Approach this recipe with confidence and patience, and your mastery of the dark chocolate macaron will soon become a signature achievement in your pâtisserie repertoire.


Frequently Asked Questions (FAQ)

Q1: How do I know if my ganache is ready for piping?
A1: The ganache should be firm but still soft enough to hold its shape when piped. If it’s too runny, refrigerate it a bit longer; if too hard, let it warm slightly at room temperature.

Q2: Can I make the macarons without the chocolate palets?
A2: Absolutely. The palets add texture and visual appeal, but the macarons are delicious on their own with just the ganache filling.

Q3: What’s the purpose of the maturation time in the fridge?
A3: Maturation allows moisture from the ganache to gently soften the interior of the shells, balancing the crisp shell with a tender center.

Q4: How do I prevent the ganache from becoming grainy?
A4: Use quality couverture chocolate and maintain gentle temperatures during melting. Avoid overheating the cream and chocolate to keep the emulsion smooth.

Q5: Can I prepare the ganache and palets in advance?
A5: Yes. Both can be made a day or two before assembly, stored properly in airtight containers to preserve freshness and texture.

Q6: How do I store finished macarons?
A6: Store in an airtight container in the refrigerator for up to 3–4 days. Bring to room temperature before serving for optimal taste and texture.

How to Age Egg Whitedark chocolate macaronss for Macaron Success

Cacao Barry: What Makes a Great Couverture Chocolate

4 Secrets Unveiled: The Insider’s Guide to Perfect Kougelhopf

Close-up of a golden, fluted Kougelhopf cake, showcasing its tender crumb and delicate sugar glaze, symbolizing traditional Alsatian baking secrets.

kougelhopf recipe

Kougelhopf is more than just a cake — it is a symbol of heritage and celebration, deeply rooted in the cultural tapestry of Alsace and neighboring regions. Its iconic fluted shape, reminiscent of a crown or a festive wreath, evokes centuries of tradition and craftsmanship passed down through generations.

This baked masterpiece captivates not only by its distinctive silhouette but also by the remarkable contrast of textures and flavors it offers. The exterior, golden and delicately crisp, gives way to a tender, airy crumb that is both buttery and subtly fragrant. Each slice reveals a tender crumb that is light yet rich, embodying a perfect balance between indulgence and refinement.

Often enjoyed

during holidays or special occasions, Kougelhopf carries with it an air of conviviality and warmth, inviting friends and family to gather around the table and share in its simple pleasure. Its presence on the table is a nod to timeless artistry — the kind that transforms humble ingredients into a cherished centerpiece, rich with history and soul.

Whether savored for breakfast alongside a steaming cup of coffee or as an afternoon treat, Kougelhopf offers a moment of gentle luxury, a pause to appreciate the delicate craftsmanship and heartfelt tradition that make this cake a true classic of French pastry.Never made enriched dough before? Learn it first in our Brioche Masterclass

Kougelhopf Recipe Overview (Serves 4 to 6)

  • Preparation Time: 1 hour
  • First Proofing (Pointage): 1 hour
  • Refrigeration: 30 minutes
  • Second Proofing (Pousse): 2 hours
  • Baking Time: 45 minutes to 1 hour
  • Storage: Best consumed within 1 to 3 days for optimal freshness

Essential Equipment

  • Stand mixer (robot pâtissier) — to achieve the perfect dough texture with ease
  • Traditional 20 cm diameter earthenware Kougelhopf mold — for that iconic fluted shape and ideal heat distribution
  • Pastry brush — for glazing and finishing touches

Ingredients

  • 100 g golden raisins
  • 18 g kirsch (cherry brandy)
  • 250 g flour
  • 15 g fresh yeast
  • 6 g salt
  • 50 g egg (about 1 large egg)
  • 75 g whole milk
  • 40 g sugar
  • 75 g sourdough starter (optional)
  • 125 g butter
  • 25 g raw almonds

Kirsch Syrup

  • 100 g water
  • 80 g sugar
  • 10 g kirsch

Finishing

  • Sufficient quantity of melted butter
  • Sufficient quantity of powdered sugar

Preparation Method

Begin by plumping the golden raisins: immerse them in boiling water and let them soak gently for about 30 minutes. Once rehydrated, drain thoroughly and transfer the raisins to a small bowl to macerate in kirsch, allowing them to infuse with the rich cherry brandy aroma while you prepare the dough.

In the bowl of your stand mixer fitted with a dough hook, prepare the poolish starter by combining the milk, flour, and fresh yeast. Mix at low speed for no more than 5 minutes, just until the mixture forms a smooth and homogeneous batter. Cover the bowl tightly with cling film and allow the poolish to ferment at room temperature for approximately 1 hour and 30 minutes, until it has visibly risen and developed bubbles.

Once the poolish is ready,

add all the remaining brioche dough ingredients except for the butter into the mixer bowl. Begin kneading on low speed for about 7 minutes to combine, then increase to medium speed and continue kneading for an additional 10 minutes. The dough should become elastic and smooth. Gradually incorporate the butter in small pieces, continuing to knead gently until fully incorporated. Finally, fold in the kirsch-soaked raisins and almonds, mixing just enough to distribute them evenly without overworking the dough.

Stand mixer bowl with dough in process, showing the gradual addition of butter while kneading at low speed for optimal texture.
Carefully adding butter to the dough while kneading at low speed ensures a rich, smooth texture — the cornerstone of a tender, buttery Kougelhopf.
Transfer the dough

to a lightly floured work surface or tray, cover, and allow it to proof at room temperature for 1 hour, during which the dough will continue to rise and develop flavor.

Next, gently degass the dough by folding it over itself to release excess gas. Cover tightly and place in the refrigerator for a minimum of 2 hours, or preferably overnight — this cold rest will enhance flavor complexity and dough strength.

When ready, remove the dough from the refrigerator and shape it into a smooth ball. Using your thumb, carefully create a hole in the center of the dough ball. Stretch the dough gently to form a ring or crown shape, ensuring even thickness all around.

Hands delicately folding risen dough on a floured surface to gently release gas without tearing the gluten structure.
Folding the dough over itself with care releases excess gas while preserving its strength — a key gesture in refining texture before shaping.

Place the shaped dough into a traditional fluted Kougelhopf mold, previously buttered, and allow it to rise for 2 hours in a warm, humid environment. You can create this by placing the mold in an oven set to 26°C (about 78°F) with a container of boiling water inside to maintain humidity.

Once the dough has sufficiently proofed and almost doubled in size, use a pastry brush to glaze the surface with egg wash, giving it a beautiful golden finish. Using kitchen scissors, carefully make decorative incisions along the edges to enhance its characteristic look.

Pastry brush gently applying egg wash over the surface of a proofed Kougelhopf dough in its traditional fluted mold.
A delicate coat of egg wash ensures a glossy, golden crust — the hallmark of a beautifully finished Kougelhopf.

Sprinkle generously with pearl sugar for a delicate crunch and a touch of sweetness.

Bake the Kougelhopf at 140°C (about 285°F, oven setting 4/5) for 20 minutes. Once baked, carefully remove the cake from the oven and transfer it onto a wire rack to cool completely.

For a finishing touch, decorate the cooled Kougelhopf with an assortment of dried fruits and candied peel, adding vibrant color and festive flair.

Professional Tip:


When incorporating the soaked fruits into your dough, it is crucial to handle them with the utmost care. Avoid mixing them too vigorously or for too long in your stand mixer, as the mechanical action can easily break down the delicate texture of the fruits, turning them into an unwanted puree rather than maintaining their desirable plumpness and bite. To preserve their integrity and ensure each piece remains distinct, fold the macerated fruits gently and briefly by hand or at the lowest mixer speed, just until evenly distributed. This subtle technique guarantees a perfect contrast in texture throughout your Kougelhopf, elevating the overall eating experience“Kougelhopf is a cultural icon in Alsace — read more on TasteAtlas.”

Conclusion

The Kougelhopf is much more than a traditional cake; it is a celebration of history, craftsmanship, and the art of patience. Each step in its preparation—from the delicate soaking of golden raisins in kirsch to the slow, careful folding of butter into the enriched dough—reflects a timeless dedication to quality and technique. The dough’s long fermentation and multiple proofs not only develop complex flavors but also create the light, tender crumb that defines this iconic Alsatian specialty.

Baking Kougelhopf is an invitation to slow down and savor the process, honoring the harmony between texture, aroma, and taste. The final product is a stunning visual masterpiece with its elegant fluted shape and glistening pearl sugar topping, a treat that enchants the senses and invites conviviality.

Whether served for a festive occasion, a leisurely brunch, or an afternoon tea, Kougelhopf offers a perfect balance of rustic charm and refined sophistication. It is a reminder that the most memorable dishes are those made with patience, respect for tradition, and a touch of love.

By mastering this classic, you not only bring a piece of Alsace to your table but also carry forward a culinary legacy that continues to delight and inspire. So take your time, relish each moment, and let every bite tell a story of heritage and craftsmanship.

Frequently Asked Questions (FAQ) – Kougelhopf

Q1: Can I use dried fruits other than golden raisins in this recipe?
A: Absolutely. While golden raisins are traditional, you can experiment with other dried fruits such as currants, chopped dried apricots, or cherries. Just make sure to soak them adequately to ensure they remain plump and juicy in the final cake.

Q2: Is it possible to make Kougelhopf without fresh yeast?
A: Yes, you can substitute fresh yeast with active dry yeast. Use about one-third of the fresh yeast weight and activate it in warm milk before adding to the dough. The rising times may be slightly longer, so monitor the dough’s volume rather than the clock.

Q3: What is the purpose of the refrigeration step during dough preparation?


A: The refrigeration slows down fermentation, allowing the dough to develop deeper flavors and a more complex texture. It also makes the dough easier to handle and shape, resulting in a better final structure.

Q4: Can I use a different type of mold if I don’t have a traditional earthenware Kougelhopf mold?
A: Yes, you can use any fluted tube pan or Bundt pan with a similar shape to achieve the classic form. Just be sure to thoroughly grease the mold to prevent sticking.

Q5: How long can I keep Kougelhopf fresh?
A: Kougelhopf is best enjoyed within 1 to 3 days. To preserve freshness, store it in an airtight container at room temperature. Avoid refrigeration as it may dry out the cake.

Q6: Can Kougelhopf be frozen?
A: Yes, you can freeze Kougelhopf wrapped tightly in plastic wrap and placed in a freezer bag. Thaw it gently at room temperature before serving. Note that texture may slightly change after freezing.

Q7: What drinks pair well with Kougelhopf?
A: This cake pairs beautifully with light teas, coffee, or a glass of Alsatian white wine such as Riesling. For a festive touch, serve it alongside a glass of sparkling wine.

Scallop Sophistication: A Gourmet Bite in Just 4 Minutes

Mini tartares de Saint-Jacques finement coupées, garnies de pistaches concassées, servis sur des tortillas croustillantes, prêts en quatre minutes.

4-minute gourmet scallops

There are appetizers, and then there are statements. These mini tartares fall into the latter category — sophisticated yet inviting, minimalist yet richly nuanced. Inspired by the elegance of French hors-d’œuvre and the vibrant generosity of Mediterranean tables, this creation captures the essence of refined entertaining in a single, exquisite bite.

At the heart of this dish lies the scallop — prized for its silky, almost ethereal texture and its naturally sweet, briny character. Carefully prepared in tartare form, it reveals a raw delicacy that needs no adornment, only the right companions. Here, it is elevated by a subtle contrast: a whisper of crunch that brings out its smoothness, and a layer of warmth beneath that supports without overpowering.

That foundation

— a delicate, golden tortilla crisped just so — is more than a vessel; it is a balancing act. Light and airy, yet sturdy enough to hold its crown, it provides a gentle counterpoint to the softness of the scallop. On top, a final flourish: a hint of vibrant green, a suggestion of earthiness, a pleasing resistance to the tooth — enough to awaken curiosity without distracting from the central star.

Each tartare is composed with intention, designed not only to taste exquisite but to look like a jewel on the plate. Their small size invites indulgence while encouraging slow appreciation. Perfect for a sophisticated cocktail hour, a refined canapé tray, or the opening course of a curated tasting menu, they offer a moment of luxury that lingers far beyond the last bite.

This is not just a recipe — it’s a sensory narrative. A celebration of texture, of contrast, of balance. A dish that speaks quietly but confidently of the sea, of craftsmanship, and of modern elegance on a miniature scale Serious Eats – How to Perfectly Sear Scallops

Ingredients (Serves 2)

  • 1 small pack of soft wheat tortillas
    Choose mini tortillas or cut standard ones into bite-sized rounds using a cookie cutter. They will serve as the crispy base for the tartare, so aim for a thin, even texture that crisps up nicely when lightly toasted or pan-fried.
  • 1 small pack of shelled, unsalted pistachios
    Preferably raw or lightly roasted. You’ll be chopping them finely or crushing them to sprinkle over the tartare, adding both a nutty aroma and a subtle crunch that contrasts beautifully with the scallops.
  • 5 fresh scallops (or high-quality frozen scallops, fully thawed)
    Use sashimi-grade or diver-caught scallops if possible. They should be firm, translucent, and smell faintly of the sea. If frozen, thaw them slowly in the refrigerator and pat dry before use. These will be finely diced for the tartare.
  • 1 teaspoon of finely snipped chives
    Adds a mild oniony note and a touch of color. Use fresh chives for the best flavor and a clean, aromatic finish.
  • 1 teaspoon of freshly squeezed lime juice
    Brings a bright, citrusy acidity that gently “cooks” the scallops and balances the richness of the nuts and oil. Use fresh limes only — bottled juice is too sharp and lacks complexity.
  • A small drizzle of toasted sesame oil
    Use sparingly — this fragrant oil adds depth and an elegant, slightly smoky finish. Just a few drops are enough to enhance the natural sweetness of the scallops.
  • Fine sea salt and freshly ground black pepper, to taste
    Season delicately. Salt enhances the sweetness of the scallops, while a twist of black pepper adds a faint warmth without overpowering the other flavors.

Preparation

Begin by preparing the pistachios: shell them if necessary, then place them on a clean cutting board. Using a chef’s knife, roughly crush them — you want small, irregular pieces that will provide a pleasant crunch, not a fine powder. Set them aside in a small bowl, reserving them for the final garnish.

Next, tend to the scallops, which must be handled with care. If they are fresh, rinse them gently under cold water and pat them completely dry with paper towels — excess moisture will dilute the flavor of the tartare. If using high-quality frozen scallops, ensure they are fully thawed in the refrigerator, then dried thoroughly. Once ready, place them on a chilled cutting board and, with a very sharp knife, finely dice them into small, even cubes, roughly 3–5 mm in size. This precise cut will ensure a refined texture and even seasoning throughout.

Transfer the diced scallops into a mixing bowl.

Season delicately with a small pinch of fine sea salt and a turn or two of freshly ground black pepper. Add the chopped chives, the fresh lime juice, and a thin drizzle of toasted sesame oil — just enough to perfume the preparation without masking the natural sweetness of the scallops. With a soft spatula or spoon, gently mix to combine all elements evenly, taking care not to mash the delicate scallop pieces.

Now, turn to the tortilla base.

If you are using standard-sized tortillas, use a cookie cutter or glass to cut out small discs, ideally 5–6 cm in diameter. Toast them lightly in a dry pan or oven until just golden and crisp around the edges — they should remain light and snappy without becoming too hard. Let them cool slightly before assembly.

To compose the tartares,

place a small spoonful of the scallop mixture onto each tortilla round. Spread or mound it carefully, respecting the circular shape for a visually appealing result. Top generously with the crushed pistachios, letting some pieces fall slightly off the sides for a natural, artisanal look.

Serve immediately, while the tortillas remain crisp and the tartare retains its delicate freshness. This dish is best enjoyed within minutes of preparation to preserve the contrast between the tender scallops, the crunchy nuts, and the crisp base.

Method – In the Style of a Chef de Cuisine

1. Preparing the Pistachios
Begin by selecting a small handful of shelled, unsalted pistachios. For optimal aroma and texture, lightly toast them in a dry pan over medium heat for 2 to 3 minutes, shaking occasionally to prevent scorching. This step is optional but will intensify their natural oils and enhance flavor. Allow them to cool slightly, then transfer them to a clean work surface. Using the side of a chef’s knife or a mortar and pestle, crush them coarsely — you want a mix of fine crumble and small shards, to introduce both flavor and crunch in the final bite. Reserve in a bowl.

2. Preparing the Scallops
Whether using extra-fresh or properly thawed frozen scallops, utmost care must be taken in handling. Rinse gently under cold water and dry meticulously with a paper towel. Any excess moisture will dull the precision of the tartare. Place the scallops on a chilled cutting board and, with a sharp knife, proceed to dice them finely and evenly, aiming for uniform cubes of approximately 4 mm. Work swiftly to preserve the chill and natural integrity of the flesh.

3. Seasoning the Tartare


Transfer the scallop dice into a cold stainless-steel mixing bowl. Season with a pinch of fine sea salt and a crack of fresh black pepper. Add 1 teaspoon of finely snipped chives — their mild sharpness offers a clean aromatic lift. Squeeze in 1 teaspoon of freshly pressed lime juice, avoiding any pulp or seeds, and add a delicate drizzle of toasted sesame oil — just enough to lend depth, not dominance.
Using a soft spatula or the back of a spoon, fold the mixture gently until fully combined. The scallops should remain intact, their surface lightly coated but never drenched. Taste, adjust seasoning delicately if needed, then refrigerate briefly while preparing the base.

4. Preparing the Tortilla Base
Using a round cutter (5–6 cm diameter), cut out small discs from soft wheat tortillas. These will act as your canapés’ crisp base. Warm a dry skillet or griddle over medium heat. Without adding oil, toast the tortilla rounds on each side until lightly golden and just crisp at the edges — about 1 to 2 minutes per side. Transfer to a cooling rack to maintain crispness.

5. Assembling the Tartares


Working quickly to preserve freshness, place the tortilla rounds on a serving tray. Using a small spoon or quenelle technique if desired, deposit a neat mound of scallop tartare onto each base. The layer should be generous but well-proportioned — about one heaping teaspoon per piece. Flatten gently into a dome or circle, keeping the edges clean and precise.

6. Garnishing and Final Touches
Top each tartare with a sprinkling of the crushed pistachios, ensuring every bite carries both visual contrast and textural intrigue. A final touch of micro herbs (optional) or a dot of citrus zest can elevate presentation.

7. Service
Serve immediately. These tartares are intended to be enjoyed fresh, where the crispness of the base contrasts with the supple texture of the scallops, and the pistachio offers a final, satisfying crunch. Do not delay service, as the tortilla will begin to soften under the tartare with time.

Conclusion – A Delicate Balance Between Simplicity and Sophistication

These mini scallop tartares with pistachios on crisp tortillas embody the elegance of minimalism elevated by thoughtful technique. At first glance, they appear simple — a small, elegant bite. But with each element meticulously prepared and purposefully combined, they reveal a deeper complexity: the soft sweetness of scallop, the subtle acidity of lime, the umami richness of sesame oil, and the pleasing crunch of roasted pistachios.

This is a dish that relies not on extravagance, but on precision. Every step — from the careful dicing of the scallops to the crisping of the tortilla base — contributes to a finished product that is both refined and approachable. It is equally at home in a chic cocktail reception as it is in an intimate dinner setting, where the cook seeks to impress without overwhelming.

The beauty of this preparation lies in its balance: between texture and temperature, delicacy and intensity, tradition and modern flair. It invites both the chef and the diner to pause — to observe, to taste, to appreciate the quiet luxury of a well-crafted bite. And in doing so, it reminds us that true elegance in cuisine is often found in restraint, in respect for the ingredients, and in the story a single mouthful can tell.The Ultimate Guide to Elegant Canapés


Chef’s Q&A – Frequently Asked Questions

Can I prepare the tartare in advance?
Yes — the scallops can be diced and seasoned up to 1 hour in advance. Keep the tartare covered in the refrigerator to preserve freshness. However, assembly should only be done at the last moment to ensure the tortilla base stays crisp.

What if I can’t find fresh scallops?
High-quality frozen scallops (preferably labeled sashimi-grade) are an excellent substitute. Defrost them slowly in the refrigerator and pat dry thoroughly before dicing.

Can I substitute the pistachios?
Absolutely. Toasted hazelnuts, pine nuts, or even crushed almonds can offer a different character. Choose something with a mild, buttery flavor and good texture. Avoid heavily salted or spiced nuts, which would overpower the dish.

Is there a vegetarian version of this recipe?
While scallops are the heart of this preparation, you can experiment with finely diced hearts of palm or king oyster mushrooms, marinated in lime juice and sesame oil, to create a similar texture and umami-rich flavor profile.

How can I make it more festive for a special occasion?
Top with microgreens, edible flowers, or a tiny dot of yuzu gel for added color and brightness. For a luxurious touch, a few grains of caviar or a shaving of truffle can transform this into a show-stopping canapé.

Can I use store-bought tostadas instead of tortillas?
Yes, provided they’re small and thin enough. Store-bought mini tostadas can save time, but homemade toasted tortilla rounds offer more control over texture and flavor.

How should these be served?
Ideally, serve on a chilled platter to preserve freshness. Provide small cocktail forks or serve as finger food. These tartares pair beautifully with a dry white wine (like Sancerre or Chablis) or a crisp sparkling wine.

From Oven to Elegance: A Chef’s Chocolate Millefeuille in Under 4 Hours

Chocolate Millefeuille dessert with three layers of golden puff pastry, filled with vanilla mousseline cream and topped with piped vanilla Chantilly.

chocolate millefeuille recipe

Layer upon layer of indulgence, the chocolate millefeuille is a dessert that redefines refinement. Rooted in the grand tradition of French pâtisserie, this elegant creation transforms a classic into something boldly modern, where crispness meets richness and precision meets decadence.

At first glance, the millefeuille seduces with its striking architecture — alternating tiers of ultra-thin, golden puff pastry and luscious chocolate cream, stacked with the precision of a jeweler setting stones. Each bite is a journey: the shattering crunch of the pastry, the silken glide of the chocolate filling, the delicate balance between sweetness and depth. It is a study in contrasts — airy and dense, crisp and smooth, refined and indulgent.If you’re new to laminated dough, start with our Beginner’s Puff Pastry Guide

But beyond

its visual and textural sophistication lies an emotional appeal. The chocolate millefeuille evokes both nostalgia and novelty. It pays homage to the traditional millefeuille, that elegant patisserie staple served in salons de thé, while inviting the richness and intensity of fine chocolate to take center stage. The result is a dessert that feels at once timeless and boldly contemporary.

Served as the grand finale to a dinner party or savored in quiet solitude with a cup of espresso, the chocolate millefeuille brings a sense of ceremony to the table. Its meticulous layers invite admiration before the first forkful is even taken — and once tasted, its elegance lingers in memory.

Crafting it at home is an ode to patience and precision, but above all, to pleasure. Whether you’re a seasoned baker or a curious enthusiast, making a chocolate millefeuille is not just about assembling a dessert — it’s about creating a moment of pure, layered joy.

Recipe Overview — Chocolate Millefeuille

Serves: 6
Preparation time: 4 hours
Chilling time: 3 hours
Baking time: 50 minutes
Storage: Keeps for up to 48 hours in the refrigerator when well wrapped

This recipe is designed to serve six guests with individual portions or larger slices for sharing. It requires careful attention to detail and a generous timeline, but the result is a pastry that rivals those found in the finest patisseries.


Recommended Equipment

To achieve chocolate millefeuille recipe with professional-level precision and elegance, the following tools are essential:

  • Fine sieve
    For sifting dry ingredients and preventing lumps in creams and doughs, ensuring a smooth, refined texture throughout.
  • Dough scraper (bench scraper)
    Perfect for handling pastry dough, cleaning work surfaces efficiently, or transferring mixtures cleanly.
  • Rolling pin
    A sturdy wooden or stainless steel rolling pin helps roll the puff pastry evenly without compressing its delicate layers.
  • Balloon whisk
    Ideal for emulsifying creams or mixing batters thoroughly by hand, offering control and lightness.
  • Electric mixer or stand mixer
    Essential for whipping creams or preparing chocolate ganache with a light, airy texture.
  • Piping bag with two nozzles
    • Plain round tip for neat piping between layers or within the pastry
    • Saint-Honoré tip for creating elegant, ribbon-like decorative finishes on the top layer
  • Serrated knife (bread knife)
    To slice cleanly through the crisp puff pastry and soft fillings without compressing the layers. A gentle sawing motion preserves the pastry’s structure and presentation.

Ingredients

Inverted Puff Pastry

  • 100 g all-purpose flour
  • 200 g dry butter (beurre de tourage)
  • 5 g fine sea salt
  • 90 g cold water
  • 150 g all-purpose flour (for the détrempe)

Vanilla Mousseline Cream

  • 250 g whole milk
  • 50 g granulated sugar
  • 1 vanilla bean
  • 40 g egg yolks (approximately 2 yolks)
  • 20 g custard powder (or cornstarch as a substitute)
  • 60 g unsalted butter (for the pastry cream)
  • 65 g softened butter (for the mousseline texture)

Vanilla Chantilly Cream

  • 100 g heavy cream (35% fat)
  • 10 g granulated sugar
  • 2 vanilla beans (scraped)

Inverted Puff Pastry — Method

Begin by preparing a classic feuilletage inversé, or inverted puff pastry, where the butter envelops the dough rather than the reverse. This technique yields an exceptionally flaky and tender pastry, perfect for a refined millefeuille.

1. Prepare the butter layer (beurrage):
Place 200 g of dry butter (beurre de tourage) between two sheets of parchment paper. Using a rolling pin, gently flatten it into a square approximately 15 x 15 cm. Place in the refrigerator to chill and firm up, but not harden completely.

2. Prepare the dough (détrempe):
In a mixing bowl, combine 150 g of flour, 5 g of fine salt, and 90 g of cold water. Mix just until a homogeneous dough forms — do not overwork. Shape it into a square approximately 10 x 10 cm, wrap in plastic, and chill for 20–30 minutes.

3. Encase the dough in the butter:
Once both components are chilled and workable, place the détrempe at the center of the butter square. Fold the butter over the dough to encase it entirely, as if wrapping a present. Lightly seal the edges.

4. Perform the turns (tours):


Roll the dough lengthwise into a long rectangle. Give it a single turn (fold into thirds like a letter), rotate it 90 degrees, and chill for 20 minutes. Repeat this process three more times, chilling between each turn. Be precise and gentle to maintain distinct layers.

5. Final roll-out and baking:
Roll the rested dough out to a 3 mm thickness, adjusting it to match the dimensions of your baking sheet — approximately 30 x 40 cm. Transfer to a parchment-lined tray, then rest again in the refrigerator for 30 minutes to prevent shrinkage during baking.

6. Bake to golden perfection:
Preheat the oven to 220°C (428°F). Bake the pastry for 10 minutes to initiate a strong rise, then reduce the temperature to 190°C (374°F) and continue baking for about 40 minutes, or until the layers are evenly puffed, golden, and fully cooked through.

7. Cool and reserve:
Once baked, allow the puff pastry sheet to cool completely on a wire rack. Trim the edges carefully if needed. Store in an airtight container until ready to assemble the millefeuille.

Vanilla Mousseline Cream — Method

1. Infuse the milk:
In a medium saucepan, combine the whole milk, half the sugar, and the vanilla bean, split lengthwise and scraped. Place over medium heat and bring just to a simmer, allowing the vanilla to infuse its full aroma into the milk.

2. Prepare the egg mixture:
In a separate mixing bowl (preferably a stainless steel bowl or cul-de-poule), whisk together the egg yolks and the remaining sugar until pale and slightly thickened — this is called “blanchir.” Sift in the custard powder and whisk again until fully incorporated.

3. Temper the eggs:
Once the milk reaches a boil, remove it from the heat. Gradually pour a small amount of the hot milk into the egg mixture while whisking continuously to temper the yolks and prevent curdling. Then, pour the tempered mixture back into the saucepan with the remaining milk.

4. Cook the pastry cream:


Return the saucepan to medium heat and cook the mixture while whisking constantly. Once it begins to thicken and boil, continue cooking for 2 full minutes at a gentle simmer to ensure the custard is fully set and smooth. The cream should be glossy and thick.

5. Finish with butter:
Remove from the heat and immediately whisk in the first quantity of butter (60 g), cut into small pieces. Stir until completely melted and incorporated.

6. Chill the base cream:
Spread the hot pastry cream onto a tray lined with plastic wrap. Cover it directly with another layer of wrap (film it “au contact”) to prevent a skin from forming. Refrigerate until fully cooled.

7. Transform into mousseline:
Once cold, transfer the pastry cream to a mixing bowl. Using an electric mixer or stand mixer fitted with the paddle or whisk attachment, beat the cream until smooth and loosened. Gradually incorporate the softened butter (65 g) in small additions, beating until the mixture becomes light, fluffy, and perfectly emulsified.

The result is a silky, airy vanilla mousseline — stable, richly flavored, and perfect for layering in the millefeuille.

Vanilla Chantilly Cream — Method

In the bowl of a stand mixer fitted with the whisk attachment (or using a handheld electric mixer), whip the cold heavy cream until it begins to thicken. Add the sugar and the seeds of the vanilla beans, scraped and dispersed evenly.

Continue to whip just until soft, elegant peaks form. The texture should be smooth and airy, not overwhipped. Transfer the chantilly into a piping bag fitted with a Saint-Honoré tip, and reserve chilled until needed.


Assembly — Chocolate Millefeuille

1. Prepare the pastry base:
Trim the baked puff pastry sheet to create clean, even edges. Cut it into three equal-sized strips, each approximately 10 x 30 cm (or to fit your presentation format). Handle the layers gently to preserve their delicate flakiness.

2. Prepare the mousseline cream:
Remove the chilled mousseline cream from the refrigerator. Using a flexible spatula (maryse), gently loosen and smooth the cream. Transfer it into a piping bag fitted with a plain round tip.

3. Layer the millefeuille:
Place the first puff pastry strip on your work surface or serving board. Pipe an even cordon of mousseline cream along the entire length. Top with the second puff pastry strip and repeat the process, ensuring a neat and uniform finish. Finally, place the third strip of pastry on top to complete the layering.

4. Set the structure:
Refrigerate the assembled millefeuille for at least 30 minutes. This allows the cream to firm up and stabilizes the layers for clean slicing.

5. Portioning:
Using a serrated knife (bread knife), carefully cut the millefeuille into six equal portions. Saw gently to avoid compressing the layers.

6. Final decoration:
Stand each millefeuille piece upright on its side. Using the prepared piping bag with the Saint-Honoré tip, pipe elegant rosettes or ribbon-like waves of vanilla chantilly on the visible surface. The contrast between the creamy topping and crisp pastry will create a visually stunning, texturally refined finish.

Conclusion

The Chocolate Millefeuille is not just a dessert — it’s a celebration of contrast, technique, and elegance. From the shattering crispness of the inverted puff pastry to the silky lightness of the vanilla mousseline and the airy crown of chantilly, every element is designed to awaken the senses and honor classic French pâtisserie. This dessert demands time, precision, and respect for detail, but the reward is an exquisite creation that bridges tradition and modern refinement.

Whether served at an intimate dinner or as the centerpiece of a sophisticated gathering, this millefeuille offers both a visual spectacle and a delicate harmony of textures and flavors. It’s the kind of pastry that invites silence at the first bite and conversation long after the last crumb.

Let this millefeuille be more than a recipe — let it be a pastry ritual, a moment of pause, and a tribute to craft.Add depth with culinary context:
“Learn about the millefeuille’s origins from Larousse Gastronomique.”


Questions & Answers

Q: Can I make the components in advance?
A: Absolutely. The puff pastry can be baked and stored in an airtight container for up to 48 hours. The mousseline cream and chantilly can be prepared the day before, kept separately in the fridge, and assembled on the day of serving for optimal texture and freshness.

Q: What if I don’t have time to make inverted puff pastry from scratch?
A: While homemade inverted puff pastry yields the most refined result, high-quality all-butter puff pastry from a trusted bakery or gourmet store can be used in a pinch. Look for one with visible layering and no additives.

Q: How do I ensure clean cuts when slicing the millefeuille?
A: Use a serrated knife and a gentle sawing motion. Chilling the assembled pastry before slicing is crucial — it stabilizes the cream and prevents collapse. Clean the knife between each cut for sharp, professional edges.

Q: Can I flavor the mousseline differently?
A: Yes. While vanilla offers a classic base, you can infuse the milk with coffee beans, citrus zest, or even earl grey tea for a more personalized touch. Just be sure to strain well and balance the flavors carefully.

Q: Is this dessert suitable for summer service?
A: Definitely — its light creams and delicate layers make it perfect for warmer months. Serve well-chilled, and consider garnishing with fresh raspberries or edible flowers for a seasonal finish.

5-Minute Crispy Smoked Salmon Maki: Ready in a Flash!

Close-up of crispy smoked salmon maki rolls garnished with Japanese seed mix, showing creamy filling and golden crunchy coating.

crispy smoked salmon maki

The crispy smoked salmon maki is a perfect harmony of textures and flavors that brings a refined touch to any meal or gathering.

The delicate smokiness of the salmon, paired with the satisfying crunch of the exterior, creates an irresistible contrast that delights the palate with every bite.

This dish is a testament to how simple ingredients, when prepared thoughtfully, can transform into an extraordinary culinary experience.

Whether served as an appetizer, a light lunch, or part of a sophisticated dinner spread, these maki rolls embody the elegance and freshness that sushi lovers cherish.

Their crispy shell adds a modern twist to a classic favorite, making them not only delicious but also visually captivating on the plate.

Preparing

these maki at home allows you to engage with the artistry of Japanese cuisine, bringing a restaurant-quality dish right to your kitchen.

The process invites creativity, encouraging you to perfect the balance between crispness and tenderness, smokiness and subtle seasoning.

In the end, the crispy smoked salmon maki isn’t just a dish; it’s a celebration of flavor, texture, and the joy of crafting something beautiful and delicious from scratch.

Sharing these maki with friends or family will surely elevate your dining experience and leave a lasting impression on everyone fortunate enough to taste them.

Quick Elegant Starters Under 10 Minutes

Ingredients for 2 servings:

  • 2 generous slices of smoked salmon
    Select high-quality smoked salmon with a silky texture and a delicate smoky aroma.
  • The slices should be thick enough to hold their shape but tender enough to melt in the mouth.
  • providing a luxurious foundation for the maki.
  • 100 grams of fresh cream cheese
    Opt for a smooth and creamy fresh cheese that will lend a rich, slightly tangy contrast to the smoky salmon.
  • The cheese acts as a luscious binder inside the roll, balancing the flavors with its gentle freshness.
  • 1 generous drizzle of extra virgin olive oil
    Use a fruity, aromatic extra virgin olive oil to add a subtle layer of richness and a fragrant finish.
  • This oil will enhance the overall mouthfeel without overpowering the delicate ingredients.
  • 25 grams of Japanese seed mix (furikake or toasted sesame blend)
    This mixture, often composed of toasted sesame seeds.
  • nori flakes, and sometimes poppy or flax seeds.
  • provides a nutty, umami-packed crunch that elevates the texture and visual appeal of the maki.
  • Freshly ground black pepper, to taste
    A few twists of freshly ground black pepper will add a gentle warmth and complexity, perfectly complementing.
  • the creaminess of the cheese and the smokiness of the salmon without overwhelming the palate.

METHODE

Start by placing the fresh cream cheese in a small bowl. Using the back of a spoon or a small whisk, gently crush and blend the cheese until it becomes smooth and creamy.

Gradually drizzle in the extra virgin olive oil while continuing to mix, allowing the oil to fully incorporate and create a silky, spreadable texture.

Season generously with freshly ground black pepper, adjusting to taste — this will bring a subtle warmth and depth to the mixture.

Lay out the slices of smoked salmon on a clean surface or cutting board.

With a small spoon or a butter knife, carefully spread a thin, even layer of the seasoned cream cheese mixture along one edge of each salmon slice.

Make sure to cover just enough to add flavor without overpowering the delicate salmon.

Starting from the edge with the cream cheese,

gently but firmly roll each slice of salmon into a tight cylinder, taking care to keep the filling inside.

The roll should be compact enough to hold its shape, yet delicate to preserve the texture of the salmon.

Using a sharp knife, slice each roll into bite-sized tronçons (pieces), ideally about 2 to 3 centimeters thick. For a cleaner cut, wipe the knife blade between each slice.

Finally, sprinkle the tops of the salmon rolls with the crushed Japanese seed mix, ensuring an even coating.

This adds a beautiful visual contrast and a delightful crunchy texture that complements the softness of the salmon and cream cheese.

Serve immediately to enjoy the perfect balance of creamy, smoky, and crunchy sensations.

Begin by placing the fresh cream cheese into a chilled mixing bowl. Using a small whisk or the back of a spoon, carefully work the cheese until it achieves a smooth, velvety consistency.

This step is crucial to ensure the cheese spreads effortlessly without clumping. Slowly incorporate the extra virgin olive oil in a steady, thin stream while continuously folding the mixture.

The oil not only enriches the texture but also imparts a subtle fruity aroma, elevating the overall flavor profile.

Season judiciously with freshly cracked black pepper, grinding it directly over the mixture to preserve its aromatic oils.

Taste as you go — the pepper should enhance the creaminess without dominating the delicate notes of the smoked salmon.

Next,

prepare your workstation by laying out the slices of smoked salmon flat on a clean surface, such as a bamboo sushi mat or a large cutting board.

Carefully spread a precise layer of the prepared cream cheese mixture along one edge of each salmon slice, approximately one centimeter thick.

Use an offset spatula or the back of a spoon to achieve an even distribution. This layering technique ensures each bite has a harmonious balance of creaminess and smoky richness.

To assemble, gently but firmly roll the salmon slices from the cheese-coated edge, maintaining a tight and consistent roll without compressing the fish excessively.

The roll should hold together with a slight resistance, preserving the tender texture of the salmon.

Use your fingers to gently shape and compact the roll as you go, taking care to avoid tearing the delicate slices.

Using a very sharp, preferably serrated knife, slice each roll into even tronçons measuring roughly two to three centimeters in thickness.

To achieve clean, precise cuts and prevent smearing, periodically wipe the knife blade with a damp cloth between each slice.

Finally,

garnish the tops of the sliced maki generously with the crushed Japanese seed mixture.

which provides a delightful textural contrast with its nutty, toasted notes.

Press the seeds lightly into the surface to ensure they adhere without overwhelming the salmon’s delicate flavor.

Serve these crispy smoked salmon maki immediately to preserve their freshness and textural integrity.

Present them elegantly on a chilled plate or slate board, accompanied optionally by pickled ginger.

a small dish of soy sauce, or a touch of wasabi for guests who desire an additional layer of flavor complexity

Conclusion

The crispy smoked salmon maki is a sublime example of how simplicity and sophistication can coexist harmoniously in one bite.

This dish celebrates the natural elegance of smoked salmon, enhanced by the creamy freshness of cheese and the satisfying crunch of toasted Japanese seeds.

The contrast of textures—from the tender, silky salmon to the crisp exterior—creates a sensory journey that captivates both the eye and the palate.

Preparing these maki at home

offers a rewarding experience, inviting you to explore the subtle art of balance in flavor and texture.

Each step, from the careful blending of the cheese to the precise rolling and slicing.

reflects a dedication to culinary craftsmanship that elevates a seemingly simple snack into a gourmet delight.

Moreover, this recipe’s versatility makes it suitable for various occasions—whether as an elegant appetizer for dinner parties.

a sophisticated bite for casual gatherings, or a refined treat to indulge in solo.

Its beauty lies in its adaptability and the opportunity it provides to personalize with different seed mixes, oils, or seasoning tweaks.

Ultimately, the crispy smoked salmon maki is not just a dish but a celebration of freshness, texture, and flavor synergy.

It invites both novice cooks and seasoned chefs to enjoy the pleasure of creating something visually stunning and deliciously satisfying

.Curious about the best nori for rolling? Check out The Kitchn’s guide to sushi-making essentials.


Frequently Asked Questions

Q: Can I substitute smoked salmon with another type of fish?
A: Absolutely.

While smoked salmon offers a distinctive smoky richness, you can experiment with other cured or smoked fish such as trout or mackerel.

Fresh sashimi-grade salmon can also be used but will yield a different flavor profile.

Q: How can I make the maki even crispier?


A: To enhance the crunch, consider lightly toasting the Japanese seed mix before applying it, or incorporate crushed tempura flakes for extra texture.

Additionally, chilling the rolls before slicing can help maintain their firmness.

Q: What variations of cream cheese can I use?
A: Traditional full-fat cream cheese works best for its creamy texture, but you can experiment with herbed cream cheese or mascarpone .

for a richer, more decadent taste. Just be mindful of added flavors to maintain balance.

Q: Can I prepare these maki in advance?
A: It’s best to serve them fresh to preserve the contrast between the creamy interior and the crispy topping.

However, you can prepare the rolls and slice them shortly before serving.

Store the assembled rolls tightly wrapped in the refrigerator for up to a few hours.

Q: Are there vegan alternatives for this recipe?
A: Yes! Smoked carrot or smoked tomato slices can substitute the salmon.

and vegan cream cheese alternatives can replace the fresh cheese. The seed mixture remains an excellent textural element.

6 Chef’s Secrets – What You’ve Always Wanted to Know About Tiramisu

Elegant individual tiramisu desserts layered in clear verrines with cocoa-dusted tops

Tiramisu secrets

Few desserts capture the imagination quite like tiramisu. With its name translating to “pick me up” in Italian, this beloved treat is more than just a finale to a meal—it’s a celebration of contrasts, textures, and traditions that have endured through generations. From the intimate cafés of Treviso to the fine dining tables of Paris, New York, and Tokyo, tiramisu has secured its place as a global icon of Italian indulgence.

What makes tiramisu so enchanting is its delicate balance between richness and lightness. It is a dessert that speaks in layers—each one unfolding a new sensation, a different temperature, a contrasting mouthfeel. The soft and velvety creaminess, the slight resistance of sponge soaked in deep, dark notes, and the subtle bitterness that lingers on the palate—tiramisu is not eaten, it is experienced.

Its origins are often debated, wrapped in romantic tales and culinary legends. Some attribute its invention to the Veneto region in the late 20th century, while others trace it to the kitchens of Piedmont or Tuscany. Regardless of its birthplace, tiramisu has always been associated with comfort, sophistication, and a kind of effortless charm that only Italian desserts seem to master.

Beyond the plate, tiramisu is a symbol of hospitality and togetherness. In Italian homes, it is lovingly assembled for special occasions, birthdays, and Sunday lunches. In restaurants, it is the dessert that draws sighs of contentment and murmurs of delight. It’s elegant yet approachable, luxurious yet nostalgic.

Today, tiramisu has inspired countless variations around the world—infused with seasonal fruits, reimagined in frozen forms, or transformed into towering cakes and delicate petits fours. Yet, despite its adaptability, the soul of tiramisu remains unchanged: it is a dessert that brings joy, comfort, and a touch of la dolce vita to every table it graces.

Tiramisu is not just a recipe—it’s a story. A sweet story of Italian culture, shared moments, and timeless pleasure.

For 8 servings

Preparation time: 1 hour
Chilling time: 1 hour
Baking time: 8 minutes
Storage: Up to 3 days in the refrigerator


Equipment needed

  • Whisk
  • Stand mixer
  • Cooking thermometer
  • Piping bag (no nozzle)
  • 8 individual serving glasses or verrines
  • Round cutter (same diameter as the verrines)
  • Fine mesh sieve

Tiramisu for 8 Servings

Homemade Ladyfinger Sponge (150 g required)

Ingredients:

  • 60 g egg yolks (about 3)
  • 75 g egg whites (about 2–3)
  • 60 g granulated sugar
  • 60 g all-purpose flour
  • A pinch of salt
  • Icing sugar (for dusting)

Method:

  1. Preheat the oven to 180°C (356°F), fan off.
  2. Whisk the egg whites with a pinch of salt until soft peaks form. Gradually add half the sugar and continue to whisk until stiff and glossy.
  3. In another bowl, whisk the egg yolks with the remaining sugar until pale and thick.
  4. Gently fold the whipped whites into the yolks in two additions.
  5. Sift the flour over the mixture and fold it in carefully with a spatula.
  6. Transfer to a piping bag and pipe lines or disks depending on your mold size.
  7. Dust with icing sugar and bake for 8–10 minutes until lightly golden and just firm.
  8. Cool on a wire rack. Cut as needed to fit your verrines.

Coffee Soaking Syrup

  • 100 g strong brewed coffee (hot)
  • 50 g sugar
  • 5 g dark rum
  • 2.5 g coffee liqueur

Method:

  1. Combine the coffee and sugar while still hot. Stir until the sugar dissolves.
  2. Add the rum and coffee liqueur.
  3. Let cool completely before use.

Tiramisu Cream

  • 40 g egg yolks (about 2)
  • 70 g sugar (to be cooked to 110°C / 230°F)
  • 4 g sheet gelatin (softened in cold water and squeezed)
  • 125 g mascarpone (room temperature)
  • 25 g amaretto
  • 150 g heavy cream (35% fat), very cold

Method:

  1. Place the egg yolks in the bowl of a stand mixer.
  2. Cook the sugar with a splash of water until it reaches 110°C (230°F).
  3. Immediately pour the hot syrup in a thin stream over the yolks while whisking on high speed. Continue whisking until cooled and pale.
  4. Melt the softened gelatin gently and incorporate into the yolk mixture.
  5. Add the mascarpone and amaretto. Mix until smooth.
  6. Whip the cold cream to soft peaks and gently fold it into the mascarpone mixture in two additions.
  7. Transfer to a piping bag (no nozzle needed).

Assembly and Finishing

  1. Using an emporte-pièce (round cutter), trim the ladyfinger sponge to fit the verrines.
  2. Dip each sponge round briefly into the coffee syrup and place one at the bottom of each verrine.
  3. Pipe a layer of tiramisu cream.
  4. Add another soaked biscuit layer and a final layer of cream, smoothing the top.
  5. Chill for at least 1 hour in the refrigerator.
  6. Before serving, dust the surface generously with unsweetened cocoa powder (50 g total).

Step-by-Step Preparation

1. Prepare the Ladyfinger Sponge

  1. Make the ladyfinger sponge according to the recipe and spread it evenly onto a baking tray lined with parchment paper.
  2. Bake at 180°C (356°F) for about 8 minutes, or until lightly golden and springy to the touch.
  3. Allow to cool completely.
  4. Using a round cutter the same diameter as your verrines, cut out 16 disks of sponge. You’ll need 2 disks per verrine.
Freshly baked ladyfinger sponge sheet cooling on parchment, ready to be cut for tiramisu
Light, airy, and golden—this homemade ladyfinger sponge is the foundation of a truly exceptional tiramisu.

2. Make the Coffee Soaking Syrup

  1. In a small saucepan, combine the brewed coffee, sugar, rum, and coffee liqueur.
  2. Heat gently, stirring until the sugar is completely dissolved.
  3. Remove from heat and let the syrup cool to room temperature.
  4. Dip each sponge disk quickly into the cooled syrup to soak. Be careful not to oversaturate them—they should remain intact.
  5. Let the soaked disks drain briefly on a wire rack.
A saucepan with dark coffee soaking syrup being gently heated on the stove
A fragrant coffee syrup blending bold espresso, sweet sugar, and a touch of liqueur—essential for perfectly soaked tiramisu biscuits.

3. Prepare the Pâte à Bombe

A pâte à bombe is a base made by whipping egg yolks with hot sugar syrup. It gives the tiramisu cream its airy, stable texture.

  1. Place the egg yolks in the bowl of a stand mixer fitted with the whisk attachment.
  2. In a small saucepan, heat the sugar with just enough water to moisten it. Cook until it reaches 110°C (230°F) on a thermometer.
  3. Immediately pour the hot syrup in a thin, steady stream over the yolks while whisking at medium speed.
  4. Increase the speed and whip until the mixture cools down completely. This can take several minutes. The final result should be pale, airy, and mousse-like.
  5. In the meantime, melt the rehydrated and squeezed gelatin to around 40°C (104°F) and incorporate it into the pâte à bombe once it has cooled to around 20°C (68°F).
Whisking egg yolks as hot sugar syrup is poured to create pâte à bombe
Carefully cooked sugar syrup whisked into egg yolks creates the light, airy pâte à bombe—the essential base for a smooth and stable tiramisu cream.

4. Whip the Cream and Mascarpone

  1. In a separate large mixing bowl, whisk the cold heavy cream and mascarpone together until they reach soft peaks. Be careful not to overwhip.
  2. Add the amaretto and mix just until combined.
Whipping heavy cream and mascarpone together until soft peaks form
Gently whipped heavy cream combined with creamy mascarpone forms the luscious, velvety layer that defines a perfect tiramisu.

5. Combine and Finish the Cream

  1. Gently fold the pâte à bombe into the whipped cream-mascarpone mixture. Begin with one-third of the cream to lighten the mixture, then fold in the rest carefully using a whisk or spatula.
  2. The cream should be smooth, light, and well aerated.
  3. Transfer the cream into a piping bag without a nozzle. It is now ready for assembly.

Conclusion: The Art of Tiramisu

Tiramisu is more than a dessert—it is an expression of balance, precision, and indulgence. From the softness of the sponge to the silkiness of the cream, each element plays its part in creating a composition that is both comforting and refined. Every step, though technical, contributes to something deeply emotional: a bite that evokes warmth, nostalgia, and pure pleasure.

Preparing tiramisu in verrines, with carefully layered biscuit soaked in aromatic coffee and a delicately crafted mascarpone cream, brings a modern elegance to a traditional classic. It’s an opportunity to showcase finesse: in the cooking of the sugar, in the structure of the pâte à bombe, and in the lightness of the final texture. These are the techniques of the pâtissier—demanding, yes, but deeply rewarding.

What makes tiramisu truly timeless is its ability to adapt without ever losing its soul. It welcomes subtle variations—different spirits, flavored creams, or shaped presentations—while always returning to its roots: a balance of bitter, sweet, creamy, and airy. It is both accessible and elevated, capable of impressing at dinner parties or comforting on a quiet evening.

When well-executed, tiramisu becomes a signature—one that speaks of your care for detail, your respect for tradition, and your love of sharing. It invites slow savouring. It invites silence around the table. And most importantly, it lingers—not only on the palate, but in the memory.

Whether you’re serving it for guests or treating yourself, this tiramisu will never go unnoticed. In every spoonful lies a quiet celebration of craft, culture, and the simple joy of dessert done right.

Chef’s Q&A – The Tiramisu Edition

Q: My tiramisu cream is too runny—what went wrong?

A: This often happens if the whipped cream wasn’t firm enough, or if the pâte à bombe was still warm when incorporated. Be sure the pâte à bombe has fully cooled to around 20°C before folding it in, and that your cream and mascarpone are whipped to soft, stable peaks. Also, do not skip the gelatin—it plays a key role in setting the cream.


Q: Can I prepare tiramisu the day before?

A: Absolutely! In fact, tiramisu benefits from a few hours of rest in the refrigerator—ideally between 4 and 24 hours. This allows the cream to firm up and the flavors to meld harmoniously. Just be sure to dust the cocoa powder right before serving for a clean finish.


Q: How do I cut the sponge perfectly to fit my verrines?

A: Use a round metal cutter with the exact diameter of your serving glasses. If needed, freeze the baked sponge briefly to make cleaner cuts. This avoids crumbling and ensures a tight, elegant fit at the base of each verrine.


Q: Can I replace the alcohol?

A: Of course. You can either omit it entirely or substitute with a few drops of almond extract or vanilla for flavor depth. For a child-friendly version, use decaffeinated coffee and skip the spirits altogether.


Q: How do I get a perfectly smooth top layer in the verrines?

A: Once you’ve piped the final layer of cream, tap the verrines gently on the counter to settle the surface. Then, smooth it with a small offset spatula or the back of a spoon dipped in warm water. Chill before dusting with cocoa for that flawless, professional look.Creamy vs. Crunchy: Chef’s 2 Secret Revealed: The Ultimate Waffle Recipe with Pro Tips & Answers!

http://History of Tiramisu – Eataly