7 Secrets to a Perfect Lemon Tart (That Pastry Chefs Swear By)

There’s something timeless about a well-crafted lemon tart — its vibrant color, silky texture, and bold citrus flavor awaken the senses with every bite.

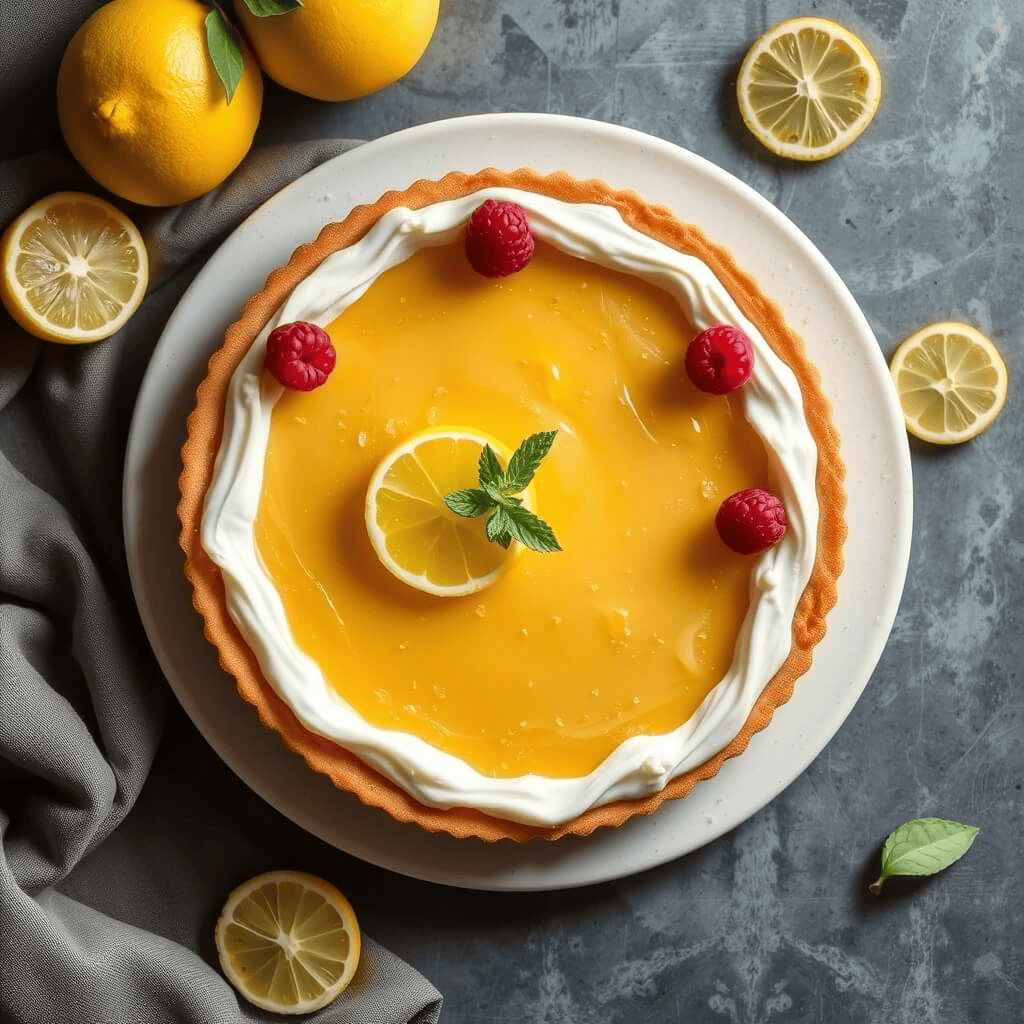
perfect lemon tart

A lemon tart is the embodiment of refined simplicity, a dessert that captures the essence of balance and brightness in every bite. At first glance, it is a work of understated beauty — a gleaming golden filling nestled in a crisp, delicately browned shell. The surface is smooth, almost glassy, inviting you in with its vibrant hue, like the first rays of morning sunlight.

What makes this tart truly irresistible is its harmony of textures and flavors. The crust, thin yet sturdy, offers a gentle crunch that gives way to the silky, luscious lemon curd within. The curd itself is a masterclass in contrast: both zesty and sweet, sharp yet comforting, its citrusy tang awakening the taste buds while a hint of creaminess rounds out the intensity. With each forkful, you experience a cascade of sensations — the coolness of the curd, the warmth of the pastry, and the lingering brightness of fresh lemon on the tongue.

Whether served simply as is, or adorned with a whisper of powdered sugar, a few curls of lemon zest, or a swirl of soft, toasted meringue, the lemon tart is as versatile as it is elegant. It’s the kind of dessert that feels both nostalgic and luxurious — perfect after a long lunch on a summer day or as a centerpiece for an afternoon tea.

The lemon tart doesn’t shout; it shines — quietly, confidently, and always beautifully.

This lemon tart with red berries is a celebration of contrast and elegance. The brightness of the lemon curd, with its bold, citrus tang, finds its perfect balance in the gentle sweetness and freshness of ripe berries.
Tangy lemon cream, buttery crust, and a crown of fresh berries — where elegance meets indulgence.

Lemon Tart

Preparation time: 1 hour
Chilling time: 2 hours
Freezing time: 20 minutes
Baking time: 15 to 20 minutes
Storage: Up to 48 hours in the refrigerator


Equipment

  • Whisk
  • Sieve
  • Dough scraper
  • Rolling pin
  • 22 cm tart ring
  • Microplane grater
  • Thermometer
  • Immersion blender
  • Pastry brush

Components

Sweet Pastry

(See recipe step by step on https://briochechic.com/mastering-the-art-of-sweet-pastry-a-step-by-step-guide/#more-245)
Use approximately 250 g of dough. Line a 22 cm tart ring and freeze for 20 minutes before baking to prevent the edges from collapsing. Blind bake for 15–20 minutes at 160°C (320°F). Let the crust cool completely, then even the edges with a microplane grater.

Enough for a 22 cm tart (approx. 250 g of dough)

Ingredients:

  • 200 g (1 2/3 cups) all-purpose flour
  • 100 g (1/2 cup) unsalted butter, cold and cubed
  • 80 g (2/3 cup) powdered sugar
  • 1 pinch of salt
  • 1 egg
  • 1/2 tsp vanilla extract (optional)
  • Zest of 1 lemon (optional, pairs beautifully with lemon tart)
This is not just a tart — it’s a jewel of pâtisserie. A classic lemon tart elevated to art with the addition of edible gold leaf, turning a simple citrus dessert into a show-stopping centerpiece.
Zesty, silky, and crowned in gold — when dessert becomes pure luxury.

Lemon Cream

  • 150 g fresh lemon juice
  • 150 g eggs
  • 120 g sugar
  • 3 g gelatin leaves
  • 75 g softened butter

In a bowl, mix the lemon juice, eggs, and sugar. Cook over a bain-marie, whisking constantly until thickened. Off the heat (at around 60°C), add rehydrated gelatin and softened butter (30–35°C), then blend with an immersion blender for a smooth, glossy finish.

Finishing

Apply a thin layer of neutral glaze with a pastry brush over the surface of the lemon cream for a professional shine.


Chef’s Tip

Brush the inside of the baked tart shell with melted white chocolate or, even better, cocoa butter. This creates a moisture barrier that prevents the pastry from becoming soggy and keeps it crisp for longer.

Conclusion: A Tart That Transcends Simplicity

A lemon tart is more than just a dessert — it’s a testament to the beauty of balance in pastry. With its crisp, buttery crust and vibrant, velvety filling, this classic embodies the art of contrast: sweet and tart, soft and crunchy, refined yet comfortingly familiar. Every detail matters — from the quality of the lemons to the chill of the dough, the precision of the bake, and the gentle glaze that finishes it all with a glossy touch.

Whether you’re preparing it for an elegant dinner, a family gathering, or simply to enjoy a quiet moment with a perfect slice, this tart always delivers. It invites you to slow down, savor, and celebrate the small perfections that make baking such a joyful craft. With care, patience, and a few chef’s tips, you can achieve a result that is as stunning to look at as it is satisfying to eat.

And so, this tart — golden, zesty, and bright — becomes not just a dessert, but a celebration of citrus, craftsmanship, and tradition. A timeless favorite that never fails to leave a lasting impression.

Frequently Asked Questions: Lemon Tart Edition

Q: Can I make the lemon tart in advance?
A: Yes! The tart keeps beautifully in the fridge for up to 48 hours. In fact, it’s even better the next day when the flavors have had time to meld and the cream has set fully.


Q: My crust turned soggy — how can I prevent that?
A: Brush the baked tart shell with melted white chocolate or cocoa butter before filling. This creates a moisture barrier and keeps the pastry crisp.


Q: Can I use bottled lemon juice instead of fresh?
A: It’s highly recommended to use fresh lemon juice for the best flavor and brightness. Bottled juice can taste dull or metallic.


Q: My lemon cream isn’t smooth. What went wrong?
A: Be sure to whisk constantly while cooking the cream over the bain-marie, and never let it boil. Also, blending the cream at the end with an immersion blender gives it that signature silky finish.


Q: Can I freeze the tart?
A: You can freeze the tart shell after baking. However, once filled, it’s best enjoyed fresh — freezing can affect the texture of the lemon cream.http://What Makes a Good Lemon Curd – Epicurious https://briochechic.com/why-professional-bakers-never-share-these-5-viennoiserie-success-secrets/#more-229

Use for Perfect Apple Turnovers

Golden apple turnovers with flaky puff pastry and glossy syrup finish, displayed on a baking tray.

perfect apple turnovers

Few things rival the simple pleasure of biting into a warm apple turnover — the crackle of golden puff pastry giving way to soft, spiced compote is pure magic. With this recipe, we lean into the French tradition using inverted puff pastry, a method that delivers an exceptionally light, crisp result, worthy of the finest pâtisserie.

The Art of the Pastry

We start with a classic inverted puff pastry, where the butter encases the dough, rather than the other way around. This technique, while more delicate, creates intense flakiness. The pastry is built in two parts:

  • Beurre manié – a pliable butter-flour mix
  • Détrempe – a moistened flour dough that provides structure

Together, they form the hundreds of buttery layers we expect in a truly perfect chausson.

Filling the Heart of the Turnover

The filling is simple and honest: a generous scoop of apple compote, smooth yet flavorful, rich with the natural sweetness of slow-cooked apples. You can add a hint of vanilla, lemon zest, or cinnamon — though even plain, the purity of the fruit shines through beautifully.

Assembly & Shaping

Once your dough is chilled and rolled, use a fluted round cutter (13 cm Ø) to stamp out your pastry circles. A spoonful of compote is placed at the center, then the dough is folded into a half-moon and sealed with care — either with a fork or a delicate twist of the fingers.

A light egg wash gives that golden sheen, and once baked, the turnovers are brushed with a simple syrup glaze for shine and a whisper of sweetness.

The Final Touch

Serve these warm or at room temperature, ideally the day they’re baked. The result? Crisp, glossy pastries with tender apple hearts — a perfect companion to a cup of tea, or a beautiful ending to a cozy brunch.

Apple Turnovers – Flaky and Golden

Yield: 5 to 6 turnovers
Prep time: 2 h 30
Chill time: 2 h 30
Baking time: 30 minutes
Storage: Best consumed within 24 hours


Tools Required

  • Dough scraper
  • Rolling pin
  • 13 cm fluted round cutter
  • Pastry brush

Ingredients

Filling

  • 500 g apple compote

Inverted Puff Pastry

Beurre manié:

  • 200 g butter
  • 100 g flour

Détrempe:

  • 150 g flour
  • 5 g salt
  • 87 g water

Egg Wash

  • 50 g whole egg
  • 40 g egg yolks
  • 50 g milk

Syrup (for finishing)

  • 30 g water
  • 30 g sugar

Technique Focus: Inverted Puff Pastry (Feuilletage Inversé)

Unlike traditional puff pastry where the butter is enclosed inside the dough, inverted puff pastry reverses the roles: the dough is wrapped inside a layer of butter. This method is more delicate to handle but yields an incredibly light, flaky, and crisp result — perfect for refined viennoiseries like chaussons aux pomme sSEE –https://briochechic.com/why-professional-bakers-never-share-these-5-viennoiserie-success-secrets/#more-229

Step-by-Step Overview

1. Prepare the Beurre Manié
Mix 200 g of butter with 100 g of flour until smooth and pliable. Shape into a rectangle, wrap in plastic wrap, and refrigerate for 30 minutes.

2. Make the Détrempe
Separately, combine 150 g of flour, 5 g of salt, and 87 g of water to form a soft dough. Knead gently, wrap, and chill for 30 minutes.

3. Enclose the Détrempe
Roll out the beurre manié into a large rectangle. Place the détrempe in the center and fold the butter over it like an envelope to encase it completely.

4. Laminate the Dough
Roll out the dough gently into a long rectangle, then perform a double fold (book fold). Chill for 30 minutes. Repeat the process for a total of 4 turns (alternating single and double folds as desired), resting the dough between each fold to keep the butter cold and layers distinct.

5. Rest Before Use
Wrap the dough well and refrigerate for at least 2 hours (or overnight) before rolling and shaping

Step-by-Step – Shaping the Turnovers

1. Prepare the puff pastry
Begin by making your inverted puff pastry.https://www.seriouseats.com/the-science-of-flaky-pie-dough – sur la science de la pâte feuilletée Once rested and ready, roll out the dough on a lightly floured surface until it’s about 3 mm thick — just enough to be pliable, but still rich with layers.

Puff pastry, with its delicately layered structure and irresistibly buttery flavor, is the foundation of many classic recipes.
The secret to perfect puff pastry: each fold and each turn, a promise of lightness and crispiness.

2. Cut the pastry
Using a fluted round cutter about 13 cm in diameter, cut out 5 to 6 discs of pastry. Work efficiently to keep the dough cool and avoid over-handling.

Cutting puff pastry carefully is essential to ensure uniform pieces and perfect results.
Clean, precise slices—ready to be transformed into flaky delights.

3. Fill with apple compote
Place a generous spoonful — around 70 to 80 g — of smooth apple compote in the center of each circle. The filling should be thick and not too watery, so it stays contained during baking.

Filling puff pastry with homemade apple compote is the step that transforms simple dough into a true culinary masterpiece.
A generous spoonful of apple compote spread over the puff pastry, ready to wrap each bite in sweetness.

4. Fold and seal
Carefully fold the dough over the filling to create a half-moon shape. Press the edges together to seal, then crimp with a fork or twist slightly for a more traditional chausson look. Make sure the edges are tightly sealed to prevent leakage in the oven.

Folding and sealing the puff pastry around the apple compote is the step that gives your turnovers their final shape..
A perfect fold, a clean seal: the apple turnovers are ready to be baked to perfection.

Baking & Finishing – The Final Flourish

5. Chill and egg wash
Place the sealed turnovers onto a parchment-lined baking tray. Brush the tops gently with your egg wash (a mix of egg, yolks, and milk), then refrigerate them for 30 minutes. This helps the dough relax and hold its shape during baking.

6. Second egg wash and scoring
Once chilled, give the turnovers a second coat of egg wash to ensure a deep golden sheen. Then, using the tip of a sharp knife, score the tops with a curved or radiating pattern — a classic chausson touch that adds visual elegance. Don’t forget to pierce each turnover 5 to 6 times with the tip of a knife or skewer. These small vents allow steam to escape and prevent puffing or bursting in the oven.

After carefully folding and sealing your apple turnovers, it’s time to add the final touch: the egg wash and chilling.
A delicate egg wash for a flawless golden finish, and a chill to guarantee perfectly flaky pastry.

7. Bake to golden perfection
Preheat your oven to 210°C (410°F). Bake the turnovers for 10 to 12 minutes at this high temperature to encourage lift and flakiness. Then reduce the oven to 190°C (375°F) and continue baking for another 15 to 20 minutes, or until the pastries are richly golden and crisp.

8. Glaze and shine
While still hot from the oven, brush the turnovers lightly with a warm sugar syrup (equal parts water and sugar, simmered together). This final step gives a glossy finish and seals in a bit of extra moisture and sweetness.

Golden apple turnovers with flaky puff pastry and glossy syrup finish, displayed on a baking tray.
Delicate layers of inverted puff pastry filled with smooth apple compote — crisp, golden, and ready to enjoy.

Final Thoughts – A Turnover Worth the Time

Apple turnovers are more than a treat — they’re a small celebration of time, technique, and tradition. From the delicate folds of the inverted puff pastry to the warm heart of velvety apple compote, each step builds toward a pastry that’s both rustic and refined.

Whether you serve them warm with a swirl of crème fraîche or tuck them into a picnic basket for a golden surprise, these chaussons aux pommes embody the charm of French baking at its finest. Take your time, trust the process, and enjoy the buttery reward

Q&A – Apple Turnovers, Your Questions Answered

Q: Can I use store-bought puff pastry instead of making inverted puff pastry?
A: Absolutely! While homemade inverted puff pastry offers superior flakiness and flavor, high-quality store-bought puff pastry is a great shortcut for busy days. Just make sure it’s made with real butter for the best results.

Q: How do I keep the turnovers from leaking in the oven?
A: Make sure the edges are well sealed — use a fork to press them down or twist slightly by hand. Also, avoid overfilling with compote, and always chill the turnovers before baking to help them hold their shape.

Q: Can I freeze the turnovers?
A: Yes! You can freeze them unbaked. Just shape and seal them, skip the egg wash, and freeze on a tray. Once solid, transfer to a freezer bag. Bake from frozen, adding a few extra minutes to the cooking time.

Q: What other fillings can I try?
A: Pear, apricot, cherry, or even frangipane work beautifully. Just make sure the filling isn’t too wet, or it may affect the pastry texture.

Mastering the Art of Sweet Pastry: A Step-by-Step Guide

*Golden, baked tart shell in a fluted tart pan, crisp and evenly browned

Sweet pastry is the heart of many classic desserts — a tender, buttery canvas that elevates every filling it cradles. Whether it’s the delicate base of a fruit tart, the crumbly frame of a custard pie, or the flaky foundation of a refined tea-time treat, sweet pastry brings balance, texture, and quiet sophistication. Its charm lies not only in its taste but in the way it transforms under gentle heat — crisping at the edges, softening beneath creamy fillings, and always offering that unmistakable whisper of sweetness with each bite. More than a technical component, it’s a sensory experience: the aroma of butter as it bakes, the delicate snap when a fork breaks through, the golden hue that hints at patience and care. Sweet pastry may be humble in appearance, but it is nothing short of poetic in purpose — a silent star of the pâtisserie world, letting fruits, creams, and ganaches shine while always grounding them in comfort and craft.

Sweet Pastry is a delicately crumbly and sweet dough, typically used for tart bases filled with creams, fruits, or ganaches. It stands out for its smooth texture and sweet flavor, thanks to the addition of powdered sugar. Sweet pastry is perfect for tarts that need a sturdier crust, providing a pleasant contrast to creamy or fruity fillings.

Characteristics:


Texture: Tender and less crumbly than short Rust pastry, but still firm enough to hold its shape during baking.

Flavor: Mildly sweet, enriched by powdered sugar.

Uses: Ideal for tarts with fillings that require a well-structured base, such as chocolate tarts, fruit tarts, or custard-filled tarts.

Preparation:


Sweet pastry is made by creaming butter and powdered sugar together until smooth, then adding eggs and flour. It’s important not to overwork the dough to avoid making it elastic, which would make it difficult to roll out.

Typically, it is chilled before rolling to prevent shrinking during baking.

Sweet pastry gives a perfectly sweet, crisp base for elegant and refined pastry creations.

Sweet Tart Base (22 cm)

Serves: 6 people
Prep time: 15 minutes
Chill time: 2 hours
Storage: Up to 3 days in the refrigerator


Tools Needed

  • Whisk
  • Sieve
  • Dough scraper

Ingredients

  • 50 g unsalted butter
  • 50 g icing sugar
  • 30 g egg (about ½ egg)
  • 0.5 to 1 g salt
  • 125 g all-purpose flou

Instructions1:


Mix dry ingredients and butter: Sift the flour and powdered sugar into a large bowl. Add the butter, cut into small pieces, and work the mixture with your fingertips or a bench scraper until it forms a sandy texture.

  • Add egg and salt: Add the egg and salt to the mixture. Stir until the dough comes together smoothly.
  • Form the dough: Gather the dough into a ball, then flatten it slightly to form a disk.
  • Chill the dough: Wrap the dough in plastic wrap and refrigerate it for at least 2 hours to make it easier to roll out and handle.
  • Baking:
    After chilling, roll the dough out with a rolling pin and place it into your tart pan.
  • Prick the bottom of the tart crust with a fork to prevent air bubbles.
  • You may need to blind-bake the crust by covering it with parchment paper and adding baking beads for about 15-20 minutes at 180°C (350°F).
  • Storage:
    The dough can be kept in the refrigerator for up to 3 days.

Instructions2:

  • Prepare the butter: In a mixing bowl, beat the butter until it’s soft and creamy (pomade texture)Whisk and combine: Use a whisk to mix everything together until the dough is smooth. Add the egg mixed with salt and continue to blend until smooth.Add powdered sugar: Sift the powdered sugar and add it to the dough, then mix until fully combined.
Butter in a mixing bowl, creamed to a soft, smooth pomade texture with a whisk.
Softened butter beaten to a smooth, creamy texture — a crucial first step for a flawless sweet pastry dough.
  • Add flour: Sift the flour and add it to the butter mixture. Mix it well to incorporate.
Flour being sifted into a bowl of creamed butter, ready to be mixed into dough.
Sifted flour being added to the creamy butter mixture — a key moment where the tart dough starts to take shape.
  • Fraser the dough: Using your hands or a bench scraper (corne), work the dough on the work surface until it forms a homogeneous paste.
Hands using a bench scraper to press and smear tart dough on a work surface during the frasage step.
The dough is worked gently on the surface with a bench scraper, bringing it to a smooth, homogeneous consistency
  • Wrap and chill: Wrap the dough in plastic wrap and refrigerate it for at least 2 hours before using.
Dough wrapped in plastic wrap, resting in the refrigerator for chilling.
The tart dough is wrapped tightly in plastic wrap and chilled, allowing it to rest and firm up before rolling.

Conclusion – The Foundation of Great Tart Making

Mastering sweet tart dough is less about complexity and more about care. Each step — from creaming the butter to chilling the dough — is a quiet act of precision that lays the groundwork for exceptional pastries. Whether you’re filling it with lemon curd, chocolate ganache, or fresh seasonal fruits, a well-made tart shell supports the filling both structurally and in flavor. It’s the elegant base of countless pâtisserie classics, where texture and technique shine. With patience, the right tools, and attention to detail, this simple dough becomes your gateway to endless dessert possibilities.

Q&A – Sweet Tart Dough Basics

Q: Why does the dough need to rest in the fridge before baking?
A: Resting the dough allows the gluten to relax and the butter to firm up. This helps prevent shrinking during baking and ensures a tender, flaky texture.


Q: Can I freeze the dough for later use?
A: Absolutely. Wrap it tightly in plastic wrap and freeze it for up to one month. Thaw overnight in the fridge before rolling.


Q: What’s the purpose of “frasage”?
A: Frasage helps evenly distribute the butter and flour without overworking the dough. It ensures a smooth, cohesive texture without developing too much gluten.


Q: My dough cracks when I roll it out. What went wrong?
A: It may be too cold or too dry. Let it sit at room temperature for a few minutes to soften, or lightly press it back together with your fingers as you roll.


Q: Do I need to blind-bake the tart shell?
A: Yes, if you’re using a no-bake filling or one that cooks quickly. Blind baking ensures the crust is fully cooked and crisp before adding the filling.http://Pâte Sucrée Techniques – King Arthur Baking https://briochechic.com/why-professional-bakers-never-share-these-5-viennoiserie-success-secrets/#more-229

7 Timeless Soup Recipes That Will Make You Feel Like a Master Chef

Creamy leek and potato soup served in a white bowl, topped with fine julienned vegetables and fresh chervil.

7 Classic Soup Recipes

In the hushed world of grand dining and timeless recipes, certain soups glide through history with their elegance undisturbed.

Moreover, Above all,Julienne soup, with its finely cut strands of vegetables, reflects a culinary style that values visual harmony as much as delicate flavor.

Beside it stands Darblay soup, creamy and comforting — a nod to bourgeois tradition where soup was served with poise and pride.

Moreover ,also These two recipes, rooted in the heritage of French cuisine, are quiet witnesses to a time when soup was a refined entrée, presented in delicate porcelain with ceremony.

So,They also tell a story: one of craftsmanship, attention to detail, and a warm sense of shared simplicity.

In this article, I invite you to rediscover these classics through the Brioche Chic lens — where nostalgia meets elegance, and the everyday becomes quietly extraordinary. No need to reinvent the soup —

sometimes, all it takes is serving it with love.

A Portrait of Potage Julienne

Light, structured, and precise — Potage Julienne is the soup equivalent of a string quartet. Each vegetable, carefully julienned, plays its part in a graceful composition. This is a dish that elevates knife work to an art form and simplicity to sophistication.

Far from rustic, Julienne is clarity in a bowl: a clear broth where every element is visible, intentional, and harmonious. It’s a dish that whispers refinement, perfect for those who appreciate the quiet luxury of tradition.

Originally crafted in the 18th century and named after the culinary cut itself, this potage is less about invention and more about execution. It reminds us that elegance is often found in restraint — and in a perfectly timed ladle.

Potage Darblay – The French Velouté

Potage Darblay is warmth in its most noble form: a gentle velouté made with leeks and potatoes, enriched with a touch of cream for a satin-like texture. It’s a soup that comforts without being heavy, perfect for cool days or to be served in a soup tureen at an elegant dinner.

What makes Darblay truly magical is its finishing touch: a bouquet of vegetables cut into julienne, sweated in butter. Carrots, celery, turnips, and leeks — all carefully prepared to delicately dance in the creamy velouté. It’s a meeting of rustic and refined, of everyday cooking and formal service.

At the Table:

The soup is served in a tureen, as tradition dictates, or in a warm soup bowl. Moreover The julienne is placed in the center, topped with the velouté, and finished with a sprig of fresh chervil for a green, aniseed-like touch.

Light ,A hint of cream, if desired — and there you have it: a classic French dish in all its glory.

Technical Sheet – Darblay Soup with Julienne Garnish


Base Elements

IngredientQuantity
Butter100 g
Leek whites400 g
Potatoes1.4 kg

Finishing Touch

IngredientQuantity
Cream100 ml
Chervil¼ bunch

Julienne Garnish (vegetables sweated in butter)

IngredientQuantity
Carrots200 g
Turnips150 g
Leek whites100 g
Celery stalk100 g
Butter50 g

Seasoning

IngredientQuantity
Coarse salt / Fine saltTo taste
SugarTo taste

Preparation Technique

  1. Peel and wash all vegetables carefully.
  2. Cook the base: sauté the leek whites and potatoes in butter, cover with water, and cook until tender.
  3. Cut the julienne: slice carrots, turnips, celery, and leek into fine, even matchsticks.
  4. Sweat the julienne in butter over low heat without browning, until soft yet structured.
  5. Blend the soup base, then strain or purée until smooth. Add the cream and adjust seasoning.
  6. Plate up in a warm soup tureen or bowl, gently placing the julienned vegetables in the center. Finish with fresh chervil.
Creamy leek and potato soup served in a white bowl, topped with fine julienned vegetables and fresh chervil.
A classic Potage Darblay — silky, elegant, and crowned with a delicate julienne of buttered vegetables.

A Final Sip – Timelessness in a Bowl

In a world of fleeting food trends and rapid reinvention, there’s something deeply grounding about a potage that has stood the test of time. Moreover Julienne and Darblay are not just soups — they’re quiet declarations of a culinary heritage where precision, patience, and respect for ingredients reign.

They remind us that elegance doesn’t need extravagance. Moreover That comfort can come in the form of a perfectly cut vegetable or a well-balanced velouté. And that sometimes, the most beautiful things are served warm, in silence, with a simple spoon.

Not only sometimes ,So whether you’re ladling into porcelain for guests or sipping solo on a quiet afternoon, know that you’re partaking in a legacy — one bowl at a time .

Link to Secrets Behind French Bistro Cooking at Home

Everything You Wanted to Know About Potage Darblay (But Were Afraid to Ask)

Q: What makes Potage Darblay different from a classic leek and potato soup?
A: Potage Darblay is a refined version of the traditional leek and potato soup. What elevates it is its smooth, velvety texture — achieved by passing the soup through a fine sieve or blender — and its final enrichment with cream. It’s a soup designed for elegance, not rusticity.


Q: Is the julienne garnish essential?
A: Yes — the julienne of butter-sweated vegetables is a key component. It brings texture, color, and a subtle crunch that contrasts beautifully with the creamy soup. Think of it as a whisper of tradition and technique in every spoonful.


Q: Can I prepare Potage Darblay ahead of time?
A. also The base can be made a day in advance and even frozen.

That’s why,Simply reheat gently and prepare the julienne fresh before serving for best texture and presentation.


Q: What’s the best way to serve it?
A: In a warm soup tureen or deep porcelain bowls.

also Garnish at the last moment with the julienne and a touch of fresh chervil.

For an extra touch of chic: add a drizzle of cream or a crack of white pepper.French Culinary Techniques: The Five Mother Sauces – Auguste Escoffier School of Culinary Arts

Which of these timeless soups will you try first? Tell us your go-to comfort bowl — and don’t forget to share your master-level results with us on Instagram! #BriocheChicSoups

Why Professional Bakers Never Share These 5 Viennoiserie Success Secrets

viennoiserie secrets

In the refined world of viennoiserie, everything begins with the dough. Whether it’s a soft brioche, a delicately layered croissant, or a quick Scottish-style puff pastry, each relies on precise technique, patience… and a touch of chef’s secret.
Unlike crumbly doughs, yeasted doughs depend on baker’s yeast and the elasticity of gluten, both essential to develop a light texture, an airy crumb, and a structure strong enough to hold butter.
But their success also hinges on a step that’s often overlooked: proper storage. Whether resting in the fridge, freezing, or resuming proofing, each dough has its rules. Here’s a practical guide to help you master viennoiseries — even when prepping ahead of time.


Brioche Dough viennoiserie secrets

Storage

  • Refrigerator: up to 24 hours, wrapped in plastic wrap.
  • Freezer: after the first proof.

After Freezing

  1. Defrost in the refrigerator.
  2. Allow to resume proofing.
  3. Egg wash.
  4. Bake.
Golden and fluffy brioche fresh out of the oven.
A golden, airy brioche, perfect for breakfast or dessert.

Laminated Yeasted Dough

(for croissants, pains au chocolat, etc.)

Storage

  • Refrigerator: 24 hours, wrapped in plastic wrap.
  • Freezer: after shaping, as raw pieces.

After Freezing

  1. Defrost in the refrigerator.
  2. Proof for 1 hour at room temperature.
  3. Egg wash.
  4. Bake.
 Homemade laminated yeasted dough, smooth and richly layered
Buttery, airy, and layered to perfection—ideal for croissants and pains au chocolat.

Quick Puff Pastry

(also known as “Scottish” or “record” dough)

Storage

  • Refrigerator: 24 hours, wrapped in plastic wrap.
  • Freezer: after the first proof.

After Freezing

  1. Defrost in the refrigerator.
  2. Resume proofing.
  3. Egg wash.
  4. Bake.
Homemade quick puff pastry, golden and flaky
Fast and flaky: the shortcut puff pastry perfect for tarts and pastries.

Proper Kneading

Kneading is done in two stages: first, at low speed — called frasage — to mix the ingredients evenly. Then, at medium speed, to develop the gluten network and incorporate air, which allows the dough to rise.
Kneading should last just long enough to give structure to the dough, but not too long, as overworking it can make it overly elastic and difficult to shape.

Laminated Dough – A Core Viennoiserie Skill

King Arthur Baking: Guide to Laminated Dough


The Perfect Egg Wash

Straining the beaten egg through a fine sieve removes the chalazae and results in a smoother, more fluid egg wash. A pinch of salt can make it even more fluid.
Be careful not to over-apply the wash: too much can “glue” the layers of laminated dough, preventing proper expansion during baking.


Unmold While Hot!

Molded brioches retain moisture: they should be unmolded while still hot to avoid becoming soggy in their mold. This step allows proper steam release — known in baking as ressuage.

Conclusion

Behind the beauty and balance of viennoiserie secrets lies a precise science and attention to detail that cannot be overlooked. From the careful kneading to the delicate egg wash, to the perfect timing for unmolding — every step makes a difference.
These techniques are not just mechanical steps; they are small secrets known only to professionals, who follow them meticulously, as they make all the difference between a successful dough and an ordinary one.

Ultimately, success in fine pastries doesn’t come from just a recipe, but from understanding the dough, the technique, and the time — and, of course, from your passion for the craft.

Technical Review: Crafting the Perfect Braided Brioche Like a Pro

This brioche recipe doesn’t just promise ease — it delivers precision pastry technique in a home baker–friendly format. Let’s break it down like a pro would in the back kitchen of a Parisian boulangerie.https://briochechic.com/make-it-at-home-the-ultimate-braided-brioche-in-just-10-minutes-like-the-pros/#more-275

Q&A with Brioche Chic
Because a perfect croissant never happens by accident.


1. Why don’t my croissants have those flaky, airy layers like in a real bakery?

Because it’s not just about the dough — it’s about the butter.
Professionals use beurre de tourage — a high-fat (84%) laminated butter that remains pliable when cold. It creates distinct, clean layers. Regular butter often breaks or melts, ruining the lamination.


2. Do I really need to rest the dough that long?

Yes — but timing is everything.
Fermentation develops flavor, but over-proofing weakens structure. Pros know exactly when to chill, when to rest, and when to roll. Cold dough = clean layers. Rushing = heartbreak.


3. What’s the one mistake almost every home baker makes?

Poor lamination — or no real technique.
Croissants aren’t just rolled out — they’re carefully folded, chilled, and turned. Pros use a dough sheeter (laminoir) for perfect consistency. At home, it’s possible — but your pressure, angle, and temperature control must be spot on.


4. Why don’t my viennoiseries rise in the oven?

Because proofing isn’t just a waiting game — it’s science.
Final fermentation (proofing) needs a warm, humid space — around 26–28°C. Too cold? No oven spring. Too hot? The butter melts. Bakers use proofing chambers. You can hack it with a warm box and a bowl of steaming water.


5. Is double egg wash really necessary?

Yes — if you want that glossy, golden finish.
The first wash hydrates the dough before proofing. The second (right before baking) gives you that irresistible bakery shine. Always use a soft brush to avoid deflating the dough.


So what’s the real secret behind the secrets?

Consistency. Control. Craft.
Nothing’s truly hidden — but professionals don’t just bake, they master. Tools help. Time matters. And the tiniest details make all the difference.

Mastering Crumbly Doughs: Techniques for Perfect Tarts and Pastries

A close-up view of freshly kneaded dough, its smooth and soft texture ready for rolling or shaping into pastry. The dough has a light, fluffy appearance, dusted with a touch of flour, set against a rustic wooden surface

crumbly doughs

Pastry doughs are the foundation of many sweet and savory creations in baking. From shortcrust to puff pastry, each type of dough has its own texture, flavor, and preparation method, directly influencing the success of a dessert or dish. They are both a challenge and a joy for the baker, requiring precision, patience, and an understanding of the techniques to master them.

Doughs like shortcrust, sweet, sable, and puff form the base for tarts, biscuits, pastries, and other treats. Whether you’re crafting the perfect tart shell or achieving a light, flaky puff pastry, each dough demands a different approach and specific tips.

In this exploration of pastry doughs, we will uncover the secrets of their preparation, common mistakes to avoid, and tips to ensure they turn out perfectly every time. Get ready to dive into the delicate and delicious world of the doughs that make up the finest pastry creations.

A Big Family of Doughs!

There are five main types of doughs in pastry making:

  • Crumbly Doughs: Pâte à foncer, pâte brisée, pâte sucrée, pâte sablée
  • Puff Pastries: Classic puff, inverted puff, etc.
  • Leavened Doughs: Bread dough, brioche, baba, etc.
  • Leavened Puff Pastries: Croissant dough, kouign-amann, etc.
  • Choux Pastry
Close-up of hands kneading dough on a floured surface, with soft, smooth dough forming under the pressure, ready to be shaped into pastries.
Artisan hands carefully working dough, preparing it for the next step in the pastry-making process

Crumbly Doughs & Tarts

  • These doughs share a common trait—they don’t engage much of the gluten found in the flour. The goal is not to create elasticity in the dough, as this would make it harder to roll out and cause it to shrink during baking.
  • To prevent elasticity, two techniques are used: sablage (incorporating butter into the flour) and crémage (emulsifying butter, sugar, and eggs in sweet dough). The resulting textures differ: doughs made by sablage are more crumbly, while those made by crémage have more cohesion and crunch.
  • Perfecting Crémage and Sablage
    The temperature of the ingredients is crucial when making dough using the crémage technique. The butter should be soft but not melted, and the egg should be at room temperature. Mix at a slow speed to avoid incorporating too much air, which could make the dough brittle and cause it to deform during baking. For sablage, always use the flat beater rather than your hands to prevent the butter from melting. Ensure the butter is cold.
  • Handling with Care
    These doughs are delicate and should not be overworked once the flour is incorporated. The correct action is to gently mix, not knead! To achieve a homogeneous dough, use the palm of your hand without applying force.

Proper Refrigeration of Dough


Chilling is a crucial step for crumbly doughs: the butter in the dough needs to solidify again. If the dough is too cold, it will be brittle and difficult to roll out; if it’s too soft, it will be hard to handle. Follow the recommended resting times carefully. To speed up and ensure even cooling, shape the dough into a flat disc rather than a ball and wrap it in plastic wrap. This will make it easier to roll out later.

Rolling Out the Dough


You only need a light dusting of flour to roll out dough, and it should be barely noticeable to the eye. A cold rolling pin helps prevent the dough from warming up and becoming sticky. If the dough becomes too soft to handle, it’s better to briefly chill it again in the fridge than to add more flour, which would dry it out. The thickness of the dough depends on its use and storage. For blind baking, the dough should be rolled thicker than for a tart filled with almond cream. The longer the dough needs to be stored (as a tart shell, for example), the thicker it should be.

Blind Baking: When and How to Perfect Your Tart Crust
To Blind Bake or Not?

The dough can either be partially baked or baked without filling, a technique known as “blind baking.” To prevent the dough from shrinking during blind baking, “blind baking weights” are used — typically baking beads placed in the tart shell. This step is essential for pâte à foncer. For pâte sucrée and pâte sablée, if the tart pan is well-buttered and the dough is properly lined, you can skip the weights.

Storage

Wrap the shaped dough into a disc and cover it well with several layers of plastic wrap or place it in a freezer bag, labeled with the date. Store it in the coldest part of the fridge and away from any strong-smelling items (like melons or cheeses). Adding a few drops of vinegar or lemon juice will help extend the shelf life of pâte à foncer and pâte brisée.

Wrapped dough resting in a bowl covered with a cloth, ready for refrigeration or freezing, with a few ingredients scattered around
Proper dough storage: wrapped and ready for refrigeration or freezing to preserve freshness

FONCER

  • Refrigeration: 3 days
  • Freezing: 3 months

BRISÉE

  • Refrigeration: 3 days
  • Freezing: 3 months

SUCRÉE

  • Refrigeration: 2 days
  • Freezing: 3 months

SABLÉE

  • Refrigeration: 2 days
  • Freezing: 3 months

Perfect Size for Your Tart!

Different tart sizes laid out side by side, ranging from small individual portions to larger family-sized tarts, each with a golden, flaky crust
Variety of tart sizes, perfect for different occasions, from individual servings to larger family-sized tarts

Tarts come in various sizes to accommodate different needs and occasions. From small, individual servings to larger, family-style portions, the size of the tart can influence both its appearance and the balance between crust and filling. Whether you’re preparing a single-serve dessert or a large centerpiece, choosing the right size ensures an optimal experience for your guests.

4 PERSONS

  • Mold: 18 cm
  • Dough: 24 cm
  • Quantity: 200 g

6 PERSONS

  • Mold: 22 cm
  • Dough: 26 cm
  • Quantity: 250 g

8 PERSONS

  • Mold: 24 cm
  • Dough: 28 cm
  • Quantity: 280 g

10 PERSONS

  • Quantity: 300 g
  • Mold: 26 cm
  • Dough: 30 cm


Which Dough for Which Tart?

Close-up of rolled-out tart dough, perfectly smooth and ready to be placed into a tart pan
Freshly rolled-out tart dough, carefully shaped and ready for the tart pan


TYPE OF TART

  • Quiche: Pâte à foncer (without sugar)
  • Baked fruit tart (apples, pears, etc.): Shortcrust, sweet, or sable dough
  • Juicy fruit tart (plums, damsons, etc.): Blind-baked shortcrust
  • Tart with cream (custard, lemon, etc.): Sable or sweet dough
  • Quark cheese tart: Shortcrust dough
  • Pastry cream flan: Puff or shortcrust dough
  • Thin tart: Puff dough

Conclusion on the Types of Pastry Dough

Each type of pastry dough is suited for specific tart styles, providing the perfect texture and flavor balance. For savory tarts like quiches, the neutral, crisp pâte à foncer (without sugar) is ideal. Fruit-based tarts benefit from the buttery richness of shortcrust, sweet, or sable dough, while juicy fruit tarts, like those with plums or damsons, require a blind-baked shortcrust to ensure a stable base. Cream-based tarts (like custard or lemon) are best paired with either sweet or sable dough for their delicate texture. For cheesier or custard-based fillings, a simple shortcrust dough works wonders, whereas a flan pâtissier or thin tart calls for the flaky elegance of puff pastry.

In short, the dough type you choose plays a crucial role in enhancing the final tart, making the selection process essential for achieving the right flavor and texture balance.

Tart Dough Demystified: Your Essential Q&A Guide

Q: Can homemade tart dough be frozen?
A: Yes, most tart doughs freeze very well for up to 3 months. Just make sure to wrap them tightly in plastic wrap or place them in a freezer bag to protect them from absorbing freezer odors.


Q: Do I always need to blind-bake tart dough before filling it?
A: Not always. Blind baking is important for wet fillings (like creams or juicy fruits) or when the filling doesn’t require baking. It helps prevent the crust from getting soggy.


Q: Which dough should I use for a quiche?
A: Shortcrust pastry or pâte à foncer (unsweetened dough) are best suited for quiches. They’re neutral in flavor, hold up well to moist fillings, and stay crisp.


Q: How do I stop tart dough from puffing up during blind baking?
A: Prick the base with a fork and use pie weights (ceramic baking beads or dried beans) to keep the dough flat while it bakes.http://Shortcrust Pastry Guide – King Arthur Baking.7 Timeless Soup Recipes That Will Make You Feel Like a Master Chef