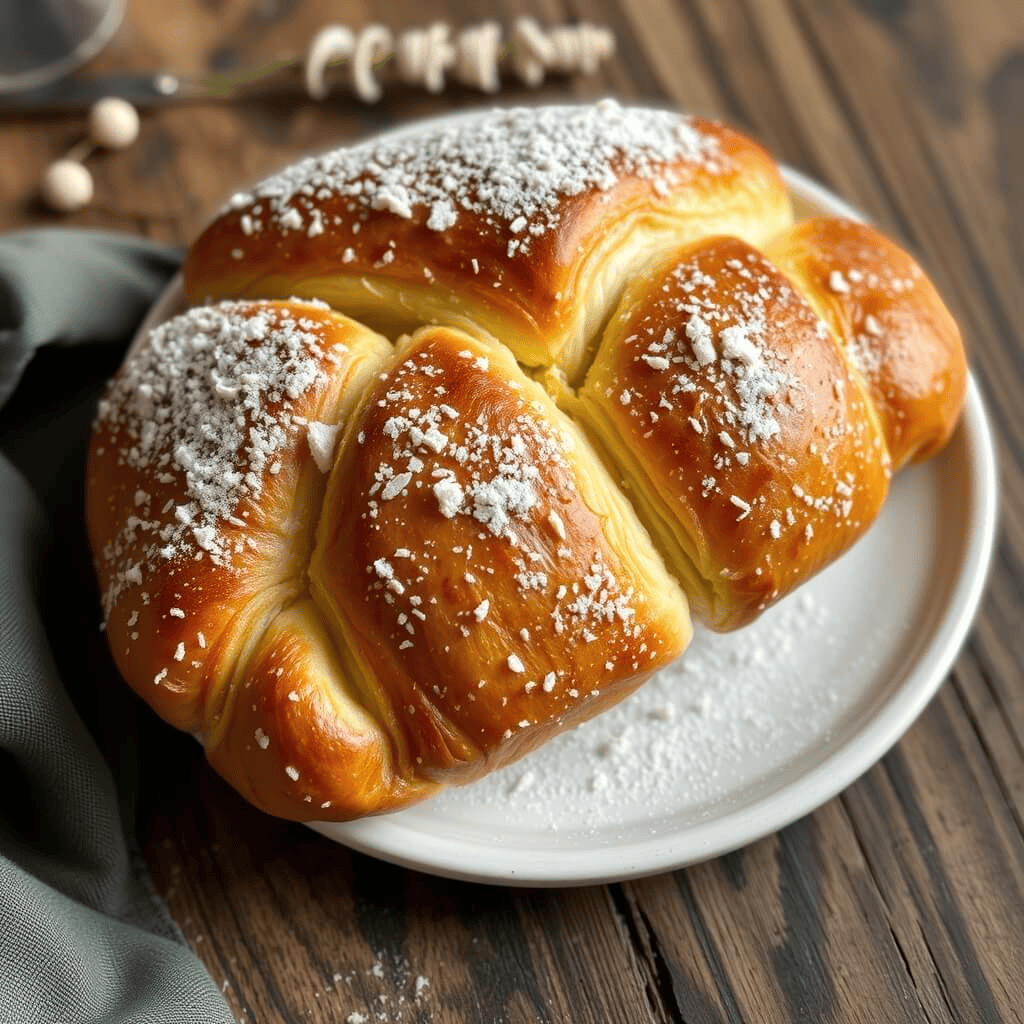
5 Sweet Steps to Perfect Bichons: A Pastry Lover’s Journey

A close-up of three golden lemon bichons on a rustic baking tray, sugar-crusted and slightly glossy, with a creamy filling peeking out from the folds

How to make Bichons

There’s something uniquely charming about classic French pastries—the way they balance elegance and comfort, the precision of their folds, and above all, the burst of flavor you get in every bite. Among the lesser-known but utterly delightful members of the pâtisserie family is the bichon: a golden, sugar-dusted puff pastry filled with a luscious lemon cream. If you’ve ever strolled past a French bakery and caught the scent of caramelized pastry and citrus in the air, there’s a good chance a tray of bichons was just pulled from the oven.

These little pastries are crisp on the outside, soft and tangy on the inside, and finished with a shimmering glaze that catches the light like sugar crystals. They’re often overlooked in favor of croissants or chaussons aux pommes, but once you’ve had a freshly made bichon, warm from your own oven, it just might become your new favorite.

Baking bichons at home is surprisingly achievable—even if you’re not a professional pâtissier. The beauty lies in their simplicity: a good puff pastry (homemade or store-bought), a velvety lemon curd, and a few finishing touches are all you need. But like any good French recipe, it’s the technique and attention to detail that elevate this pastry from something good to something exceptional.

In this article, we’ll walk you through everything you need to know to make authentic lemon bichons at home—from preparing a smooth, bright lemon filling to achieving that perfect sugar-encrusted exterior. We’ll also share tips for folding the pastry so the filling stays intact, tricks for getting that bakery-style glaze, and even a few chef’s secrets to help your bichons shine (literally and figuratively!).

Whether you’re baking for a weekend treat, planning a chic dessert for guests, or simply want to bring a bit of French flair into your kitchen, these lemon bichons are a perfect choice. Light, fragrant, and visually irresistible, they’re the kind of pastry that makes people pause after the first bite—and then reach for a second.

Ready to bake? Let’s dive into the ingredients and start creating your own batch of lemony perfection.

Method

Step 1: Prepare the Inverted Puff Pastry (Feuilletage Inversé)

The Art of Flaky Pastry Dough

Inverted puff pastry may sound intimidating, but it’s well worth the effort for its superior flakiness. Unlike classic puff pastry, here the butter envelops the dough—reversing the usual process and yielding a more delicate texture.

Make the Beurre Manié
  1. In a mixing bowl, combine the cold butter (200 g, cut into cubes) and flour (100 g). Use your fingertips to gently incorporate the flour into the butter until you have a smooth but firm paste.
  2. Shape the mixture into a square about 2 cm thick, wrap it in plastic wrap, and place it in the fridge to firm up for at least 30 minutes.
Make the Détrempe
  1. In another bowl, mix the flour (150 g) and salt (5 g).
  2. Add the cold water (87 g) gradually, mixing just until a dough forms—do not overwork it.
  3. Shape the détrempe into a smaller square, wrap it well, and chill it for 30 minutes.
Assemble the Dough
  1. On a lightly floured surface, roll out the beurre manié into a square large enough to encase the détrempe.
  2. Place the détrempe in the center and fold the butter over it from all four sides, sealing it like an envelope.
  3. Gently roll the dough into a long rectangle.
  4. Perform a double fold (also known as a book fold): fold both short ends toward the center, then fold the dough in half.
  5. Wrap and chill for 30 minutes.
  6. Repeat this process two more times, with 30-minute rests in between each fold. After the final fold, chill the dough for at least 2 hours before using.

Tip: The colder your dough, the better the layering. Always chill between folds to avoid butter melting into the flour http://Puff Pastry Basics – King Arthur Bakingy

Step-by-step process of preparing inverted puff pastry: a square of beurre manié enveloping détrempe, rolled and folded on a floured surface
The classic technique behind perfect flakiness: inverted puff pastry in the making, ready for its first book fold.

Step 2: Make the Lemon Pastry Cream (Crème Bichon)

While the pastry dough is chilling, prepare the filling. This rich, lemon-scented cream will become the heart of your bichons.

  1. In a saucepan, pour the milk (500 ml) and add the lemon zest. Heat over medium-low until just simmering.
  2. In a bowl, whisk together the egg yolk (20 g), sugar (75 g), and cornstarch (40 g) until smooth and pale.
  3. Once the milk is warm, slowly pour about a third of it into the egg mixture to temper it, whisking constantly.
  4. Return everything to the saucepan and cook over medium heat, stirring constantly with a whisk or silicone spatula, until the cream thickens.
  5. Once thick and glossy, remove from heat, transfer to a shallow dish, cover with plastic wrap (touching the surface), and chill until completely cold—at least 2 hours.
A saucepan of lemon-infused milk being whisked into an egg yolk and sugar mixture to make
Bright and silky: the lemon pastry cream brings a fresh twist to the classic custard filling.

Chef’s Note: The lemon zest should be as fine as possible to infuse the cream evenly. You can strain the cream if you prefer a smoother texture.


Step 3: Roll and Slice the Dough

  1. Prepare the inverted puff pastry as described above .
  2. Generously sprinkle granulated sugar over the surface of the chilled pastry.
  3. Roll it out into a rectangle measuring 50 cm x 25 cm, about 5 mm thick.
  4. Starting from the long edge, roll the dough into a tight log, like a jelly roll.
  5. Wrap the roll in plastic wrap and refrigerate until firm—this makes slicing much easier.
  6. Once chilled, cut 12 rounds of dough, each about 2 cm thick.
The art of rolling and slicing the brioche dough is what gives the final loaf its signature layers and soft, fluffy texture
Achieve those beautiful, airy layers by gently rolling and slicing the dough. Here’s how to master this essential step.

Step 4: Flatten and Shape the Pastries

  1. Lightly dust your work surface with granulated sugar (instead of flour) to enhance caramelization during baking.
  2. Place one dough round (or “escargot”) on the sugar and use a rolling pin to flatten it into an oval, about 2 mm thick.
  3. Repeat with all the slices—you should have 12 thin, oval-shaped bases.
Flattening and shaping your turnovers is one of the most rewarding steps in the pastry-making process. It allows you to transform the dough into perfectly formed parcels that will hold their shape and crisp up beautifully during baking
Master the art of shaping your turnovers to create a delicious, golden finish.

Step 5: Fill and Fold

  1. Prepare the crème bichon.
  2. Transfer the cooled cream to a piping bag.
  3. Pipe a small amount of filling on half of each oval—leave space around the edge.
  4. Fold the pastry over to form a half-moon shape.
  5. Press the edges firmly to seal. You can gently crimp with your fingers or a fork for a more defined edge.
  6. Arrange the filled bichons on a baking tray lined with parchment paper.
The "Fill and Fold" step is where the magic of a turnover truly happens, transforming your dough into a pocket of deliciousness.
Stuff your dough with a delicious filling, then fold to seal in the flavor.
After filling and shaping your bichons, the final step before baking is arranging them on the tray. Take a baking tray and line it with parchment paper to prevent sticking and make cleanup a breeze.
Place your filled bichons on a lined baking tray, setting them up for a perfect bake.

Step 6: Bake

  1. Preheat your oven to 200°C (392°F / Gas Mark 6-7).
  2. Bake for 20 minutes, or until puffed, golden, and slightly caramelized at the edges.
It’s time to bake your bichons to perfection! Preheat your oven to the right temperature and place the tray of filled bichons inside, making sure there’s enough space around each pastry to allow for even puffing and browning.
Let the oven work its magic, transforming your filled bichons into golden, flaky delights.

The sugar on the outside creates a beautifully glossy and crisp crust—no extra glaze needed!

Conclusion

There’s something deeply satisfying about baking your own lemon bichons from scratch. From the buttery layers of puff pastry to the velvety citrus cream tucked inside, each step brings you closer to a pastry that feels—and tastes—like it came straight from a Parisian window display. Whether you go for the classic fold-over method or the charming spiral technique, these bichons are a celebration of texture, flavor, and French baking tradition.

Serve them warm with a cup of tea, or pack them up for a weekend brunch—they’re guaranteed to bring a little sunshine to your table.

And remember: once you’ve mastered the basics, you can start playing with variations. Think orange zest, passion fruit cream, or even a touch of ginger for something a little unexpected. The world of bichons is yours to explore MORE RECIPS ;

https://briochechic.com/crispy-caramelized-bliss6-secret-to-perfect-palmiers-revealed/#more-390


FAQ – Your Bichon Questions, Answered

Can I use store-bought puff pastry?
Absolutely! While homemade inverted puff pastry gives unbeatable flakiness, a high-quality all-butter store-bought version will still yield delicious results.

How do I keep the filling from leaking out?
Make sure your cream is fully chilled and thick before piping. When folding, press the edges firmly and avoid overfilling. Chilling the shaped bichons before baking also helps.

Why use sugar instead of flour when rolling?
Rolling the dough in sugar not only prevents sticking—it also caramelizes during baking, giving that signature glossy, crisp exterior.

Can I make them in advance?
Bichons are best enjoyed the same day, but you can prepare the dough and cream ahead of time. Assemble and bake the day you plan to serve them for the best texture.

How should I store leftovers?
Store in an airtight container at room temperature for up to 24 hours, or in the fridge for 48 hours max. Reheat gently in the oven to restore crispness.

Make It at Home: The Ultimate Braided Brioche in Just 10 Minutes — Like the Pros!

"A three-strand braided brioche loaf with a golden-brown crust and sugar crystals, placed on a light gray background with a linen cloth in the corner

braided brioche recipe

There’s a certain kind of magic woven into the strands of a braided brioche. Soft, rich, and golden, it’s more than a loaf — it’s a celebration of craftsmanship and comfort. From the first glance, its glossy, burnished surface and intricate braids promise something special. And once sliced, it delivers: featherlight texture, a tender crumb, and a taste that feels like home.

Braided brioche is where technical skill meets poetry. Each strand of dough is shaped with care, rolled to perfection, then woven in a dance of symmetry and softness. It’s a slow process, yes — one that demands patience and a gentle hand — but that time and intention are precisely what give the final result its signature beauty and flavor.

The loaf rises once, then again, and finally bakes into a golden masterpiece. When it emerges from the oven, it fills the kitchen with the unmistakable aroma of sweet butter and warmth. The crust glows with a delicate sheen, the result of a simple glaze brushed on just before baking. But its allure is not just in appearance — the first bite is pure delicacy. Slightly sweet, incredibly airy, and meltingly soft, each mouthful speaks of Sunday mornings, family gatherings, and timeless tradition.

Braided brioche is a chameleon, too. It pairs as effortlessly with a dollop of jam at breakfast as it does with a sliver of cheese or a touch of chocolate. It’s as fitting for a holiday table as it is for an everyday indulgence. It may look intricate, but at its heart, it is a bread of generosity — one that’s meant to be shared, enjoyed, and remembered.

Link to your classic brioche à tête recipe


Anchor text: Also learn how to master the classic brioche à tête like a pro
URL suggestion:
https://briochechic.com/classic-brioche-a-tete-recipe

This is not just baking. This is a quiet ritual. A moment of stillness. A tribute to the slow and the beautiful.

Braided Brioche

Serves: 4 to 6 people
Preparation Time: 45 minutes
First Rest (Bulk Fermentation): 30 minutes
Chilling Time: At least 2 hours
Final Proofing (Second Rise): 2 hours
Baking Time: 20–25 minutes, depending on weight
Storage: Keeps well for up to 48 hours at room temperature, ideally wrapped or under a dome


You Will Need:

Dough
– 300 g of brioche dough

Egg Wash
– 25 g whole egg
– 20 g egg yolk
– 25 g whole milk

Finishing Touch
– Pearl sugar, as needed, for garnish


Recommended Tools:

– Stand mixer
– Bowl scraper
– Dough cutter
– Pastry brush

Step-by-Step Braided Brioche Recipe

  • To begin, divide the chilled brioche dough into three equal portions using a dough cutter. The image captures a beautifully baked braided brioche loaf resting on a lightly textured surface. Its golden-brown crust glistens under soft, natural lighting, with sugar pearls delicately scattered over the top, adding a touch of sparkle and sweetness. Each strand of the braid is clearly defined, revealing the baker’s precision and technique..
Three portions of brioche dough evenly cut on a floured work surface with a metal dough cutter beside them.
Precision begins here: the chilled brioche dough is divided into three equal parts — the foundation of a flawless braid.
  • Lightly flour the brioche logs and place them side by side on your work surface. Braid the logs together by pinching the top ends to seal them and then alternating the strands: cross the right strand over the center, followed by the left strand over the new center, repeating this sequence until you reach the ends. Gently press the ends together and tuck them underneath to seal the braid.
Three floured strands of brioche dough being braided together on a clean work surface, ends tucked neatly underneath.
Floured and aligned, the brioche strands come together in a smooth, elegant braid — the signature of a baker’s finesse.
  • Brush the loaf with an egg wash, then proof it for about 2 hours at around 26°C (or in an off oven with a bowl of boiling water placed inside), allowing it to at least double in size. Once proofed, sprinkle the top with pearl sugar and bake the brioche at 170°C (350°F, gas mark 5/6) for about 20 minutes.Link to your
Braided brioche loaf brushed with egg wash, sprinkled with pearl sugar, resting on a tray before baking.
Brushed with egg wash and crowned with pearl sugar, the braided brioche is ready to rise and shine in the oven.
  • After baking, transfer the brioche to a cooling rack to let it rest and cool slightly before serving.
Freshly baked braided brioche resting on a cooling rack, with steam gently rising from its golden crust.
Fresh from the oven, the braided brioche cools gently on a wire rack, its golden crust settling into buttery softness.

Conclusion: The Art of Braided Brioche – A Rewarding Experience

Baking braided brioche is more than just following a recipe; it’s about immersing yourself in the process, allowing time to knead, rest, braid, and bake. The result isn’t just a loaf of bread — it’s a delicate masterpiece that fills your kitchen with the heavenly aroma of butter, sweetness, and freshly baked dough. The intricate braiding, the golden finish, and the soft, airy crumb come together in perfect harmony, offering not just a delicious treat, but also a sense of accomplishment.

While it may seem like a long process, each step is essential for creating that perfect, soft texture and a crisp golden crust. So, take your time, savor the moment, and enjoy the journey of creating something truly extraordinary. Whether you’re baking for a family gathering, a special occasion, or simply because you love the art of baking, a braided brioche will never disappoint

King Arthur Baking – Classic Brioche Recipe
Anchor text: See the traditional method at King Arthur Baking
URL:
https://www.kingarthurbaking.com/recipes/brioche-recipe

Now, as with any craft, there are always questions, and I’m here to help guide you through!


Q&A: Common Questions About Braided Brioche

Q: What should I do if my brioche dough is too sticky?
A: If your dough feels sticky and hard to handle, don’t worry! It’s important to let it rest for a little while as brioche dough needs time to absorb all the flour and butter properly. You can also lightly flour your hands and work surface to help with handling. If it’s still too sticky, add just a touch more flour, but be careful not to overdo it, as too much flour can make your brioche dense.

Q: Can I freeze braided brioche?
A: Yes! Braided brioche freezes beautifully. Once baked and cooled, wrap it tightly in plastic wrap or foil, and store it in an airtight bag or container. It can be frozen for up to 3 months. To reheat, simply thaw it at room temperature and warm it up in the oven for a few minutes for that fresh-baked taste.

Q: How do I know when my brioche is properly proofed?
A: Proper proofing is crucial to achieving that light, airy texture. You’ll know the dough is ready when it has roughly doubled in size and feels soft to the touch. You can perform the “poke test” by gently pressing your finger into the dough; if the indentation remains and doesn’t spring back, it’s ready for baking.

Q: Can I add different flavors to my brioche?
A: Absolutely! Brioche is a versatile dough that can be flavored in many ways. Try adding a bit of citrus zest for a refreshing twist, or fold in some cinnamon, vanilla, or chocolate for a more indulgent treat. The dough can also be enriched with fruits like raisins or chocolate chips for a fun variation.

Use for Perfect Apple Turnovers

Golden apple turnovers with flaky puff pastry and glossy syrup finish, displayed on a baking tray.

perfect apple turnovers

Few things rival the simple pleasure of biting into a warm apple turnover — the crackle of golden puff pastry giving way to soft, spiced compote is pure magic. With this recipe, we lean into the French tradition using inverted puff pastry, a method that delivers an exceptionally light, crisp result, worthy of the finest pâtisserie.

The Art of the Pastry

We start with a classic inverted puff pastry, where the butter encases the dough, rather than the other way around. This technique, while more delicate, creates intense flakiness. The pastry is built in two parts:

  • Beurre manié – a pliable butter-flour mix
  • Détrempe – a moistened flour dough that provides structure

Together, they form the hundreds of buttery layers we expect in a truly perfect chausson.

Filling the Heart of the Turnover

The filling is simple and honest: a generous scoop of apple compote, smooth yet flavorful, rich with the natural sweetness of slow-cooked apples. You can add a hint of vanilla, lemon zest, or cinnamon — though even plain, the purity of the fruit shines through beautifully.

Assembly & Shaping

Once your dough is chilled and rolled, use a fluted round cutter (13 cm Ø) to stamp out your pastry circles. A spoonful of compote is placed at the center, then the dough is folded into a half-moon and sealed with care — either with a fork or a delicate twist of the fingers.

A light egg wash gives that golden sheen, and once baked, the turnovers are brushed with a simple syrup glaze for shine and a whisper of sweetness.

The Final Touch

Serve these warm or at room temperature, ideally the day they’re baked. The result? Crisp, glossy pastries with tender apple hearts — a perfect companion to a cup of tea, or a beautiful ending to a cozy brunch.

Apple Turnovers – Flaky and Golden

Yield: 5 to 6 turnovers
Prep time: 2 h 30
Chill time: 2 h 30
Baking time: 30 minutes
Storage: Best consumed within 24 hours


Tools Required

  • Dough scraper
  • Rolling pin
  • 13 cm fluted round cutter
  • Pastry brush

Ingredients

Filling

  • 500 g apple compote

Inverted Puff Pastry

Beurre manié:

  • 200 g butter
  • 100 g flour

Détrempe:

  • 150 g flour
  • 5 g salt
  • 87 g water

Egg Wash

  • 50 g whole egg
  • 40 g egg yolks
  • 50 g milk

Syrup (for finishing)

  • 30 g water
  • 30 g sugar

Technique Focus: Inverted Puff Pastry (Feuilletage Inversé)

Unlike traditional puff pastry where the butter is enclosed inside the dough, inverted puff pastry reverses the roles: the dough is wrapped inside a layer of butter. This method is more delicate to handle but yields an incredibly light, flaky, and crisp result — perfect for refined viennoiseries like chaussons aux pomme sSEE –https://briochechic.com/why-professional-bakers-never-share-these-5-viennoiserie-success-secrets/#more-229

Step-by-Step Overview

1. Prepare the Beurre Manié
Mix 200 g of butter with 100 g of flour until smooth and pliable. Shape into a rectangle, wrap in plastic wrap, and refrigerate for 30 minutes.

2. Make the Détrempe
Separately, combine 150 g of flour, 5 g of salt, and 87 g of water to form a soft dough. Knead gently, wrap, and chill for 30 minutes.

3. Enclose the Détrempe
Roll out the beurre manié into a large rectangle. Place the détrempe in the center and fold the butter over it like an envelope to encase it completely.

4. Laminate the Dough
Roll out the dough gently into a long rectangle, then perform a double fold (book fold). Chill for 30 minutes. Repeat the process for a total of 4 turns (alternating single and double folds as desired), resting the dough between each fold to keep the butter cold and layers distinct.

5. Rest Before Use
Wrap the dough well and refrigerate for at least 2 hours (or overnight) before rolling and shaping

Step-by-Step – Shaping the Turnovers

1. Prepare the puff pastry
Begin by making your inverted puff pastry.https://www.seriouseats.com/the-science-of-flaky-pie-dough – sur la science de la pâte feuilletée Once rested and ready, roll out the dough on a lightly floured surface until it’s about 3 mm thick — just enough to be pliable, but still rich with layers.

Puff pastry, with its delicately layered structure and irresistibly buttery flavor, is the foundation of many classic recipes.
The secret to perfect puff pastry: each fold and each turn, a promise of lightness and crispiness.

2. Cut the pastry
Using a fluted round cutter about 13 cm in diameter, cut out 5 to 6 discs of pastry. Work efficiently to keep the dough cool and avoid over-handling.

Cutting puff pastry carefully is essential to ensure uniform pieces and perfect results.
Clean, precise slices—ready to be transformed into flaky delights.

3. Fill with apple compote
Place a generous spoonful — around 70 to 80 g — of smooth apple compote in the center of each circle. The filling should be thick and not too watery, so it stays contained during baking.

Filling puff pastry with homemade apple compote is the step that transforms simple dough into a true culinary masterpiece.
A generous spoonful of apple compote spread over the puff pastry, ready to wrap each bite in sweetness.

4. Fold and seal
Carefully fold the dough over the filling to create a half-moon shape. Press the edges together to seal, then crimp with a fork or twist slightly for a more traditional chausson look. Make sure the edges are tightly sealed to prevent leakage in the oven.

Folding and sealing the puff pastry around the apple compote is the step that gives your turnovers their final shape..
A perfect fold, a clean seal: the apple turnovers are ready to be baked to perfection.

Baking & Finishing – The Final Flourish

5. Chill and egg wash
Place the sealed turnovers onto a parchment-lined baking tray. Brush the tops gently with your egg wash (a mix of egg, yolks, and milk), then refrigerate them for 30 minutes. This helps the dough relax and hold its shape during baking.

6. Second egg wash and scoring
Once chilled, give the turnovers a second coat of egg wash to ensure a deep golden sheen. Then, using the tip of a sharp knife, score the tops with a curved or radiating pattern — a classic chausson touch that adds visual elegance. Don’t forget to pierce each turnover 5 to 6 times with the tip of a knife or skewer. These small vents allow steam to escape and prevent puffing or bursting in the oven.

After carefully folding and sealing your apple turnovers, it’s time to add the final touch: the egg wash and chilling.
A delicate egg wash for a flawless golden finish, and a chill to guarantee perfectly flaky pastry.

7. Bake to golden perfection
Preheat your oven to 210°C (410°F). Bake the turnovers for 10 to 12 minutes at this high temperature to encourage lift and flakiness. Then reduce the oven to 190°C (375°F) and continue baking for another 15 to 20 minutes, or until the pastries are richly golden and crisp.

8. Glaze and shine
While still hot from the oven, brush the turnovers lightly with a warm sugar syrup (equal parts water and sugar, simmered together). This final step gives a glossy finish and seals in a bit of extra moisture and sweetness.

Golden apple turnovers with flaky puff pastry and glossy syrup finish, displayed on a baking tray.
Delicate layers of inverted puff pastry filled with smooth apple compote — crisp, golden, and ready to enjoy.

Final Thoughts – A Turnover Worth the Time

Apple turnovers are more than a treat — they’re a small celebration of time, technique, and tradition. From the delicate folds of the inverted puff pastry to the warm heart of velvety apple compote, each step builds toward a pastry that’s both rustic and refined.

Whether you serve them warm with a swirl of crème fraîche or tuck them into a picnic basket for a golden surprise, these chaussons aux pommes embody the charm of French baking at its finest. Take your time, trust the process, and enjoy the buttery reward

Q&A – Apple Turnovers, Your Questions Answered

Q: Can I use store-bought puff pastry instead of making inverted puff pastry?
A: Absolutely! While homemade inverted puff pastry offers superior flakiness and flavor, high-quality store-bought puff pastry is a great shortcut for busy days. Just make sure it’s made with real butter for the best results.

Q: How do I keep the turnovers from leaking in the oven?
A: Make sure the edges are well sealed — use a fork to press them down or twist slightly by hand. Also, avoid overfilling with compote, and always chill the turnovers before baking to help them hold their shape.

Q: Can I freeze the turnovers?
A: Yes! You can freeze them unbaked. Just shape and seal them, skip the egg wash, and freeze on a tray. Once solid, transfer to a freezer bag. Bake from frozen, adding a few extra minutes to the cooking time.

Q: What other fillings can I try?
A: Pear, apricot, cherry, or even frangipane work beautifully. Just make sure the filling isn’t too wet, or it may affect the pastry texture.

Why Professional Bakers Never Share These 5 Viennoiserie Success Secrets

viennoiserie secrets

In the refined world of viennoiserie, everything begins with the dough. Whether it’s a soft brioche, a delicately layered croissant, or a quick Scottish-style puff pastry, each relies on precise technique, patience… and a touch of chef’s secret.
Unlike crumbly doughs, yeasted doughs depend on baker’s yeast and the elasticity of gluten, both essential to develop a light texture, an airy crumb, and a structure strong enough to hold butter.
But their success also hinges on a step that’s often overlooked: proper storage. Whether resting in the fridge, freezing, or resuming proofing, each dough has its rules. Here’s a practical guide to help you master viennoiseries — even when prepping ahead of time.


Brioche Dough viennoiserie secrets

Storage

  • Refrigerator: up to 24 hours, wrapped in plastic wrap.
  • Freezer: after the first proof.

After Freezing

  1. Defrost in the refrigerator.
  2. Allow to resume proofing.
  3. Egg wash.
  4. Bake.
Golden and fluffy brioche fresh out of the oven.
A golden, airy brioche, perfect for breakfast or dessert.

Laminated Yeasted Dough

(for croissants, pains au chocolat, etc.)

Storage

  • Refrigerator: 24 hours, wrapped in plastic wrap.
  • Freezer: after shaping, as raw pieces.

After Freezing

  1. Defrost in the refrigerator.
  2. Proof for 1 hour at room temperature.
  3. Egg wash.
  4. Bake.
 Homemade laminated yeasted dough, smooth and richly layered
Buttery, airy, and layered to perfection—ideal for croissants and pains au chocolat.

Quick Puff Pastry

(also known as “Scottish” or “record” dough)

Storage

  • Refrigerator: 24 hours, wrapped in plastic wrap.
  • Freezer: after the first proof.

After Freezing

  1. Defrost in the refrigerator.
  2. Resume proofing.
  3. Egg wash.
  4. Bake.
Homemade quick puff pastry, golden and flaky
Fast and flaky: the shortcut puff pastry perfect for tarts and pastries.

Proper Kneading

Kneading is done in two stages: first, at low speed — called frasage — to mix the ingredients evenly. Then, at medium speed, to develop the gluten network and incorporate air, which allows the dough to rise.
Kneading should last just long enough to give structure to the dough, but not too long, as overworking it can make it overly elastic and difficult to shape.

Laminated Dough – A Core Viennoiserie Skill

King Arthur Baking: Guide to Laminated Dough


The Perfect Egg Wash

Straining the beaten egg through a fine sieve removes the chalazae and results in a smoother, more fluid egg wash. A pinch of salt can make it even more fluid.
Be careful not to over-apply the wash: too much can “glue” the layers of laminated dough, preventing proper expansion during baking.


Unmold While Hot!

Molded brioches retain moisture: they should be unmolded while still hot to avoid becoming soggy in their mold. This step allows proper steam release — known in baking as ressuage.

Conclusion

Behind the beauty and balance of viennoiserie secrets lies a precise science and attention to detail that cannot be overlooked. From the careful kneading to the delicate egg wash, to the perfect timing for unmolding — every step makes a difference.
These techniques are not just mechanical steps; they are small secrets known only to professionals, who follow them meticulously, as they make all the difference between a successful dough and an ordinary one.

Ultimately, success in fine pastries doesn’t come from just a recipe, but from understanding the dough, the technique, and the time — and, of course, from your passion for the craft.

Technical Review: Crafting the Perfect Braided Brioche Like a Pro

This brioche recipe doesn’t just promise ease — it delivers precision pastry technique in a home baker–friendly format. Let’s break it down like a pro would in the back kitchen of a Parisian boulangerie.https://briochechic.com/make-it-at-home-the-ultimate-braided-brioche-in-just-10-minutes-like-the-pros/#more-275

Q&A with Brioche Chic
Because a perfect croissant never happens by accident.


1. Why don’t my croissants have those flaky, airy layers like in a real bakery?

Because it’s not just about the dough — it’s about the butter.
Professionals use beurre de tourage — a high-fat (84%) laminated butter that remains pliable when cold. It creates distinct, clean layers. Regular butter often breaks or melts, ruining the lamination.


2. Do I really need to rest the dough that long?

Yes — but timing is everything.
Fermentation develops flavor, but over-proofing weakens structure. Pros know exactly when to chill, when to rest, and when to roll. Cold dough = clean layers. Rushing = heartbreak.


3. What’s the one mistake almost every home baker makes?

Poor lamination — or no real technique.
Croissants aren’t just rolled out — they’re carefully folded, chilled, and turned. Pros use a dough sheeter (laminoir) for perfect consistency. At home, it’s possible — but your pressure, angle, and temperature control must be spot on.


4. Why don’t my viennoiseries rise in the oven?

Because proofing isn’t just a waiting game — it’s science.
Final fermentation (proofing) needs a warm, humid space — around 26–28°C. Too cold? No oven spring. Too hot? The butter melts. Bakers use proofing chambers. You can hack it with a warm box and a bowl of steaming water.


5. Is double egg wash really necessary?

Yes — if you want that glossy, golden finish.
The first wash hydrates the dough before proofing. The second (right before baking) gives you that irresistible bakery shine. Always use a soft brush to avoid deflating the dough.


So what’s the real secret behind the secrets?

Consistency. Control. Craft.
Nothing’s truly hidden — but professionals don’t just bake, they master. Tools help. Time matters. And the tiniest details make all the difference.