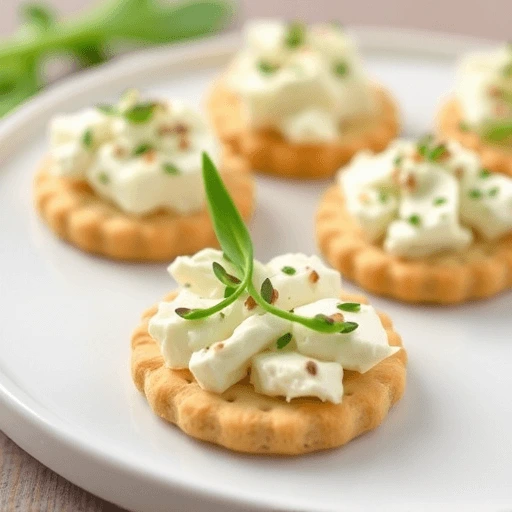
Ready in 3min : Effortless Foie Gras Canapés with a Crunch

Close-up of elegant foie gras canapés on salted crackers, topped with glossy onion confit and toasted pecans, arranged beautifully on a serving platter.

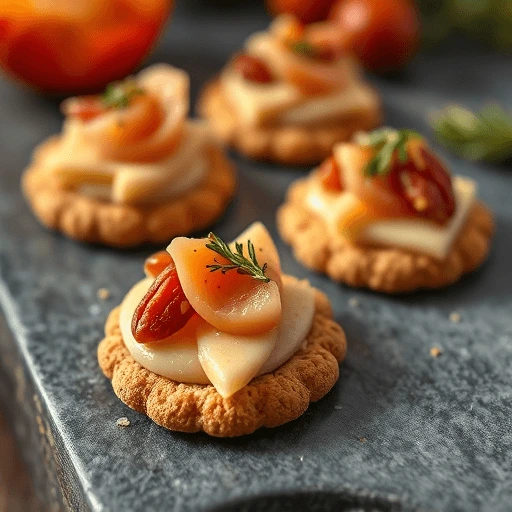
foie gras canapés

There are appetizers—and then there are statements.

Foie gras, with its buttery opulence and silken texture. belongs to that rare class of delicacies that require little adornment yet command absolute attention.

When paired with the subtle crunch of a finely crafted cracker and the deep, toasted sweetness of pecans, it transforms into something unforgettable: a canapé that is both refined and indulgent, delicate yet bold.

These are not canapés to be hurried or overlooked. Each one is an invitation to pause.

The foie gras, smooth and mellow, melts into the warmth of the tongue, releasing layers of flavor that hint at spice, cream, and a whisper of sweetness.

Beneath it, the crispness of the cracker provides a gentle contrast—never competing, only supporting—while the pecan’s nutty richness rounds out the bite with an earthy echo.

This composition is about balance.

It is not merely the layering of textures or the marriage of savory and sweet; it is the experience of harmony, where each element enhances the next.

The salt, the fat, the crunch, the subtle aroma of toasted nut—all aligned to awaken the senses without overwhelming them.

Perfect as the opening note to a festive evening or the centerpiece of a luxurious apéritif, these canapés carry the unmistakable elegance of something prepared with thought and restraint.

They need no flourish, no dramatic drizzle or garnish. Their beauty lies in their simplicity, their restraint, and above all, their extraordinary taste.

In a world where excess often overshadows intention, this is a bite-sized lesson in culinary grace.

Ingredients for 6 to 8 guests:

  • 1 packet of savory crackers
    Select a high-quality variety of crackers with a delicate crunch and a lightly salted finish. The ideal cracker should offer a neutral yet slightly buttery base that complements. the richness of foie gras without overpowering it. Their crisp texture provides the perfect foundation for building complex flavors.
  • 150 grams of foie gras
    Choose a smooth, well-marbled foie gras with a rich, creamy texture and a subtle, refined flavor.
  • Whether it is a classic terrine or a gently seared slice, the foie gras.
    • should be soft enough to spread easily yet firm enough to hold its shape on the cracker. This ingredient is the star of the canapé, lending decadence and an irresistible melt-in-the-mouth sensation.
2 tablespoons of onion confit
  • A carefully prepared onion confit adds.
  • a beautiful balance of sweetness and slight acidity, enhancing the foie gras without overwhelming it.
  • The confit should be silky and tender, with onions slowly cooked until .
  • they release their natural sugars, creating a glossy, jam-like accompaniment that offers depth and complexity
  • 50 grams of pecan nuts
    Toasted pecans bring a warm, nutty aroma and a gentle crunch to the canapé. Their buttery texture and subtle sweetness harmonize beautifully with both the savory crackers and the rich foie gras. They should be roughly chopped or left whole, depending on your preference for texture contrast.
  • Freshly ground black pepper
    Just a few twists from the mill will introduce a delicate heat and aromatic spice. that cuts through the richness of the foie gras and enhances the overall flavor profile. Use sparingly to maintain balance and to highlight the other ingredients.

Preparation

Begin by selecting a clean, elegant serving platter to showcase your canapés—a simple wooden board or a sleek ceramic plate will both work beautifully.

This presentation is as much about visual appeal as it is about taste, so take a moment to arrange your workspace thoughtfully.

Next, take the foie gras out of refrigeration and allow it to come to just below room temperature.

This gentle warming will ensure the foie gras softens slightly, making it easier to sli ce without crumbling. and allowing its full flavor and delicate texture to shine.

Using a very sharp, preferably thin-bladed knife, carefully slice the foie gras into thin.

even lamelles—delicate ribbons .that are substantial enough to hold their shape yet fine enough to melt effortlessly on the palate.

The precision of these slices is key: each should be smooth and silky, without ragged edges.

reflecting the care and attention this luxurious ingredient deserves.

Place each thin slice carefully atop the salted cracker,

centering it to create a neat and balanced canapé. The cracker’s crisp base will provide a delightful contrast to the creamy foie gras, so avoid overcrowding the surface. Each canapé should look like a small work of art—simple, refined, and inviting.

Now, reach for your freshly ground black pepper. Holding the pepper mill a few inches above the assembled canapés.

turn it slowly to release a fine dusting of pepper over each slice of foie gras.

The gentle warmth and aromatic spiciness of the pepper will subtly awaken the palate, enhancing the richness without overpowering it.

Next, with a small spoon or a delicate offset spatula.

take a dollop of the onion confit and carefully place it atop each foie gras slice.

The confit should be spread lightly, just enough to add a glossy, sweet-savory accent that complements the foie gras perfectly. Its deep caramelized notes bring a subtle complexity, balancing the canapé with layers of flavor.

Finally,

crown each canapé with a single pecan half or a carefully chosen pecan kernel.

The nut’s rich, toasted aroma and satisfying crunch offer the perfect finishing touch, elevating .

the bite to an experience of texture and taste in harmony.

Arrange the pecan so that it sits gracefully atop the confit, inviting your guests to savor.

WX the contrast between soft, creamy, sweet, and crunchy elements all in one bite.

Once assembled, cover the platter lightly with plastic wrap and refrigerate if needed, but ideally serve these canapés .

shortly after preparation to ensure the crackers remain crisp and the foie gras retains its delicate texture.

This elegant presentation encourages guests to enjoy the canapés slowly, appreciating.

the interplay of luxurious flavors and contrasting textures with every bite—an exquisite start to any sophisticated gathering.

Conclusion

These foie gras and pecan cracker canapés embody the essence of refined indulgence—simple in composition yet sophisticated in every detail.

Each bite delivers a symphony of flavors and textures: the velvety richness of the foie gras.

the gentle sweetness of the onion confit, the nutty warmth of toasted pecans, and the crisp, buttery foundation of the cracker.

Together, they create a harmonious balance that elevates even the briefest moment into an experience to savor.

What makes this dish truly special is its ability to convey luxury without pretense. It’s an appetizer designed not merely to whet the appetite, but to inspire conversation, celebration, and connection.

The care taken in slicing the foie gras just so, the thoughtful seasoning with freshly ground pepp.

and the delicate placement of each element reflect a respect for ingredients and for those who share the meal.

Serving these canapés invites a slow,

deliberate enjoyment—a reminder that the best food is not rushed, but relished.

Whether offered as the opening note to a festive evening, or as an elegant accompaniment to a glass of fine wine,.

they stand as a testament to the power of simplicity elevated by quality and technique.

In a world that often favors the fast and the convenient, this dish encourages us to pause, to appreciate, and to celebrate the art of hospitality.

It is, quite simply, a small luxury to be shared and remembered.“Foie gras is often misunderstood —

learn about its origins and tradition http://How Foie Gras Is Made— Saveur

Q: Chef, what makes foie gras on pecan crackers such an exceptional appetizer?

A: That’s a wonderful question, and it touches on several elements that define both flavor and experience.

First and foremost, foie gras is one of those rare ingredients that carries a profound richness and luxurious texture. Its buttery, melt-in-the-mouth quality can be overwhelming if not balanced properly.

By serving it atop a lightly salted cracker, you introduce an essential contrast—crispness and subtle saltiness that cut through the creaminess. This balance is crucial because it prevents the dish from feeling heavy or one-dimensional.

Now, adding pecans to the mix brings another layer of complexity.

The toasted pecan’s natural sweetness and earthy crunch act as a bridge between the smooth foie gras and the crisp cracker.

It’s a delicate dance of textures and flavors, where each bite offers something new—a little sweetness, a little salt, a subtle crunch, and a velvety finish.

Moreover, this canapé is an excellent example of culinary restraint. It doesn’t rely on elaborate sauces or overwhelming garnishes.


Q: How important is the quality of the foie gras in this recipe?

A: Quality is absolutely paramount. Foie gras is a product that varies tremendously depending on its source, preparation, and freshness. For canapés like these, you want foie gras that is silky and fragrant, with a clean finish. Poor quality foie gras can be overly gamey or waxy, which detracts from the overall experience.

When you select foie gras, look for a smooth texture without any dryness or discoloration.

Whether you opt for a terrine, pâté, or fresh slices, make sure it is handled carefully and kept at the right temperature to preserve its delicate character.

The beauty of a simple canapé is that any flaw in the foie gras will be glaringly obvious, so investing in the best you can find is non-negotiable.

It’s what turns a good appetizer into an extraordinary one.


Q: Can this canapé be prepared ahead of time, or should it be assembled just before serving?

A: The ideal approach is to prepare the components ahead but assemble just before serving. You can slice the foie gras carefully and prepare the onion confit days in advance—both store well under proper refrigeration.

The pecans should be toasted and kept in an airtight container to maintain their crunch.

However, once you place the foie gras onto the crackers and add the toppings, the crackers risk becoming soggy if left too long.

The contrast between the crisp base and the creamy topping is one of the defining pleasures of this canapé, so it’s best to assemble these moments before serving.

If you must prepare fully in advance, consider serving the foie gras and accompaniments separately, allowing guests to build their own bites.

This adds an element of interaction and preserves the integrity of each texture.


Q: What kind of occasion suits serving these foie gras and pecan cracker canapés?

A: This canapé is perfectly suited for occasions where sophistication and intimacy are valued. Whether it’s a festive holiday gathering, an elegant dinner party, or a refined cocktail event, these bites make an impression without overwhelming the meal.

They set a tone of understated luxury—something that says you care about quality and detail.

Because foie gras carries cultural and culinary significance, serving it shows respect for tradition and a willingness to share something special.

It’s not a canapé for casual or rushed moments, but rather for those times when people want to connect, savor, and appreciate both company and cuisine.“

Serve them on toasted brioche rounds — our 10-minute brioche is ideal for this.”

Just in 10 Minutes: The Ultimate Trio Dip with Golden Twists & Crispy Toasts

Golden puff pastry twists, grilled bread toasts, and a creamy dip on a serving board.

trio dip recipe

Imagine the moment just before your guests arrive: the table set, the light low, and the air scented with something buttery and faintly smoky.

At the center of it all lies a generous bowl of creamy, luxurious dip—warm, inviting, and impossibly smooth.

Surrounding it, like golden sunrays, are puff pastry twists: each one hand-rolled and baked to a perfect crisp, their flaky layers catching the light and snapping gently between the fingers.

Next to them, an assortment of miniature toasts, lightly grilled, brushed with olive oil and coaxed to the very edge of caramelization.

These aren’t just accompaniments. They are characters in their own right—grilled to bring out rustic depth, twisted to add whimsy, and prepared to cradle the dip with texture and grace.

The contrast of warm crunch and silken dip creates a bite that is at once simple and refined. Whether dipped, scooped, or elegantly broken, each element invites you to linger a little longer at the table.

This is not an appetizer. It’s an overture. A quiet but confident beginning that sets the stage for what’s to come: shared stories, good wine, and laughter that fills the room.

“For best results, try our Quick Puff Pastry from Scratch for those golden twists!”

Ingredients for 6 to 8 guests:

  • 2 packs of puff pastry twists.
    Choose high-quality puff pastry twists, preferably those made with real butter for optimal flavor and flakiness.
  • These will serve as the primary dippers, offering a golden, crispy contrast to the creaminess of the dip.
  • 1 pack of mini toasted breads
    Select a variety of finely sliced miniature toasts or crostini. Ideally, they should be gently grilled or oven-toasted to achieve a delicate crunch without being too hard. These will complement the puff pastry with a more rustic, wheaty base.
  • 200 ml of light crème fraîche.
    Use a reduced-fat crème fraîche to create a dip that is smooth and luscious without being overly heavy.
  • This forms the creamy base of your dip, offering a mild tang and a silky texture.
  • 1 tablespoon of tapenade.
    Incorporate a spoonful of classic black or green olive tapenade for depth and umami. This Mediterranean spread brings a salty, rich dimension to the cream base, balancing its freshness with earthy intensity.

1 tablespoon of dried persillade.


A blend typically composed of parsley and garlic, dried persillade adds an herbaceous, and slightly pungent note that enhances the aromatic quality of the dip.

  • Rehydrate slightly if desired, or allow the crème fraîche to absorb and soften it naturally.
  • 1 tablespoon of sun-dried tomato caviar.
    This concentrated tomato paste, often made from finely blended sun-dried tomatoes, adds a sweet and savory accent.
  • It enriches the dip with a subtle fruitiness and a deep red hue that hints at slow Mediterranean afternoons.
  • Fine sea salt and freshly ground black pepper, to taste.
    Season delicately, allowing the natural flavors of the tapenade and tomato caviar to shine.
  • A light touch of salt heightens the savory notes, while a grind or two of black pepper adds gentle warmth and complexity.

Preparation

Begin by placing three small serving bowls side by side—preferably matching in style or color for a cohesive and inviting presentation.

Into each bowl, pour an equal portion of the light crème fraîche, carefully dividing .the 200 ml so that each bowl receives just enough to serve as the base for a distinct flavor variation.

Use a small spoon or spatula to smooth the surface of the crème in each bowl, ensuring an even texture.

Now, season each portion lightly with a pinch of fine sea salt and a gentle twist of freshly ground black pepper.

Stir gently to incorporate, allowing the seasoning to blend fully with the creamy base without disrupting its smooth consistency.

“Classic hummus is a staple in Middle Eastern cuisine. Yotam Ottolenghi shares a traditional version here.”

Next, begin creating the flavor pairings:

  • In the first bowl, add a generous tablespoon of olive tapenade.
  • Using a spoon, gently fold the tapenade into the crème fraîche, watching as the two combine. into a subtly marbled mixture of cream and dark olive richness
  • . Continue stirring until the color is even and the flavor fully integrated. This dip will offer a briny, savory punch—bold and sophisticated.
  • In the second bowl, introduce a full tablespoon of dried persillade.
  • Let the herbs begin to absorb some of the moisture from the crème fraîche as you stir, releasing their aromatic notes of garlic and parsley. The blend should take on a faint greenish hue and a lightly speckled texture, signaling the presence of herbs throughout.
  • In the third bowl, add a spoonful of sun-dried tomato caviar.
  • This concentrated ingredient, often deep red and rich in consistency, will blend into .the crème fraîche to create a vibrant, slightly sweet, and deeply flavorful spread. Stir gently but thoroughly, until the mixture becomes a soft terracotta color with the occasional fleck of tomato visible.
Once all three dips are fully prepared

cover and chill them for about 10 to 15 minutes if time allows—just long enough to let the flavors meld and the texture settle.

When ready to serve, arrange the three bowls on a serving platter or wooden board. Surround them artfully with the grilled puff pastry twists, placing them at varying angles for a touch of rustic charm. Then add a scattering of mini toasted breads, either plain or lightly brushed with olive oil before grilling, ready to be spread or dipped.

Encourage guests to explore each dip: to swipe the golden, flaky twists through the tapenade-laced cream, or to spread the tomato and herb variations generously over the crispy toasts.

The variety of textures and flavors makes this both a playful and refined way to begin a meal—or to accompany drinks in style.

Conclusion

This trio of dips, paired with crisp puff pastry twists and delicate grilled toasts, offers more than just a prelude to a meal—it is an invitation to slow down, gather, and savor.

Each element, from the buttery crunch of the feuilletés to the silken depth of the seasoned crème fraîche, has been chosen not for complexity, but for harmony. Together, they form a tableau of texture, taste, and conviviality.

What makes this dish particularly special is its effortless elegance. It requires no elaborate cooking, no complicated techniques—just thoughtful assembly and attention to balance.

The ingredients speak for themselves: the boldness of tapenade, the brightness of herbs, the sun-drenched sweetness of tomato caviar, all tempered by the gentle richness of crème fraîche.

The result

is a set of flavors that feel both familiar and refined, perfect for sharing on a quiet evening or at the start of a festive gathering.

More than anything, this is food meant to be touched, shared, and enjoyed with company. It encourages interaction, sparks conversation, and turns even the simplest moment into something memorable. Whether served at a cocktail party, as a prelude to a leisurely dinner, or as a centerpiece for an apéritif among friends, this spread promises satisfaction without excess, indulgence without pretense.

So take your time. Let your guests linger. And above all, let this deliciously unhurried experience remind you of what makes entertaining so deeply rewarding: the pleasure of good food, beautifully served, and generously shared.

Q: Chef, what makes this trio of dips with puff pastry twists and grilled toasts .stand out from a typical appetizer platter?

A: Ah, that’s an excellent question.
What elevates this simple offering to something truly memorable is not the complexity of the preparation, but rather the intention behind it. Anyone can lay out crackers and a bowl of store-bought dip.

But when you take the time to compose three distinct flavor profiles—each with its own character, each balanced and complementary—you create an experience, not just a snack.

Let’s take the base, the crème fraîche. It’s light yet luscious, with a subtle tang that supports both bold and delicate additions. By dividing it and blending it thoughtfully—

with a deep, briny tapenade in one, a rustic herbaceous persillade in another, and the sweet-savory richness .of sun-dried tomato caviar in the third—you offer your guests three perspectives on the same core ingredient.

This isn’t just clever. It’s smart cuisine: using restraint, balance, and contrast to full effect.

Then there’s the matter of texture.

A true chef knows that flavor is only part of the picture. The puff pastry twists? They bring a buttery, flaky crunch that practically melts in the mouth after the first bite. The grilled toasts? Earthier, sturdier, designed to hold a generous smear of dip without losing integrity. The combination keeps the palate alert and engaged.

But perhaps most importantly, this dish speaks to a certain philosophy I hold dear: that food should never be rushed. This presentation encourages dipping, passing, savoring. It draws people in. It’s generous. It’s warm.

In a way, it becomes the quiet heartbeat of the table—the thing everyone keeps returning to between sips and stories.

So yes, it’s simple. But in the hands of someone who cares about detail, timing, and harmony—it becomes something far greater than the sum of its parts. That, to me, is the essence of good cooking.

Top Pâtissier 5 Secret: The Rosette Cookie That Melts Hearts

Piped shortbread cookies shaped into rosettes with almonds on top, displayed on a silicone baking mat.

rosette cookie recipe

Delicately golden, finely textured, and elegantly shaped, piped shortbread cookies are a timeless treat that blend artisanal beauty with classic indulgence. Their graceful ridges—formed using a fluted piping tip—are not just visually appealing but also a testament to refined pastry technique. These elegant little biscuits embody both precision and poetry in every swirl.

Crumbly yet tender, rich yet light, they melt in the mouth with a subtle buttery finish that lingers just long enough to delight the senses. Often enhanced with a touch of chocolate drizzle or a jewel-like center of jam, they never lose their understated sophistication. Behind their simple charm lies a carefully executed method where texture, piping consistency, and baking finesse come together to create a biscuit that’s as satisfying to look at as it is to eat.

Perfect for afternoon tea, holiday platters, or simply as a homemade gift, piped shortbread cookies offer a moment of calm luxury—a pause filled with sweetness and tradition. Every bite is an invitation to slow down, savor the moment, and celebrate the art of fine baking.

Piped Shortbread Cookies (Sablés Pochés)

Delicate, buttery, and artfully piped—these classic French cookies are a study in finesse.


Yield

Makes approximately 15 cookies

Preparation Time

30 minutes (excluding resting time)

Resting Time

2 to 3 hours in the refrigerator

Baking Time

10 minutes in a preheated oven

Storage

Keeps for up to 2 weeks in an airtight container, stored in a cool, dry place.


Required Equipment

  • Fine-mesh sieve (for aerating dry ingredients)
  • Piping bag fitted with a fluted/star tip (18 mm diameter recommended)
  • Silicone baking mat (or parchment paper)
  • Mixing bowls, rubber spatula, zester, and optionally, a stand mixer or hand mixer

Ingredients

  • 125 g unsalted butter, softened to pommade consistency (smooth and spreadable, but not melted)
  • 100 g icing sugar, sifted
  • 50 g whole egg (approximately one medium egg, beaten and weighed)
  • ½ vanilla bean, seeds scraped (or substitute with quality vanilla paste)
  • Zest of ½ lime (finely grated, untreated fruit preferred)
  • 250 g all-purpose flour, sifted
  • 5 g baking powder, sifted with the flour
  • 15 whole blanched almonds, to top each cookie before baking

Step-by-Step Instructions

1. Prepare the Butter Mixture

In a large bowl (or the bowl of a stand mixer fitted with the paddle attachment), work the softened butter until smooth and creamy. It should resemble a pomade texture—supple, but not oily or melted.

Add the sifted icing sugar and beat gently until the mixture becomes pale and fluffy. Take care not to incorporate too much air if using a stand mixer; a low to medium speed is ideal.

2. Incorporate the Flavors

Add the seeds from half a vanilla pod (or a small amount of vanilla paste), followed by the finely grated zest of half a lime. Mix gently to distribute the aromas evenly throughout the buttercream base. The citrus zest will bring a bright, subtle note to the final cookie.

3. Emulsify with Egg

Gradually add the beaten egg in a thin stream, mixing thoroughly between additions. This step helps create a smooth, cohesive dough. If the mixture begins to separate slightly, continue mixing slowly until it returns to a uniform consistency.

4. Fold in the Dry Ingredients

In a separate bowl, sift together the flour and baking powder. Add the dry mixture to the butter base in several additions, mixing with a spatula or on low speed until just combined. Do not overwork the dough—stop as soon as it comes together. The dough should be soft but not sticky, and able to hold its shape when piped.

5. Rest the Dough

Transfer the dough into a piping bag fitted with an 18 mm fluted/star tip. Pipe the dough directly onto a silicone mat or baking sheet in the desired shape—typically a horseshoe, S-curve, or circle. Make sure the cookies are evenly sized and spaced at least 3 cm apart.

Once piped, place the tray in the refrigerator and let the cookies rest for 2 to 3 hours. This step is essential: it allows the dough to firm up, prevents spreading during baking, and improves flavor and texture.

6. Preheat the Oven

About 15 minutes before baking, preheat your oven to 170°C (340°F), fan off. A conventional oven is best for even browning.

7. Add the Final Touch

Just before baking, gently press one blanched almond into the center of each cookie. The almond adds a subtle crunch and a beautiful visual contrast once baked.

8. Bake to Perfection

Bake the cookies on the middle rack for approximately 10 minutes, or until the edges begin to turn a light golden brown. The goal is a gentle bake—don’t let them darken too much, or you’ll lose the delicate melt-in-the-mouth texture.

Remove from the oven and allow the cookies to cool on the tray for a few minutes before transferring them to a wire rack to cool completely.


Storage Tips

Once completely cooled, store the cookies in an airtight container. They will stay fresh and crisp for up to 2 weeks. For added elegance, you can partially dip them in tempered chocolate or drizzle with glaze just before serving.

In a mixing bowl, work the butter until it reaches a soft, creamy consistency—what the French call pommade. Add the icing sugar and mix until smooth. Incorporate the beaten egg and vanilla, mixing gently until fully combined.

Next, add the lime zest, then sift in the flour and baking powder. Fold everything together just until the dough is smooth—avoid overmixing or aerating the dough.

Transfer the dough into a piping bag fitted with a fluted tip. Pipe small rosettes, about 3 cm in diameter, onto a baking tray lined with a silicone mat. Gently place one whole blanched almond at the center of each rosette.

Allow the cookies to rest and form a light crust (croûter) at room temperature for 2 to 3 hours. This step helps preserve their shape during baking.

Preheat the oven to 220°C (about 430°F, gas mark 7/8). Bake for approximately 10 minutes, or until the edges are lightly golden. Let cool completely before serving or storing.

These piped shortbread cookies are more than just a sweet indulgence—they are a celebration of precision, patience, and the quiet pleasure of handmade baking. From the moment you begin creaming the butter to the final golden turn in the oven, every step is infused with care and craft. The crisp edges, the soft center, the fragrance of citrus and vanilla, and the delicate presence of a single almond on top—each detail speaks of tradition and elegance.

Letting the cookies rest before baking may seem like a simple step, but it’s this pause that allows the dough to settle, the shapes to hold, and the flavors to deepen. It’s a reminder that some of the most rewarding results in baking come not from rushing, but from respecting the process.

Whether you serve them with tea, gift them in a ribbon-tied box, or enjoy them quietly with your morning coffee, these sablés bring a touch of French pâtisserie into the everyday. They are proof that beauty and flavor often lie in the simplest things—so long as they are made with intention.

So go ahead: take the time, savor the ritual, and let these little rosettes become a cherished part of your baking repertoire.

Frequently Asked Questions

Can I skip the resting time before baking?

It’s not recommended. Resting the cookies for 2 to 3 hours helps them form a slight crust, which preserves their piped shape during baking and enhances texture. Skipping this step may result in flatter or misshapen cookies.


My dough is too stiff to pipe. What should I do?

If the dough is difficult to pipe, it may be too cold or overworked. Let it sit at room temperature for 10–15 minutes to soften slightly, and try again. You can also check that your butter was properly softened before mixing.


Can I make the dough in advance?

Yes. You can prepare the dough a day in advance and refrigerate it, already piped onto the tray. Just cover it loosely with plastic wrap and bake the next day.


Is it possible to freeze the cookies?

Yes, both the raw piped dough and the baked cookies freeze well. Freeze the unbaked piped cookies on a tray, then transfer to a container once firm. Bake from frozen, adding 1–2 minutes to the baking time. Baked cookies can be frozen for up to a month.


Can I use other flavors instead of lime and vanilla?

Absolutely! Lemon zest, orange zest, tonka bean, or even a hint of almond extract work beautifully. Just be sure not to overpower the delicate butter base.


What if I don’t have a piping bag or a fluted tip?

For a more rustic version, you can roll the dough into small balls and press them gently with a fork. The texture will differ slightly, but the flavor will remain delicious.

External Link Suggestion:

Wrapped & Ready: Parma Cheese Wafers in Just 2 Minutes

Crispy cheese wafers wrapped in thin slices of Parma ham, garnished with fresh basil.

parma cheese wafers

Imagine a sophisticated appetizer that perfectly marries lightness and intense flavor — these Parma ham-wrapped wafers deliver just that.

The crisp, airy texture of the wafer provides an elegant contrast to the rich, savory notes of thinly sliced Parma ham.

This combination is a celebration of simplicity and refinement, ideal for impressing guests at any gathering or for savoring a luxurious snack.

The wafers offer a subtle crunch that gives way to the melt-in-the-mouth quality of the ham, renowned for its delicate saltiness and deep umami flavor.

Each bite is a harmonious balance of textures and tastes, where the wafer’s mildness enhances the savory depth without overwhelming it.

Perfect for pairing with a glass of sparkling wine or a light white, these bites embody the art of minimalism in haute cuisine.

Their presentation is as striking as their taste, making them an ideal choice for festive occasions or elegant receptions.

Crafting these requires attention to detail — selecting wafers that maintain their crispness while complementing .

the softness of the ham, and arranging them with care to highlight the beauty of each element.

The result is a sophisticated appetizer that feels indulgent without being heavy, leaving a lasting impression on every palate.: What is Parmigiano Reggiano? – Cheese.com

Ingredients for 4 Servings

  • A packet of Emmental cheese wafers: These delicate, crisp cheese wafers form the perfect base for the appetizer.
  • Their light, airy texture contrasts beautifully with the other components.
  • while the subtle nuttiness and mild sharpness of Emmental cheese add a savory depth.
  • The wafers are thin and crunchy, ideal for creating elegant bite-sized snacks that offer a satisfying snap with every bite.
  • Five thin slices of Parma ham: Known for its exquisite quality and rich, nuanced flavor, Parma ham brings.
  • a silky, melt-in-the-mouth texture with a balanced saltiness and sweet undertones.
  • The ham’s thinness allows it to gently envelop the wafer without overpowering it, creating a harmonious marriage of taste and texture.
  • Its slightly cured, aromatic profile elevates the simple wafer into a gourmet experience.
  • A fresh bouquet of basil: The vibrant, fragrant basil leaves add a refreshing herbal note that brightens the richness of the cheese and ham.
  • Their subtle peppery and sweet aroma provides an aromatic lift and adds a beautiful burst of green color to the presentation.
  • Basil perfectly complements the savory ingredients, enhancing the overall flavor complexity with a hint of Mediterranean freshness.

Step-by-Step Preparation

Begin by selecting the finest slices of Parma ham — each one should be thin, supple.

and free of excess fat, allowing it to drape easily without tearing.

Lay a slice flat on a clean, dry surface, preferably a chilled marble board or non-stick mat to keep the ham cool and manageable.

Take a fresh, small basil leaf — vibrant green and unblemished — and place it gently in the center of the ham slice.

The basil not only brings a burst of herbal freshness but also adds a visual elegance and aromatic lift that balances the richness of the ham and chee

take one Emmental cheese wafer stick.

The wafer should be crisp and evenly shaped, offering a satisfying crunch and a subtle cheese flavor.

that pairs beautifully with the salty, umami notes of the cured ham. Carefully position the wafer stick at one end of the ham slice, just atop the basil leaf.

Begin wrapping by slowly rolling the ham around the wafer, using your fingers to guide the slice evenly around it.

The goal is to create a snug but gentle wrap that doesn’t compress the wafer, allowing it to maintain its light texture and delicate structure.

As you roll, ensure that the basil leaf remains visible through the translucent ham or peeks out slightly at the end for an added visual touch.

Repeat this process for each wafer stick,

working slowly and mindfully. The wrapping should feel almost meditative —

it’s in these small acts of care and attention that refined appetizers are born.

Once all the wafers are wrapped, arrange them neatly on a serving tray lined with parchment paper, or stand them upright in a narrow glass or porcelain dish for a chic and modern presentation.

These little bites are best served immediately to preserve the crispness of the wafers, but if prepared in advance.

they can be loosely covered and stored in the refrigerator for a short time. Allow them to return to room temperature before serving to let the full flavor of the ham and basil bloom.

Chef’s Technique

Begin by laying out the slices of Parma ham on a chilled work surface, ideally a marble or stainless steel countertop to maintain freshness and optimal handling texture.

Ensure each slice is paper-thin, evenly cut, and without excess moisture. Trim if necessary for uniformity.

Select small, fresh basil leaves — ideally of similar size — and gently pat them dry.

Place one basil leaf at the center of each ham slice, ensuring its edges don’t extend beyond the final wrap to maintain a clean finish.

Next, take one Emmental-flavored cheese wafer baton and place it precisely at one end of the ham slice.

positioned directly over the basil leaf. The wafer should be crisp and unbroken, as its integrity is key to the final texture.

If the wafers are slightly curved or uneven, rotate them to find the most stable resting side before wrapping.

With clean,

dry hands, begin rolling the ham around the wafer tightly but without applying pressure that might cause the wafer to crack.

The basil leaf should remain tucked inside, acting as a fragrant middle note between the creamy cheese flavor and the aged ham’s umami profile.

Once wrapped, the ends of the ham should overlap slightly and adhere to themselves — no need for toothpicks or garnish to hold them in place if sliced correctly.

Repeat the process for all remaining wafers, maintaining consistency in length and wrapping tension across each piece.

Arrange the prepared gaufrettes on a chilled porcelain tray or a slate board for contrast.

If holding for service, store lightly covered in a refrigerated container lined with parchment.

but note that for best textural experience, these are best assembled à la minute.

Allow to temper slightly before service to enhance aroma and mouthfeel —

the basil will release its natural oils, the ham will soften, and the Emmental will shine through in aroma and taste.

Conclusion

This simple yet elegant preparation is a masterclass in balance — in taste, in texture, and in restraint.

What begins as a trio of humble ingredients transforms, through precision and intention, into a refined hors d’œuvre worthy of the most polished table.

Each element plays its part: the crispness of the cheese wafer offers structure and salt; the silky Parma ham provides .

a rich, umami-laced counterpoint; and the basil, though subtle, lifts the entire composition with a whisper of freshness and perfume.

There is beauty in this kind of minimalism

— not for its simplicity alone, but for the demand it places on quality and execution.

With so few components, each must be chosen with care and handled with respect: the ham must be sliced to a near-translucent fineness; the basil must be vibrant and whole; the wafers, perfectly crisp.

There is no room to hide flaws — and therein lies the challenge and the elegance of this creation.

Serve these bites at the start of a summer lunch, on a canapé tray at an apéritif dînatoire, or as part of a composed antipasto board.

However you choose to present them, they will invite conversation — not only because they’re delicious, but because they express thoughtfulness and taste in every detail.

They’re a reminder that finesse isn’t about complexity; it’s about care.

And sometimes, the most memorable dishes are those that whisper, rather than shout.Link to: Tools of the Trad, 10-Minute Brioche,

Q&A – Chef’s Notes

Q: Can I prepare these ahead of time for a cocktail party?
A: Yes, you can prepare them up to 2–3 hours in advance. Store them in an airtight container lined with parchment paper and refrigerate.

However, to preserve the crispness of the wafers and the aroma of the basil, allow them to come to room temperature for 10–15 minutes before serving.


Q: What can I use instead of Emmental cheese wafers?
A: If Emmental-flavored wafers are unavailable, opt for neutral cheese straws, lightly salted crackers, or any thin.

crispy biscuit with a mild cheese note. The key is to preserve the contrast of crunch and creaminess without overpowering the Parma ham.


Q: Can I substitute another herb for the basil?


A: Certainly — though basil is preferred for its fragrance and Mediterranean character.

small leaves of fresh oregano, arugula microgreens, or even a touch of rosemary can work. Choose herbs that pair harmoniously with aged ham.


Q: How do I make this dish look more festive?
A: Presentation elevates simplicity.

Try standing each roll vertically in a shot glass, or serve them upright in a small tumbler filled with coarse salt.

or lentils to hold them in place. Garnish with a fresh herb sprig or a curl of lemon zest for color.


Q: What drink pairs best with this appetizer?
A: A dry Prosecco or sparkling rosé makes an excellent pairing.

Their acidity and effervescence cut through the richness of the ham and balance. the saltiness, while enhancing the herbal freshness of the basil.

Secrets Wrapped in Sweetness: Salted Butter Caramel Macarons

Close-up of golden brown salted butter caramel macarons with smooth caramel filling, showcasing delicate, glossy shells and a tender interior.

Salted Caramel Macarons recipe

Salted butter caramel macarons are a sublime marriage of delicate textures and rich flavors, showcasing the art of French pastry at its finest.

These little gems begin with the quintessential macaron shell — smooth, glossy, and perfectly crisp on the outside, giving way to a tender, chewy interior.

Achieving this flawless shell requires patience and precision, from expertly whipping the meringue to folding the batter with just the right technique and timing.

At the heart of these macarons lies the luscious salted butter caramel filling.

This sumptuous cream captures the deep, complex notes of caramelized sugar, balanced impeccably by a hint of sea salt that elevates the sweetness and adds a tantalizing depth.

The silky texture of the caramel buttercream provides a luxurious contrast to the lightness of the shells, creating a harmony of flavors that dances on the palate.

Each bite is an exquisite experience: the initial crisp snap of the macaron shell, followed by the rich, velvety caramel that melts smoothly, leaving behind a subtle hint of saltiness that lingers and delights.

Whether enjoyed as a sophisticated dessert at a dinner party or a special treat with afternoon tea, these macarons embody elegance, craftsmanship, and indulgence.

Making salted butter caramel macarons is as much a journey as a destination.

From mastering the delicate meringue to perfecting the caramel’s flavor and texture, this recipe invites both the novice and the seasoned baker to explore the subtle complexities of French pastry.

The result is not just a cookie, but a true masterpiece of taste and technique, guaranteed to impress and satisfy

Salted Butter Caramel Macarons for 12 Pieces

Preparation Time: 1 hour 45 minutes
Refrigeration Time: 3 hours
Storage: 3 to 4 days in the refrigerator

Equipment Needed:

  • Cooking thermometer
  • Immersion blender
  • Piping bag with a plain round tip (8 or 10 mm diameter)

This recipe yields 24 macaron shells (refer to your favorite basic macaron shell recipe).

A touch of brown water-soluble powdered coloring adds a subtle hue to enhance the caramel theme.

The heart of these macarons is a silky salted butter caramel filling — a delicate balance of rich caramel sweetness and a hint of sea salt that awakens the palate.

The preparation involves carefully cooking the caramel to achieve the perfect texture and flavor, then incorporating butter and cream to create a luxuriously smooth ganache.

After assembling, the macarons require refrigeration to allow the flavors to meld and the texture to harmonize, resulting in a tender yet crisp bite.

Stored properly, these macarons keep their freshness and flavor for several days, making them ideal for celebrations or gifting.

Mastering this recipe is a rewarding experience, blending precision with artistry, and delivering an elegant treat that delights both visually and in taste.

Macaron Shells

Prepare the macaron shells according to your favorite recipe and add the brown powder food coloring to achieve the desired hue.


Salted Butter Caramel Filling

In a saucepan, cook the glucose together with the sugar until it forms a caramel.

Meanwhile, bring the cream and the sweetened condensed milk to a boil.

Carefully deglaze the caramel by pouring the hot cream and condensed milk mixture over it.

Weigh the resulting mixture and add water to reach a total weight of 140 grams.

When the caramel cools down to between 35 and 40 °C (95–104 °F), add the softened butter cut into pieces and the fleur de sel (sea salt).

Using an immersion blender, blend the mixture until smooth and fully homogeneous.

Pour the caramel onto a tray lined with plastic wrap,

cover it tightly with plastic wrap pressed directly onto the surface to prevent a skin from forming, and refrigerate for at least 1 hour.


Assembly

Fill a piping bag fitted with a plain round tip (8 or 10 mm diameter) with the salted butter caramel. Pipe the caramel onto every other macaron shell.

Carefully sandwich with a second shell.

Refrigerate the assembled macarons for at least 2 hours before serving to allow the flavors to meld and the texture to develop.

Chef’s Tips and Tricks for Perfect Salted Butter Caramel Macarons

  • Prepare in Advance: For best results, make the macarons the day before serving. After assembling, store them at room temperature in an airtight container.
  • This resting period allows the flavors to fully develop and the texture of the shells and filling to harmonize beautifully.
  • Avoid refrigerating for extended periods once assembled, as this can affect the delicate texture.
  • Achieving the Perfect Caramel Color and Flavor: When cooking the sugar dry to make the caramel.
  • consider extending the cooking time slightly to deepen the caramel’s color.
  • A richer amber hue means a more intense and complex flavor with subtle toasted notes. However, be vigilant — overcooking can quickly lead to bitterness.
  • The goal is to develop depth without compromising smoothness and sweetness.
  • Butter Temperature is Key: Incorporating the butter at precisely the right temperature (between 35 and 40 °C / 95–104 °F) is crucial. If the butter is too cold, it won’t blend smoothly, resulting in a grainy or unstable caramel. Too warm, and the mixture may become too soft or separate.
  • This ideal temperature range ensures the butter remains stable in the final caramel.
  • yielding a velvety, spreadable consistency that holds perfectly inside the macarons.
Use an Immersion Blender for a Silky Texture:
  • After adding butter and salt, using an immersion blender to emulsify the caramel guarantees.
  • a smooth, homogeneous filling free of lumps, with a luxurious mouthfeel.
  • Rest the Caramel Properly: Let the caramel rest covered in the fridge for at least an hour, or until it firms up enough to pipe easily.
  • Covering the surface directly with plastic wrap prevents the formation of an unwanted skin.
  • Piping Precision: When filling the macarons, use a piping tip between 8 and 10 mm to control the size and shape of the caramel dollops.
  • Too much filling may cause the macarons to crack or ooze; too little and the flavor balance is lost.
  • Flavor Balance: The salted butter caramel should be rich but well balanced — the hint of fleur de sel should accentuate
  • the caramel’s sweetness without overpowering it, adding a subtle savory contrast that enhances the overall experience.

External Link Suggestion:

3 Secrets Inside: Pistachio Choux with a Citrus Soul

Close-up of a Pistachoux pastry showing a golden craquelin topping, creamy pistachio filling, and a vibrant lemon cream insert in the center.

pistachio choux recipe

Delicately crisp on the outside and sumptuously soft within, the Pistachoux is a celebration of refinement and indulgence. Inspired by the grand tradition of French pâtisserie, this elegant creation brings together the airy lightness of pâte à choux and the rich, nutty sophistication of pistachio in a harmony of textures and flavors.

Each piece is crafted with precision, beginning with a perfectly baked choux shell — golden, tender, and just the right balance of crunch and chew. The heart of the Pistachoux reveals a luscious pistachio cream, smooth and silky, offering an intense yet nuanced nutty note that lingers delicately on the palate. Often crowned with a glossy glaze or a subtle decorative crunch, it’s as pleasing to the eye as it is to the taste buds.

Ideal for refined tea times, celebratory tables, or as a signature treat for those with a taste for the exquisite, the Pistachoux is more than a pastry — it’s a moment of Parisian charm, bite after luxurious bite.“Try our basic pâte à choux tutorial before making this bold flavor variation.”

For 6pistachio choux recipe
Preparation Time: 2 hours
Baking Time: 1 hour 15 minutes
Storage: Best enjoyed within 24 hours

Equipment Needed:

  • Whisk: For mixing creams and batters smoothly by hand.
  • Immersion Blender: Essential for emulsifying creams or ganache to a perfect texture.
  • Silicone Half-Sphere Molds: Used to shape inserts or fillings — ideal for freezing and unmolding cleanly.
  • Vegetable Peeler: Handy for shaving chocolate, zesting citrus, or prepping pistachios.
  • Fine Sieve: For straining custards or sifting dry ingredients to ensure a lump-free result.
  • Food Processor: For grinding nuts into paste or blending components into a smooth texture.
  • Rolling Pin: Useful if the recipe includes a thin base or craquelin topping.
  • Sifter or Fine Mesh Strainer: To aerate flour or icing sugar and eliminate clumps.
  • Stand Mixer: Speeds up the process for whipping creams, making pâte à choux, or kneading dough.
  • Piping Bag + 15 mm Plain Tip (Round Nozzle): For clean, precise filling and shaping of choux pastries

Ingredients

Lemon Cream Insert

  • 300 g unsalted butter
  • 480 g granulated sugar
  • 600 g whole eggs
  • 320 g fresh lemon juice (yellow lemons)
  • 16 g lime zest
  • 36 g gelatin mass

Lemon Confit

  • 100 g lemon zest
  • 250 g fresh lemon juice
  • 150 g granulated sugar
  • 12 g lemon verbena leaves

Cocoa Streusel

  • 195 g all-purpose flour (T55)
  • 30 g unsweetened cocoa powder
  • 223 g toasted almond flour
  • 223 g light brown sugar
  • 4 g fleur de sel
  • 223 g unsalted butter

Craquelin (Crispy Topping)

  • 80 g softened butter
  • 100 g light brown sugar
  • 100 g all-purpose flour

Choux Pastry

  • 187 g semi-skimmed milk
  • 187 g water
  • 165 g unsalted butter
  • 3 g fleur de sel
  • 22 g sugar
  • 214 g all-purpose flour (T55)
  • 375 g whole eggs

Pistachio Pastry Cream

  • 336 g semi-skimmed milk
  • 60 g heavy cream
  • 74 g granulated sugar
  • 80 g egg yolks
  • 36 g cornstarch
  • 186 g unsalted butter
  • 50 g gelatin mass
  • 214 g pistachio paste

pistachio choux recipe

Lemon Cream Insert

Heat the butter and granulated sugar in a saucepan. Once the mixture is smooth and fully melted, add the eggs, fresh lemon juice, and lime zest. Place over medium heat and cook, whisking continuously, until the mixture comes to a gentle simmer.

Immediately remove from the heat, stir in the gelatin mass, and blend the mixture using an immersion blender until smooth.

Pour the lemon cream into silicone half-sphere molds — slightly smaller than the choux shells — and refrigerate until set.


Lemon Confit

Wash the lemons thoroughly. Using a vegetable peeler, remove the zest, leaving behind as much of the white pith as possible (as it adds bitterness).

Place the zest in a small saucepan filled halfway with water and bring to a boil to blanch. Drain through a sieve and repeat the blanching process two more times — blanching three times helps preserve the aroma while removing bitterness.

Place the blanched zest back into a saucepan with the lemon juice and sugar. Simmer over medium heat for 40 to 50 minutes, until the mixture has reduced and thickened.

Add the lemon verbena leaves, then blend the mixture while still hot in a food processor until smooth. Be aware: this preparation is intensely tart and full of flavor. Use only a small amount in the center of each lemon cream insert.


Cocoa Streusel

In a mixing bowl, combine all the dry ingredients. Add the cold butter cut into small cubes, then rub everything together between your fingers until the mixture takes on a sandy texture.

Roll or press the streusel out into a thin layer on a baking sheet lined with parchment paper.

Bake at 150°C (300°F) for 20 minutes, or until crisp and lightly browned

Craquelin (Crispy Topping)

Mix the light brown sugar and flour with the softened butter. Do not whip or incorporate air — just mix until smooth.

Roll the dough out between two sheets of parchment paper to a thickness of 2 mm. Transfer to the freezer and let it firm up completely.

Once solid, cut out small discs that match the size of your piped choux buns.


Choux Pastry

In a saucepan, bring the milk, water, butter, fleur de sel, and sugar to a boil.

Remove from the heat and immediately add the sifted flour all at once. Stir vigorously with a spatula until the mixture comes together into a dough and pulls away from the sides of the pan.

Dry the dough (panade) over medium heat for about 1 minute while stirring constantly.

Transfer the dough to the bowl of a stand mixer fitted with the paddle attachment (or whisk). Mix on medium speed until the steam dissipates and the dough cools slightly — it should no longer release visible steam.

Incorporate the eggs one at a time, mixing well after each addition until the dough becomes smooth and pipeable.

Transfer the choux dough into a piping bag fitted with a 15 mm plain tip. On a baking sheet, pipe 6 lines of 4 choux buns each, touching one another.

Place a craquelin disc on top of each choux.

Bake in a deck oven at 210°C (410°F) for 20 to 25 minutes, until golden brown and well puffed.


Pistachio Pastry Cream

In a saucepan, heat the milk and heavy cream together.

In a bowl, whisk the sugar and egg yolks until pale and creamy, then add the sifted cornstarch and mix well.

Pour the hot milk mixture over the egg yolk blend while whisking, then return the mixture to the saucepan.

Cook over medium heat, whisking constantly, until thickened like a classic pastry cream.

Remove from the heat and stir in the butter, gelatin mass, and pistachio paste. Mix thoroughly until smooth.


Assembly

Carefully cut each line of baked choux two-thirds of the way up, creating a “lid.”

Place a spoonful of cocoa streusel inside the base of each choux, then add a small amount of pistachio cream.

Set a frozen lemon cream insert in the center of each choux bun.

Pipe the remaining pistachio cream on top and sprinkle with additional streusel.

Replace the lids and dust lightly with icing sugar to finish.

Conclusion

The pistachio choux recipe is more than just a pastry — it is the embodiment of balance, technique, and refined indulgence. With its contrasting layers of crisp choux, delicate craquelin, silky pistachio cream, and the vibrant brightness of lemon, it invites the palate on a journey that is both nostalgic and innovative. Each element has been carefully composed: the comforting richness of the pistachio is lifted by the tart complexity of the citrus insert, while the textural interplay between the soft interior and the crisp topping elevates every bite into an experience.

Though this creation demands time, patience, and precision, it rewards the effort with a dessert that is as visually striking as it is flavorfully harmonious. Whether served as a showstopping centerpiece for a special occasion or enjoyed as a luxurious afternoon treat, the Pistachoux is sure to captivate and delight. It’s a testament to the magic of French pastry — where craftsmanship meets emotion, and tradition is reinvented with elegance.

So take your time, savor the process, and let your guests discover the hidden surprise at the heart of each choux. Because true pastry is not only about taste — it’s about evoking wonder.“Want to make your own pistachio paste? Check out this traditional Italian method from Eataly.”

Questions & Answers (FAQ)

Q: Can I make the Pistachoux in advance?
A: Yes — partially. The lemon inserts, confit, and streusel can all be prepared up to two days ahead. The inserts can even be frozen. However, for optimal texture and freshness, the final assembly should be done the same day you plan to serve them.

Q: Can I substitute the pistachio paste?
A: If you don’t have pistachio paste, you can use praline or hazelnut paste, but keep in mind this will change the flavor profile completely. To stay true to the Pistachoux identity, try to use a 100% pure pistachio paste if possible.

Q: What if I don’t have silicone half-sphere molds?
A: You can use a mini muffin silicone mold or even freeze the lemon cream flat and cut out rounds using a cookie cutter. The goal is to have a gelled insert that holds its shape and creates a surprise element in the center.

Q: Can I freeze the Pistachoux?
A: You can freeze the unfilled choux pastry. Once assembled, freezing is not ideal, as it will compromise the texture. If you need to plan ahead, freeze the components separately and assemble the day you serve them.

Q: What’s the difference between streusel and craquelin?
A: Streusel is a crumble topping baked separately and used for crunch and contrast, while craquelin is a thin layer of dough placed raw on top of the choux before baking — it melts into a crisp, crackled surface.

Q: Can I make this recipe without a stand mixer?
A: Yes, but it will require more manual effort — especially when incorporating the eggs into the choux dough or finishing the creams. A whisk, some elbow grease, and patience will get the job done!

A Chef’s Secret: Irresistible Blue Cheese & Pear Canapés in 3 Steps

Close-up of elegant canapés with crackers topped with creamy gorgonzola, thin pear slices, and smoked almonds on a dark serving platter

blue cheese pear canapés

These canapés are the very definition of balance in miniature form — an elegant bite that plays on contrasts of flavor and texture with sophisticated ease. Imagine the crisp base of a fine artisan cracker, delicate yet sturdy enough to support a luxurious topping. Atop it sits a velvety smear of Gorgonzola, that blue-veined Italian cheese known for its bold, creamy richness and tangy undertones.

This richness is immediately lifted and brightened by the inclusion of thinly sliced ripe pear — juicy, tender, and slightly floral. The fruit introduces a natural sweetness that perfectly offsets the assertiveness of the cheese, creating a dialogue on the palate rather than a clash.

To complete this composition, a single smoked almond crowns each canapé. Its crunch offers a final textural punctuation, while its deep, toasty, subtly smoky flavor adds warmth and complexity. The nut doesn’t dominate; it enhances — a clever final note that leaves a lasting impression.

These canapés are more than just hors d’œuvres — they’re an experience. They capture a spectrum of sensations in one perfect bite: creamy and crisp, sweet and savory, pungent and mellow, light and indulgent. Whether served at a festive cocktail hour, a refined apéritif dinatoire, or as a thoughtful amuse-bouche at a dinner party, they invite guests to pause and savor.

Best of all, they’re as simple to assemble as they are sophisticated in flavor — proof that elegance in cuisine does not always require complication, only intention and care in the choice of ingredients. Served cold or at room temperature, they pair beautifully with a chilled white wine like a Gewürztraminer or a sparkling Crémant, whose floral and mineral qualities complement both the cheese and the fruitOutbound Links | Example:
What Cheese Pairs Best with Pears? – The Cheese Professor

Ingredients (Serves 4 guests / approx. 16–20 canapés)

  • 1 box of artisanal crackers (plain or lightly salted)
    → Choose crisp, neutral-flavored crackers with a firm structure, such as water crackers or whole grain rounds. Avoid anything too brittle or highly seasoned, as the goal is to support — not overpower — the toppings. Aim for about 16 to 20 individual crackers, depending on size.
  • 1 ripe but firm pear (such as Williams, Bosc, or Comice)
    → Select a pear that is aromatic and slightly soft to the touch but not mushy. You want slices that hold their shape. Peel optional — the skin adds color and texture, but for a more refined look, you can remove it.
  • 50 grams (about 1.75 oz) of Gorgonzola cheese
    → Opt for a mild and creamy Gorgonzola Dolce if you prefer a gentler blue cheese flavor, or choose Gorgonzola Piccante for a stronger, more assertive profile. The cheese should be soft enough to spread easily at room temperature.
  • 1 small handful of smoked almonds (approx. 16–20 pieces)
    → Use whole smoked almonds, unsalted if possible, for clean, defined flavor. Chop them coarsely if desired, or place one whole almond per canapé for a bold visual and textural contrast.

Optional additions or variations (to elevate or customize):

  • A drizzle of wildflower honey or acacia honey for a touch of floral sweetness
  • A pinch of freshly cracked black pepper or micro herbs (like thyme or micro basil) for garnish
  • A splash of lemon juice to prevent browning of pear slices and enhance brightness
  • Toasted walnut halves as an alternative to smoked almonds, for a more rustic finish

Preparation Steps

  1. Prepare the pear:
    Rinse and dry the pear gently. Cut it into quarters, then remove the core and any fibrous parts. Slice each quarter into 4 even, thin wedges — you should end up with 16 delicate pear slices, one for each canapé. If not serving immediately, you may lightly brush the slices with lemon juice to preserve their color.
  2. Assemble the base:
    Lay out your crackers on a serving platter or tray, preferably something flat and neutral to highlight the presentation.
  3. Layer the flavors:
    On each cracker, place one slice of pear. Then, add a small dollop or a thin shaving of Gorgonzola cheese. Don’t overload — the cheese should complement, not dominate.
  4. Add the finishing touch:
    Gently press one smoked almond on top of each canapé. This adds a wonderful crunch and an aromatic, roasted note that ties the flavors together.
  5. Serve with style:
    Serve the canapés immediately, or cover and refrigerate for up to 30 minutes before serving. They’re best enjoyed at room temperature, when the cheese is soft and the pear is juicy.

Chef’s Tips & Tricks

  • Bring the cheese to room temperature at least 20 minutes before assembling. This enhances its creaminess and flavor, making it easier to spread or portion.
  • Slice the pear just before assembly to preserve its freshness and avoid oxidation. If preparing in advance, toss the slices gently in lemon juice and pat them dry with paper towel before placing on crackers.
  • Choose uniform crackers to ensure an elegant and consistent presentation. Irregular shapes may be charming, but balance and proportion are key in canapés.
  • Use tweezers or small tongs for assembly if you’re preparing a large batch — especially useful for precise placement of almonds or herbs.
  • Want a flavor boost? Add a tiny drop of honey or fig jam beneath the cheese, or a whisper of fresh thyme for a subtle herbal note.

🍷 Serving & Pairing Suggestions

Serve these canapés as a sophisticated amuse-bouche, or as part of a festive appetizer spread. They pair beautifully with:

  • A lightly sweet white wine, such as a Gewürztraminer or a late-harvest Riesling, which echoes the pear’s sweetness while balancing the cheese’s intensity.
  • A dry sparkling wine like Champagne or Crémant, whose effervescence cleanses the palate between bites.
  • A chilled rosé with fruity notes, ideal for spring or summer gatherings.

Serve on a dark slate board or minimalist porcelain tray to enhance visual contrast and elegance.


Conclusion

Theseblue cheese pear canapés are a celebration of contrasts — creamy and crisp, sweet and savory, bold and delicate. They showcase how just a few thoughtfully chosen ingredients can deliver a burst of complexity in one graceful bite. Whether you’re entertaining guests or indulging in a solo aperitif moment, these canapés add instant sophistication and unforgettable flavor to any occasion.

Easy to prepare, yet striking in presentation and taste, they are the perfect embodiment of “less is more” in the culinary world. A timeless pairing, reinvented with a modern, gourmet twist.“Need the perfect base? Try it with our 10-minute brioche for a buttery touch.”


FAQ – Frequently Asked Questions

Q: Can I make these canapés ahead of time?
A: Yes, you can assemble them up to 30 minutes ahead and refrigerate lightly. Add the almonds just before serving for maximum crunch.

Q: What if I don’t like blue cheese?
A: Try replacing the Gorgonzola with a soft goat cheese or Brie. These options retain the creamy texture while offering a milder flavor.

Q: Are there nut-free alternatives?
A: Yes! You can substitute the smoked almond with a roasted sunflower seed or a sliver of dried fig for texture and visual appeal.

Q: Can I use canned pears?
A: Fresh pears are highly recommended for their firm texture and natural sweetness, but in a pinch, well-drained and unsweetened canned pear halves can work if sliced very thinly.

Frozen Raspberry Reverie: The Chef’s Secret Sorbet

Full-fruit raspberry sorbet served in a chilled bowl, garnished with fresh raspberries and mint leaves

Frozen Raspberry Sorbet

In the world of frozen desserts, few creations capture the essence of summer’s vibrancy quite like a full-fruit raspberry sorbet.

This exquisite dessert is a masterclass in simplicity and purity, where the natural brilliance of sun-kissed raspberries takes center stage.

Every spoonful is a burst of vivid color and intense flavor, showcasing the true character of the fruit in its most unadulterated form.

Unlike traditional ice creams or custard-based treats, raspberry sorbet eschews heaviness and creaminess, opting instead for a delicate balance between tartness and sweetness.

The result is a refreshing, light, and palate-cleansing dessert that revitalizes the senses and leaves a lingering impression of freshness.

It’s the kind of treat that speaks directly to the soul of the fruit lover, offering an invigorating escape into nature’s bounty.

The creation of a flawless raspberry sorbet is an intricate dance of craftsmanship and patience.

The journey begins with the careful selection of the ripest, most fragrant raspberries, harvested at the peak of their season.

These berries, bursting with juice and vibrant aroma, provide the foundation for the sorbet’s rich and complex flavor profile.

The fruit is gently transformed through processes designed to preserve its vivid color, delicate seeds, and aromatic qualities —

all while enhancing the smooth, velvety texture that defines an exceptional sorbet.

Crafting the sorbet demands attention

to detail in balancing natural sweetness without overshadowing the berries’ bright acidity.

This equilibrium is essential, as it allows the raspberry’s nuanced flavors — the floral hints, the subtle tartness, and the underlying sweetness —

to shine through with clarity and depth. The process involves skillful pureeing, straining to achieve a silky smoothness,

and precise chilling techniques to create the perfect consistency that is neither icy nor overly dense.

This sorbet is much more than a frozen dessert; it’s an elegant sensory experience.

Its translucent ruby hue captivates the eye, promising the vibrant flavor to come. Upon tasting,

the sorbet offers a refreshing, cooling sensation that awakens the palate. Its clean, crisp finish makes it an ideal companion to heavier dishes as a palate cleanser, or a delightful finale to any meal.

Serving full-fruit raspberry sorbet is an opportunity to celebrate its natural beauty.

It pairs beautifully with delicate herbs like mint or basil, fresh berries, or a drizzle of sparkling wine for added sparkle and sophistication.

Its versatility makes it equally suited to casual summer gatherings or refined dinner parties, appealing to guests who appreciate authenticity and refined flavors.

Ultimately, the full-fruit raspberry sorbet embodies the philosophy that the finest desserts are those that honor the ingredients and the seasons.

It is a tribute to the raspberry’s fleeting glory, captured in a frozen form that allows us to savor its essence long after the harvest season ends.

This sorbet invites you to slow down, indulge in nature’s simplest pleasures, and experience a moment of pure, vibrant delight.

Raspberry Sorbet for 6 to 8 People

Preparation & Timing

  • Preparation time: Approximately 30 minutes
    (This includes blending the fruit, preparing the sugar syrup, and mixing everything together.)
  • Maturation time: 2 hours
    (Allowing the sorbet mixture to rest and develop deeper flavors before freezing.)
  • Storage: Up to 1 week
    (Keep refrigerated or frozen in an airtight container to maintain freshness.)

Equipment Needed

  • Candy thermometer:
    Essential for monitoring the temperature of the sugar syrup to ensure perfect texture and sweetness balance.
  • Immersion blender (hand blender):
    Used for smoothly blending the raspberry pulp and sugar mixture to achieve a fine, even consistency.
  • Ice cream machine (sorbet maker/turbine):
    To churn the sorbet mixture, incorporating air and preventing large ice crystals for a creamy texture.
  • Freezer container:
    For storing the finished sorbet during freezing or after churning to maintain its texture and flavor.

Ingredients

  • 75 g sucrose (table sugar)
  • 8 g dextrose
  • 17 g glucose powder (atomized glucose)
  • 100 g water
  • 667 g fresh raspberry pulp
  • 33 g fresh lemon juice (yellow lemon)

Preparation Method

  1. In a bowl, combine the sucrose, dextrose, and glucose powders.
  2. In a saucepan, heat the water. When it reaches about 40 °C (104 °F), add the sugar mixture and bring to a boil.
  3. Once boiling, remove from heat and cool quickly in the refrigerator.
  4. Add the raspberry pulp and fresh lemon juice to the cooled syrup, then blend thoroughly with an immersion blender until smooth.
  5. Let the mixture mature in the refrigerator for at least 2 hours.
  6. This resting period allows the flavors to develop fully.
  7. After maturation, blend the mixture again to ensure a perfectly smooth texture before pouring it into the ice cream machine (turbine).
  8. Follow the manufacturer’s instructions for churning.
  9. Once churned, transfer the sorbet into a freezer-safe container and freeze rapidly at −35 °C (−31 °F) to set the texture.
  10. Store the sorbet at −20 °C (−4 °F) until ready to serve, ensuring it maintains optimal freshness and creaminess.

Conclusion: A Sorbet That Captures the Soul of the Raspberry

Crafting a full-fruit raspberry sorbet is not just about following a recipe —

it’s about preserving the integrity of a fleeting seasonal treasure and transforming it into a refined, frozen expression of nature’s vibrancy.

With its brilliant ruby hue, delicate acidity, and lush, pure flavor, this sorbet speaks directly to the senses.

Each spoonful offers a clean, refreshing pause — light yet impactful, simple yet complex — embodying the essence of the raspberry in its most honest form.

The meticulous process of creating this sorbet — from balancing sugars for texture and stability, to respecting the natural fragrance and taste of the fruit —

is what elevates it from a mere dessert to a gastronomic experience. It demands precision,

patience, and a certain reverence for the raw ingredient, which rewards the maker with a dessert that is as beautiful as it is delicious.

Whether

served alone in a chilled coupe, paired with a shortbread biscuit, or used as a bright counterpoint to a richer chocolate or almond-based dessert,

this raspberry sorbet brings freshness and finesse to any table. It is as at home in a garden picnic as it is in a Michelin-starred tasting menu, showcasing its extraordinary versatility.

Ultimately, this sorbet invites us to pause and savor —

to slow down and appreciate the natural brilliance of one simple fruit, treated with care and transformed with elegance.

It’s more than a dessert. It’s a celebration of flavor, of color, of seasonality — and of everything that makes fruit-forward pastry a timeless art.How to Use Egg Whites in Frozen Desserts

ihttp://How alcohol affects freezing in sorbet – Serious Eats

Frequently Asked Questions About Raspberry Sorbet


Q: What makes this raspberry sorbet “full fruit”?
A:
The term “full-fruit” refers to the high concentration of real raspberry pulp used in the sorbet base. Unlike artificially flavored or watered-down versions, this sorbet is made primarily with real raspberries

— fresh or frozen — that have been gently processed to preserve their natural color, flavor, and texture.

The result is a sorbet that is intensely fruity, vividly colored, and authentically flavored, without relying on extracts or synthetic aromas.

It’s fruit-forward in the purest sense, with raspberries making up the majority of the composition.


Q: Why use multiple types of sugar like sucrose, dextrose, and glucose?
A:
Each sugar serves a specific function in sorbet making.

Sucrose (common table sugar) provides sweetness, but too much of it can result in an overly sweet or icy texture.

Dextrose has less sweetening power but lowers the freezing point, which helps maintain a softer, scoopable texture. Glucose (especially atomized glucose)

adds body and stabilizes the mix, improving mouthfeel and limiting crystallization.

The careful balance of these sugars ensures a silky sorbet that’s flavorful, smooth, and easy to serve straight from the freezer.


Q: What is the purpose of the maturation period?


A:
Allowing the sorbet base to rest — usually for at least 2 hours in the refrigerator

— is known as maturation. During this time, the sugars and fruit purée fully integrate, the texture stabilizes, and the flavor deepens.

Maturation also helps air incorporate more evenly during churning, leading to a smoother sorbet.

Skipping this step may result in a sorbet that’s less stable, less creamy, and lacking that beautifully intense fruit character.


Q: Can I make this sorbet without a professional ice cream machine?
A:
Yes — but the texture will differ. A turbine or ice cream maker is ideal for achieving a smooth, airy result, as it simultaneously freezes and churns the mixture to break up ice crystals.

If you don’t have one, you can pour the matured base into a shallow tray, freeze it partially, then whisk or blend it vigorously every 30–45 minutes for a few hours until it becomes scoopable.

It’s a bit more effort, but the flavor will still shine.


Q: How can I enhance or customize this sorbet?
A:
This raspberry sorbet is wonderfully versatile.

You can infuse the syrup with fresh mint, basil, or lemon verbena before combining it with the fruit, for an herbaceous twist.

A splash of raspberry eau-de-vie or a spoonful of Chambord liqueur can add depth and elegance.

For a gourmet presentation, serve it alongside a dark chocolate tuile, or layer it in a coupe glass with fresh berries and a dollop of whipped mascarpone.

The sorbet’s clean profile pairs beautifully with both sweet and sharp contrasts.


Q: How should it be stored, and for how long?
A:
After churning, the sorbet should be frozen quickly at −35 °C (if possible) to preserve its texture, and then stored at −20 °C in a well-sealed ice cream container.

Properly stored, it will retain optimal flavor and texture for about one week.

Although it may remain safe longer, the fruit flavor can begin to dull, and ice crystals may form over time.

Always press a piece of parchment or plastic wrap directly onto the surface before closing the lid to minimize freezer burn.

2 Secret Recipe for the Perfect Tarte Tatin — Revealed!

Close-up of a golden caramelized Tarte Tatin topped with glossy apple slices on a flaky puff pastry base, served on a rustic wooden board.

tarte Tatin recipe

Few desserts carry a tale as charming—and as delicious—as the Tarte Tatin. Born from a fortunate mishap in a countryside inn in late 19th-century France, this upside-down apple tart has since earned a place of honor on some of the finest tables around the world. It was the Tatin sisters, two hoteliers in the Sologne region, who unintentionally created what would become a culinary icon, proving once again that some of the greatest creations begin with a happy accident.

What makes the Tarte Tatin so captivating is the harmony it strikes between textures and flavors: meltingly soft fruit against a crisp, buttery pastry; deep caramel notes balanced by the natural brightness of the apples. Its signature lies in the reversed baking process—fruit caramelized directly in the pan before being topped with pastry and baked to golden perfection. The real spectacle, however, comes at the very end: the dramatic inversion, when the tart is flipped out of its mold, revealing glistening fruit bathed in amber syrup.

Though it began as a rustic country dessert

the Tarte Tatin has transcended its humble roots. Chefs have reimagined it in countless variations, yet its soul remains intact—a celebration of simplicity, craftsmanship, and patience. Warm from the oven, often served with a dollop of cream or a scoop of vanilla ice cream, it invites both comfort and sophistication.

More than just an upside-down apple tart, the Tarte Tatin is a testament to the French art of turning the ordinary into the extraordinary. It’s a dessert that tells a story—of chance, of tradition, of slow caramelization and bold gestures. And whether enjoyed in a cozy kitchen or a refined dining room, it continues to enchant those who appreciate.

the beauty of culinary serendipity “If you’re new to caramel, don’t miss our How to Master Dry Caramel.”

General Information – Tarte Tatin (Serves 4)

Timings

  • Preparation time: 3 hours
    (Includes making puff pastry, preparing caramels, cooking apples, and assembling)
  • Chilling time: 2 hours 30 minutes
    (Resting the dough, cooling components, setting apples before final baking)
  • Baking time: 2 hours 20 minutes total
    (Blind-baking the tart shell, roasting apples, final baking in the Tatin pan)
  • Storage: Up to 48 hours in the refrigerator
    (Best enjoyed slightly warm; reheat gently before serving if made in advance)

Required Equipment

Tatin pan – 18 cm diameter:
A thick, oven-safe pan used for assembling and baking the apples upside down.
This size ensures deep caramelization and a compact, elegant final tart.

Fine sieve:
For sifting the flour to ensure a smooth puff pastry base.

Dough scraper (bench knife):
Ideal for mixing and folding puff pastry, and for keeping your work surface clean.

Rolling pin:
Used to roll out the puff pastry evenly before lining the tart ring.

Tart ring – 20 cm diameter:
Used to blind-bake the puff pastry base. It gives a clean edge and professional finish.

Candy or cooking thermometer:
Essential for controlling the precise temperatures needed for both the homemade caramel (175°C) and the light caramel (165°C) stages.


Ingredients

Puff Pastry

  • 170 g flour
  • 3 g salt
  • 90 g water
  • 20 g butter
  • 110 g dry butter (for laminating)

Homemade Caramel

  • 100 g sugar
  • 30 g water
  • 15 g glucose syrup
  • 65 g heavy cream (35% fat)

Light Caramel

  • 200 g sugar
  • 40 g butter

Apple Mixture

  • 10 Golden apples
  • 200 g homemade caramel
  • 72 g heavy cream (35% fat)
  • 20 g sugar
  • 3 g liquid vanilla
  • 50 g melted butter

Tarte Tatin – Chef’s Recipe for 4 Servings

Recipe Overview

  • Prep time: 3 hours
  • Chilling time: 2 h 30
  • Baking time: 2 h 20
  • Storage: Up to 48 hours in the refrigerator

Required Equipment

  • Fine sieve
  • Dough scraper
  • Rolling pin
  • 20 cm tart ring
  • 18 cm Tatin pan
  • Cooking thermometer
  • Parchment paper + baking weights


Step-by-Step Instructions

1. Puff Pastry

  • Prepare a classic puff pastry with 5 single folds.
  • Roll out the dough and line a 20 cm tart ring (see technique reference if needed).
  • Cover the base with parchment paper and fill with baking weights.
  • Blind-bake at 180 °C (356 °F) for 30 minutes. Set aside to cool.

2. Homemade Caramel

  • In a saucepan, cook the sugar, water, and glucose to 175 °C (347 °F).
  • Carefully deglaze by adding the hot cream. Stir and set aside.

3. Light Caramel

  • In a clean saucepan, cook the sugar to 165 °C (329 °F).
  • Remove from heat and deglaze with the butter. This will be used to coat the base of the Tatin pan.

4. Apple Filling

  • Peel, core, and cut the apples into even quarters.
  • In a saucepan, heat together the homemade caramel, cream, sugar, vanilla, and melted butter.
  • Off the heat, immerse the apple quarters in the warm mixture to coat thoroughly.
  • Arrange them on a rimmed baking sheet, sprinkle lightly with sugar, and bake at 180 °C (356 °F) for 35 minutes.
  • Once baked, cool and refrigerate for about 30 minutes

Chef’s Tips & Tricks

To ensure a flawless unmolding of the apples from the tart, try gently warming the outer edges of the Tatin pan with a culinary blowtorch. This technique softly melts the caramel along the sides, loosening it from the mold and making the flipping process much easier and cleaner.

Using a blowtorch allows precise control of the heat without overheating the tart itself, preventing any risk of burning or overcooking the caramel. This simple step can transform a tricky moment into a smooth, elegant finish — perfect for impressing guests or achieving that flawless presentation“Tarte Tatin has a legendary origin in French cuisine. Read the story from La Tarte Tatin officielle.”

Conclusion: The Timeless Allure of Tarte Tatin

The Tarte Tatin is much more than a dessert — it is a story captured in caramel and pastry, a celebration of the unexpected beauty born from a simple accident. Its layers of tender, caramelized apples resting atop a crisp, buttery puff pastry embody the very essence of French patisserie: balancing rustic charm with refined technique.

Mastering the Tarte Tatin is a rewarding journey that teaches patience, precision, and respect for ingredients. From preparing the delicate puff pastry, through the careful caramelization processes, to the artful assembly and dramatic flipping, each step is a moment to savor in itself. The process demands attention and care, but the result is a dessert that enchants with its golden hues, luscious textures, and deeply satisfying flavors.

Serving the Tarte Tatin warm, perhaps accompanied by a scoop of vanilla ice cream or a dollop of crème fraîche, invites moments of pure indulgence and comfort. It connects us to tradition while allowing room for personal creativity — whether by experimenting with different apples, infusing spices, or exploring variations of caramel.

In every slice, the Tarte Tatin offers a glimpse into the magic that happens when technique meets passion and when simplicity is elevated to art. Whether you’re a seasoned pastry chef or a home baker eager to explore classic French desserts, this timeless tart promises to delight your palate and your heart.

So take your time, enjoy each step, and share this beautiful creation with those you love — because the true sweetness of Tarte Tatin lies not only in its caramel but in the memories it helps create.

Frequently Asked Questions (FAQ) — Tarte Tatin

Q1: What type of apples are best for Tarte Tatin?

A: Firm, slightly tart apples that hold their shape when cooked work best. The classic choice is Golden Delicious, but Granny Smith or Braeburn can also be excellent.

Q2: Can I use store-bought puff pastry instead of making it myself?

A: Yes, you can. While homemade puff pastry offers superior texture and flavor, good-quality store-bought puff pastry is a convenient alternative that still yields delicious results.

Q3: How do I prevent the caramel from burning?

A: Use a candy thermometer to monitor the temperature carefully. Cooking sugar to the exact temperature needed and promptly deglazing with cream or butter will help prevent burning.

Q4: What if my tart sticks to the pan when I flip it?

A: To help with unmolding, gently warm the edges of the pan with a culinary blowtorch to melt the caramel slightly and loosen the tart. Alternatively, let the tart cool a little before flipping.

Q5: Can I prepare the Tarte Tatin in advance?

A: Yes! You can prepare it a day ahead and store it in the refrigerator for up to 48 hours. Reheat gently before serving to bring back the caramel’s glossy texture and warm flavors.

Q6: What can I serve with Tarte Tatin?

A: Traditional accompaniments include vanilla ice cream, crème fraîche, or lightly whipped cream. These add a creamy contrast to the tart’s rich caramel and buttery pastry.

Sorbet Secrets Unveiled: Master Lemon Sorbet with Our Expert Q&A

Close-up of a creamy, bright yellow lemon sorbet scooped into a glass bowl, garnished with fresh lemon zest and mint leaves, showcasing its smooth texture and vibrant color.

Lemon sorbet is the very essence of refreshing elegance, capturing the bright and delicate flavors of citrus in a silky, airy texture that melts effortlessly on the palate. It’s the perfect finale to a meal or a cooling treat on a warm day, balancing tangy sharpness with subtle sweetness.

Crafting this sorbet is an exercise in harmony, where the natural acidity of fresh lemons is gently softened by a touch of sweetness to awaken the taste buds with a lively yet refined burst of flavor. The fragrant zest adds an aromatic layer, evoking the freshness of sunny orchards and a light breeze.

The texture is key — smooth and finely textured, often lightened with a bit of air to create a creamy yet refreshing mouthfeel. It holds its form well, firm enough to be scooped yet supple enough to glide on the tongue.

Presented in a graceful serving dish, sometimes adorned with a fresh mint leaf or a delicate lemon twist, lemon sorbet becomes more than just a dessert — it’s a celebration of simplicity and sophistication, perfect for those who crave a bright, clean, and invigorating finish.

Lemon Sorbet – Complete Recipe Sheet

Serves 6 to 8


Timing

  • Preparation: 30 minutes
  • Maturation: 4 hours (chilling)
  • Storage: Up to 2 weeks in the freezer

Equipment Needed

  • Kitchen thermometer
  • Immersion blender (or regular blender)
  • Ice cream maker (turbine)
  • Freezer-safe container

Ingredients

  • 35 g atomized glucose
  • 25.5 g dextrose
  • 5 g stabilizer for sorbet
  • 9 g skimmed milk powder (0% fat)
  • 191 g sucrose (regular sugar)
  • 398 g water
  • 332 g fresh yellow lemon juice

Preparation Steps

1. Prepare the base syrup

  • In a saucepan, combine water, sucrose, atomized glucose, dextrose, stabilizer, and milk powder.
  • Heat gently over medium heat while stirring regularly until all sugars and powders fully dissolve.
  • Use the thermometer to monitor temperature and keep it around 45-50°C (113-122°F).
  • Do not exceed 50°C to preserve the qualities of the stabilizer and powders.

2. Add the lemon juice

  • Remove the saucepan from heat.
  • Add the fresh lemon juice and blend with the immersion blender to fully homogenize the mixture and incorporate some air for a lighter texture.
  • The mixture should be smooth and free of lumps.

3. Maturation

  • Pour the mixture into a clean container and cover.
  • Let it rest in the refrigerator for at least 4 hours. This step enhances flavor development and improves texture.

4. Churning

  • After maturation, pour the mixture into your ice cream maker.
  • Churn for about 30 minutes or until you reach a creamy, firm sorbet consistency.
  • Keep an eye on the texture to avoid over-freezing.

5. Storage

  • Transfer the sorbet to a freezer-safe container with a tight lid.
  • Store in the freezer for up to 2 weeks.
  • Before serving, let the sorbet sit at room temperature for 10 to 15 minutes for easier scooping.

Chef’s Tips

  • Use fresh, juicy lemons for an intense and natural flavor.
  • The stabilizer is key to preventing ice crystals and keeping a smooth texture.
  • The immersion blender helps incorporate air, making the sorbet lighter.
  • Glucose and dextrose improve texture by preventing the sorbet from freezing too hard.

Detailed Lemon Sorbet Preparation

1. Mixing the powders
Begin by combining all the dry ingredients: atomized glucose, dextrose, sorbet stabilizer, skimmed milk powder, and sucrose (table sugar). Thoroughly mix these powders together to ensure an even distribution. This step is crucial for the powders to dissolve properly during cooking, which will result in a smooth, consistent texture in the final sorbet. Take your time to mix well and avoid any lumps that could affect the sorbet’s quality.

2. Heating the water and adding powders
Pour the water into a clean saucepan and start heating it gently over medium heat. Use a kitchen thermometer to monitor the temperature carefully. Once it reaches about 40°C (104°F), add the powder mixture slowly while stirring continuously with a whisk or wooden spoon. This gradual addition and moderate temperature allow the powders to dissolve evenly without burning or sticking to the pan. Then, raise the heat and bring the mixture to a boil. Boiling activates the stabilizer and ensures all sugars are fully dissolved, which is essential for the sorbet’s texture.

3. Adding the lemon juice and blending
Once boiling is reached and the powders are fully dissolved, remove the saucepan from the heat. Let the mixture cool slightly for a few minutes to avoid degrading the fresh lemon aroma. Pour in the freshly squeezed yellow lemon juice while the mixture is still warm. Use an immersion blender to thoroughly mix the preparation. This step homogenizes the mixture and incorporates a bit of air, which will lighten the sorbet’s texture. The final liquid should be smooth, uniform, and free of any pulp or lumps.

4. Cooling and maturation


After blending, transfer the mixture into a suitable container (preferably stainless steel or glass) and cover it. Place it in the refrigerator to cool down completely and allow the flavors to mature. Let it rest for at least 4 hours. This maturation phase is essential: it deepens the lemon flavor, balances the acidity, and stabilizes the texture before churning. Slow cooling also prevents the formation of large ice crystals that would make the sorbet grainy.

5. Second blending and churning
After the maturation time, take the mixture out of the fridge. For optimal texture and consistency, give it another quick blend with the immersion blender to re-incorporate any settled ingredients and smooth out the mix. Then pour the liquid into your ice cream maker (turbine), following the manufacturer’s instructions carefully. Churn for about 30 minutes or until the sorbet reaches a creamy, firm consistency. During this stage, the constant stirring and freezing create the signature light and smooth texture.

6. Transferring and blast freezing
Once churned, immediately transfer the sorbet into a clean, dry freezer-safe container. Smooth the surface evenly with a spatula to create a flat finish. This not only makes for a nice presentation but also helps with even freezing. Place the container in a blast freezer or set your freezer to a very low temperature around −35°C (−31°F) for rapid freezing. This quick freezing step is critical to lock in the smooth texture and avoid large ice crystals forming.

7. Final storage
After the initial blast freeze, store the sorbet at a stable temperature of −20°C (−4°F) for up to two weeks. This standard freezer temperature preserves the sorbet’s flavor and texture. Before serving, remove the sorbet from the freezer about 10 to 15 minutes in advance to soften it slightly for easier scooping.


Summary

This detailed, professional method ensures a lemon sorbet with perfect texture, balanced flavor, and excellent shelf life. Each step is designed to maximize the freshness and smoothness—from powder mixing to blast freezing.

Conclusion

Lemon sorbet, with its smooth texture and intense freshness, is a light and refreshing dessert that delights the palate every time. Making it requires some skill—especially in controlling temperatures and respecting the maturation stages—but the results are well worth the effort. By mastering the balance of sugars, properly mixing the powders, and carefully churning, you’ll create a sorbet worthy of the finest ice cream shops—both indulgent and subtle. Don’t hesitate to experiment with high-quality fresh lemons and follow the maturation and blast freezing steps closely for a perfectly smooth and creamy sorbet.


Questions & Answers

Q: Why is it important to mix the powders before adding them to the water?
A: Mixing the powders ensures they dissolve evenly during heating, preventing lumps and resulting in a smooth, uniform sorbet texture.

Q: What is the purpose of the maturation step in the fridge?
A: Maturation allows the flavors to fully develop and the texture to stabilize. It also helps prevent large ice crystals from forming during freezing.

Q: Can I use bottled lemon juice instead of fresh lemon juice?
A: For the best quality sorbet, fresh lemon juice is recommended because it contains more natural, intense flavors compared to pasteurized bottled juice.

Q: What does the stabilizer do in the sorbet?
A: The stabilizer prevents the formation of large ice crystals, making the texture smoother and more enjoyable. It also helps maintain the sorbet’s consistency over time.

Q: How long can I store the sorbet in the freezer?
A: The sorbet can be stored for up to two weeks at a consistent −20 °C (−4 °F) without significant loss of quality.6 Secrets to Making Perfectly Flaky and Irresistible Raisin Buns at Home

http://Lemon Sorbet Science by Serious Eats