Chocolate Ice Cream Base
Velvety, rich, and seductively smooth—chocolate ice cream is more than just a dessert. It’s a moment of pure escape. With every spoonful, it evokes childhood memories, cozy evenings, and the simple pleasure of tasting something deeply satisfying. Yet beneath its familiar surface lies a world of nuance and craftsmanship.
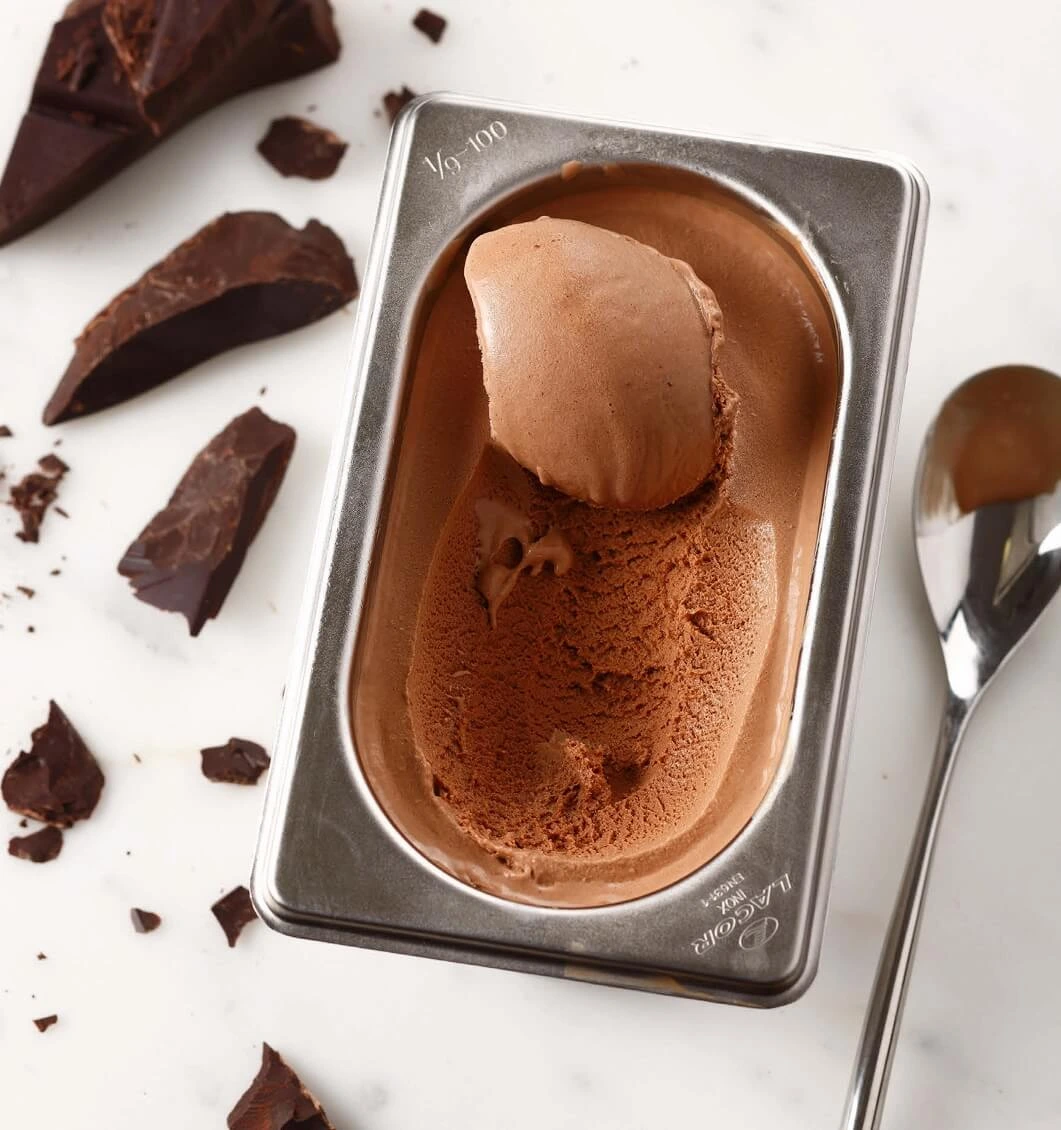
The texture is what sets it apart: perfectly churned to achieve a balance between creaminess and lightness, each bite melts gently on the tongue, releasing waves of cocoa warmth. Not too sweet, never too bitter—this frozen treat is a tribute to the complexity of chocolate in its most luscious form.
Chocolate ice cream carries a quiet confidence. It doesn’t need embellishments or elaborate presentation to impress. Whether served in a crisp cone, nestled next to a warm pastry, or savored slowly on its own, it commands attention and admiration. Its deep, glossy hue alone invites temptation.
Beyond its irresistible taste, chocolate ice cream is an emblem of universal comfort. From elegant Parisian salons to sunny boardwalks by the sea, it transcends age, culture, and season. It’s both everyday and extraordinary—a constant on dessert menus, and a highlight of gourmet creations.
Crafting the perfect chocolate ice cream is an art: a delicate interplay of temperature, technique, and timing. But when done well, the result is magic—a luxurious scoop that soothes, delights, and lingers long after the last bite.
This is not just frozen dessert. This is chocolate reimagined, made to melt hearts.
Chocolate Ice Cream – Recipe Overview
Serves: 6 to 8 people
Ideal for a dinner party, weekend treat, or gourmet gift, this quantity yields about 1 liter of intensely flavorful chocolate ice cream.
Preparation Time: Approximately 40 minutes
This includes making the custard base, melting and incorporating the chocolate, and properly emulsifying the mixture before maturation. This step is where precision and patience come together to ensure a silky texture and balanced flavor.
Maturation Time: 4 to 12 hours (preferably overnight)
Allowing the mixture to rest in the refrigerator is essential. This process lets the flavors deepen and gives the ice cream base time to stabilize. The result is a creamier texture and a scoopable consistency post-churning.
Storage: Keeps for up to 2 weeks in the freezer
Store in an airtight, freezer-safe container to prevent ice crystals and preserve the intense chocolate aroma. Though best enjoyed within the first few days, it retains its luxurious texture and flavor for up to 14 days.
Equipment Required:
- Cooking Thermometer (Digital or Analog):
Precision is everything in ice cream making. A thermometer ensures your custard base reaches the ideal temperature without curdling the eggs or burning the chocolate. - Immersion Blender (Stick Blender):
Crucial for creating a perfectly smooth and fully emulsified base. It breaks down any remaining particles and ensures the fats, sugars, and chocolate are seamlessly unified. - Fine Mesh Sieve (Chinois):
Used to strain the base before maturation, eliminating any lumps or cooked egg bits for a silky, refined finish. - Ice Cream Maker or Gelato Turbine:
The churning process introduces air and gives the ice cream its characteristic lightness. A proper turbine ensures even freezing and optimal texture. - Ice Cream Storage Container:
Preferably a shallow, rectangular container with a tight lid. Metal, silicone, or professional-grade plastic are all excellent choices for home freezing.
Ingredients – For 6 to 8 Servings (Approx. 1 Liter)
Dairy Components
- 518 g whole milk (3.6% fat):
Forms the base of the ice cream. The milk provides volume, natural lactose sweetness, and water content necessary for freezing. Choose high-quality, fresh whole milk for the best flavor. - 200 g heavy cream (35% fat):
Adds creaminess and richness. The high fat content is essential to create that signature smooth mouthfeel and to support flavor release on the palate. - 32 g skim milk powder (0% fat):
Also known as low-fat milk solids, this ingredient boosts the milk solids without adding extra water or fat. It helps improve texture, body, and prevents crystallization.
Sweeteners & Structure
- 150 g sucrose (white granulated sugar):
Provides sweetness and helps control the freezing point. It balances bitterness from the cocoa and enhances the overall flavor. - 45 g inverted sugar (e.g., trimoline or glucose syrup):
A functional sugar that retains moisture, improves scoopability, and prevents ice crystal formation. It also enhances the creaminess of the final product. - 5 g ice cream stabilizer (e.g., Stab 2000):
Essential in professional ice cream making. This reduces ice crystals and improves texture over time. Choose a neutral stabilizer specifically designed for frozen dairy applications.
Emulsifier
- 40 g egg yolks:
Serve as a natural emulsifier and thickener. They bring richness and help bind the fat and water phases, resulting in a smooth, velvety texture. Pasteurized yolks are ideal for precision and safety.
Chocolate Base
- 40 g cocoa paste (100% cocoa mass):
This pure form of chocolate adds deep, intense cocoa flavor and enhances color. It contributes richness without sweetness, ideal for creating a sophisticated chocolate profile. - 75 g dark chocolate couverture (Caraïbes 66%):
A fine, balanced couverture from Valrhona, known for its notes of roasted nuts and gentle bitterness. Adds complexity, mouthfeel, and a refined finish to the ice cream.
Aromatic Touch (Optional)
- 50 g chocolate liqueur (optional):
Enhances the depth of the chocolate and adds a luxurious note. Also helps slightly lower the freezing point, resulting in a softer scoop. Optional but highly recommended for adult palates.
Tip: All ingredients should be weighed with precision using a digital scale. Accuracy is crucial in ice cream making to ensure a balanced mix of fats, sugars, and solids.
Method – Step by Step
- Prepare the Dry Mix
In a small bowl, whisk together the skim milk powder, sucrose (white sugar), and stabilizer. This step ensures even dispersion of the stabilizer and prevents clumping during heating. - Heat the Liquid Base
In a medium saucepan, combine the whole milk, heavy cream, and inverted sugar. Begin to heat gently over medium heat, stirring regularly with a silicone spatula or whisk to prevent scorching. - Add Dry Ingredients at 35°C (95°F)
Once the liquid mixture reaches 35°C, gradually add the prepared dry mix (milk powder, sucrose, stabilizer) while continuously whisking. Maintain a steady stirring motion to promote full dissolution and prevent any lumps.
Incorporate the Egg Yolks at 40°C (104°F)
When the mixture reaches 40°C, add the egg yolks. Whisk to combine. The egg yolks enrich the custard and serve as natural emulsifiers, enhancing the final texture of the ice cream.- Pasteurize the Base at 85°C (185°F)
Continue heating the mixture until it reaches 85°C. Hold this temperature for approximately 1 minute to ensure proper pasteurization. Do not allow the mixture to boil. Stir constantly and gently to avoid scrambling the yolks. - Incorporate the Chocolate Elements
Remove the mixture from the heat. Add the cocoa paste and the dark chocolate couverture (pre-melted gently over a bain-marie). Stir or whisk until fully blended and smooth. The chocolate should be fully integrated into the hot custard. - Blend and Strain
Using an immersion blender, mix the base thoroughly for 1–2 minutes to ensure a fully emulsified texture. Then strain the mixture through a fine-mesh sieve (chinois) into a clean container to eliminate any curdled particles or solids. - Cool Rapidly and Mature the Base
Immediately chill the strained mixture by placing the container in an ice bath, or transfer directly to the refrigerator. Once cooled to 4°C or below, let the base mature in the refrigerator for a minimum of 4 hours, ideally 12. This rest time allows the fats to crystallize properly and improves the final structure and flavor of the ice cream.
Optional: Add Liqueur and Re-blend
- hocolate liqueur. Blend again with the immersion blender to fully incorporate the alcohol, which also enhances smoothness and aroma.
- Churn in Ice Cream Maker
Pour the matured base into your ice cream maker or gelato turbine. Churn according to the manufacturer’s instructions until the mixture reaches a soft-serve consistency. This usually takes between 25 and 40 minutes, depending on the machine. - Pack, Smooth, and Hard-Freeze
Transfer the churned ice cream into a freezer-safe container. Smooth the surface using a palette knife or spatula for a clean finish. Place the container in a blast freezer or set your home freezer to –35°C (if possible) to harden the ice cream rapidly and preserve its texture. - Storage
Once hardened, store the ice cream at –20°C. Allow to temper at fridge temperature (4–5°C) for 10 minutes before scooping for optimal texture and flavor release.
Pro Tip: For extra finesse, serve your chocolate ice cream with a pinch of fleur de sel, a few shards of dark chocolate, or a drizzle of warm espresso for a quick affogato twist.
Conclusion: A Scoop of Elegance
Crafting chocolate ice cream at home is more than following a recipe—it’s an invitation to slow down, to engage with texture, aroma, and precision. From the silky custard base to the moment it churns into a velvety ribbon of frozen delight, each step offers the satisfaction of mastery and the joy of indulgence.
What sets this version apart is its balanced complexity: not too sweet, never overpowering, with just the right depth of cocoa and cream. It’s a dessert that appeals to all ages, but carries the unmistakable signature of the artisan’s hand. Whether served in a coupe for a chic dinner party or simply savored alone with a spoon and a quiet moment, this chocolate ice cream offers a timeless kind of comfort—refined, familiar, and unforgettable.
So let this be your next kitchen ritual. Take the time. Temper the base. Taste as you go. And remember: the elegance of homemade is always in the detail.
Frequently Asked Questions
Can I make this ice cream without an ice cream machine?
While a turbine or professional ice cream maker yields the best texture, it is possible to make this recipe without one. Pour the chilled base into a shallow container and freeze, stirring vigorously every 30 minutes for 3 to 4 hours. The result will be denser and less aerated, but still delicious.
Can I use another type of chocolate?
Yes, but the final flavor will vary. Caraïbes 66% offers a balanced bitterness and rich cocoa notes. If you prefer something fruitier or more intense, try using Manjari 64% or Guanaja 70% from Valrhona. Always opt for couverture-quality chocolate.
Is the chocolate liqueur essential?
Not at all. It enhances depth and slightly softens the texture due to its alcohol content, but the recipe remains exquisite without it. You can also substitute it with a spoonful of espresso or a touch of vanilla extract.
How long should I mature the base?
A minimum of 4 hours is required, but 12 hours is ideal. Maturation allows proteins and fats to stabilize and flavors to meld beautifully. This rest time improves both scoopability and mouthfeel.
My ice cream is too hard out of the freezer. What should I do?
This is normal for low-overrun, high-quality ice creams. Let the container sit in the refrigerator for 10–15 minutes before serving. It will reach the perfect scooping texture and release its full bouquet of chocolate aromas.Sorbet Secrets Unveiled: Master Lemon Sorbet with Our Expert Q&A