chocolate millefeuille recipe
Layer upon layer of indulgence, the chocolate millefeuille is a dessert that redefines refinement. Rooted in the grand tradition of French pâtisserie, this elegant creation transforms a classic into something boldly modern, where crispness meets richness and precision meets decadence.
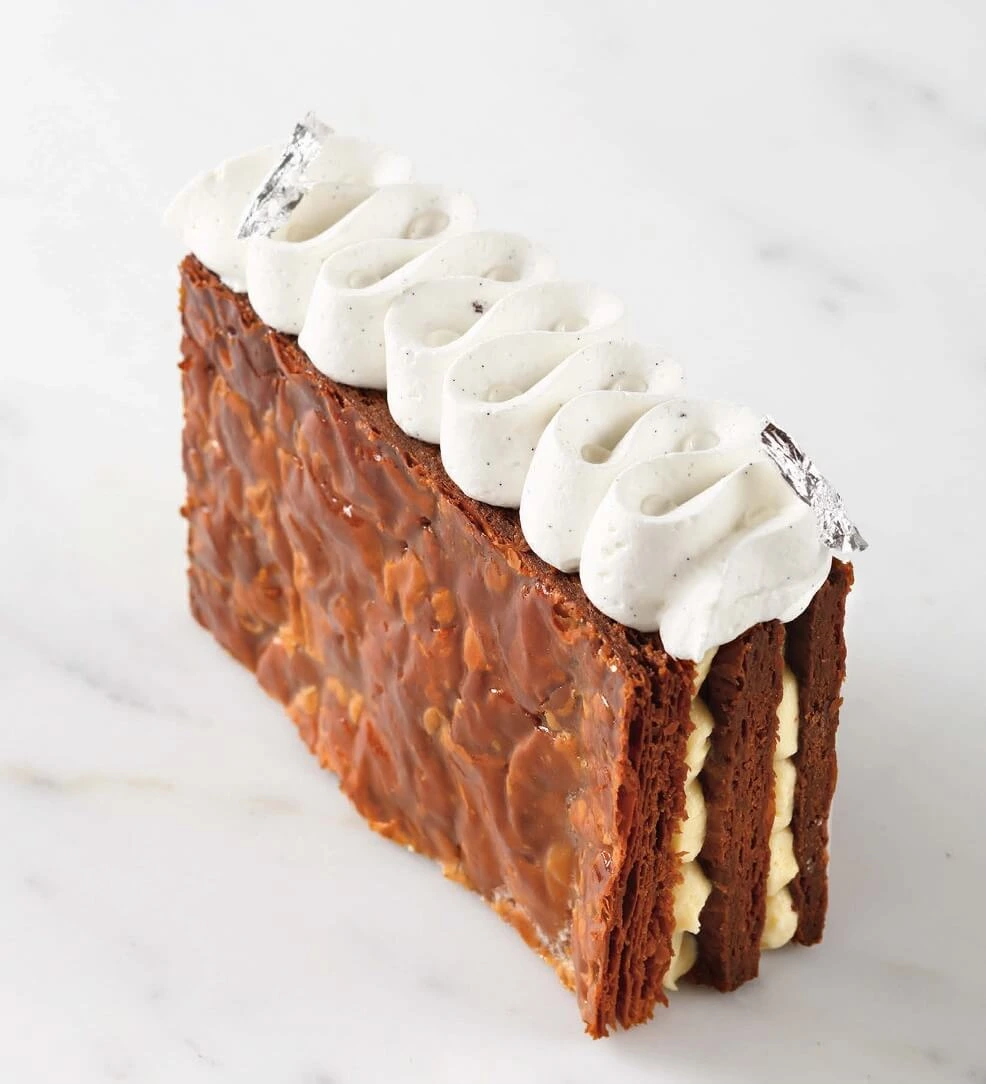
At first glance, the millefeuille seduces with its striking architecture — alternating tiers of ultra-thin, golden puff pastry and luscious chocolate cream, stacked with the precision of a jeweler setting stones. Each bite is a journey: the shattering crunch of the pastry, the silken glide of the chocolate filling, the delicate balance between sweetness and depth. It is a study in contrasts — airy and dense, crisp and smooth, refined and indulgent.If you’re new to laminated dough, start with our Beginner’s Puff Pastry Guide
But beyond
its visual and textural sophistication lies an emotional appeal. The chocolate millefeuille evokes both nostalgia and novelty. It pays homage to the traditional millefeuille, that elegant patisserie staple served in salons de thé, while inviting the richness and intensity of fine chocolate to take center stage. The result is a dessert that feels at once timeless and boldly contemporary.
Served as the grand finale to a dinner party or savored in quiet solitude with a cup of espresso, the chocolate millefeuille brings a sense of ceremony to the table. Its meticulous layers invite admiration before the first forkful is even taken — and once tasted, its elegance lingers in memory.
Crafting it at home is an ode to patience and precision, but above all, to pleasure. Whether you’re a seasoned baker or a curious enthusiast, making a chocolate millefeuille is not just about assembling a dessert — it’s about creating a moment of pure, layered joy.
Recipe Overview — Chocolate Millefeuille
Serves: 6
Preparation time: 4 hours
Chilling time: 3 hours
Baking time: 50 minutes
Storage: Keeps for up to 48 hours in the refrigerator when well wrapped
This recipe is designed to serve six guests with individual portions or larger slices for sharing. It requires careful attention to detail and a generous timeline, but the result is a pastry that rivals those found in the finest patisseries.
Recommended Equipment
To achieve chocolate millefeuille recipe with professional-level precision and elegance, the following tools are essential:
- Fine sieve
For sifting dry ingredients and preventing lumps in creams and doughs, ensuring a smooth, refined texture throughout. - Dough scraper (bench scraper)
Perfect for handling pastry dough, cleaning work surfaces efficiently, or transferring mixtures cleanly. - Rolling pin
A sturdy wooden or stainless steel rolling pin helps roll the puff pastry evenly without compressing its delicate layers. - Balloon whisk
Ideal for emulsifying creams or mixing batters thoroughly by hand, offering control and lightness. - Electric mixer or stand mixer
Essential for whipping creams or preparing chocolate ganache with a light, airy texture. - Piping bag with two nozzles
- Plain round tip for neat piping between layers or within the pastry
- Saint-Honoré tip for creating elegant, ribbon-like decorative finishes on the top layer
- Serrated knife (bread knife)
To slice cleanly through the crisp puff pastry and soft fillings without compressing the layers. A gentle sawing motion preserves the pastry’s structure and presentation.
Ingredients
Inverted Puff Pastry
- 100 g all-purpose flour
- 200 g dry butter (beurre de tourage)
- 5 g fine sea salt
- 90 g cold water
- 150 g all-purpose flour (for the détrempe)
Vanilla Mousseline Cream
- 250 g whole milk
- 50 g granulated sugar
- 1 vanilla bean
- 40 g egg yolks (approximately 2 yolks)
- 20 g custard powder (or cornstarch as a substitute)
- 60 g unsalted butter (for the pastry cream)
- 65 g softened butter (for the mousseline texture)
Vanilla Chantilly Cream
- 100 g heavy cream (35% fat)
- 10 g granulated sugar
- 2 vanilla beans (scraped)
Inverted Puff Pastry — Method
Begin by preparing a classic feuilletage inversé, or inverted puff pastry, where the butter envelops the dough rather than the reverse. This technique yields an exceptionally flaky and tender pastry, perfect for a refined millefeuille.
1. Prepare the butter layer (beurrage):
Place 200 g of dry butter (beurre de tourage) between two sheets of parchment paper. Using a rolling pin, gently flatten it into a square approximately 15 x 15 cm. Place in the refrigerator to chill and firm up, but not harden completely.
2. Prepare the dough (détrempe):
In a mixing bowl, combine 150 g of flour, 5 g of fine salt, and 90 g of cold water. Mix just until a homogeneous dough forms — do not overwork. Shape it into a square approximately 10 x 10 cm, wrap in plastic, and chill for 20–30 minutes.
3. Encase the dough in the butter:
Once both components are chilled and workable, place the détrempe at the center of the butter square. Fold the butter over the dough to encase it entirely, as if wrapping a present. Lightly seal the edges.
4. Perform the turns (tours):
Roll the dough lengthwise into a long rectangle. Give it a single turn (fold into thirds like a letter), rotate it 90 degrees, and chill for 20 minutes. Repeat this process three more times, chilling between each turn. Be precise and gentle to maintain distinct layers.
5. Final roll-out and baking:
Roll the rested dough out to a 3 mm thickness, adjusting it to match the dimensions of your baking sheet — approximately 30 x 40 cm. Transfer to a parchment-lined tray, then rest again in the refrigerator for 30 minutes to prevent shrinkage during baking.
6. Bake to golden perfection:
Preheat the oven to 220°C (428°F). Bake the pastry for 10 minutes to initiate a strong rise, then reduce the temperature to 190°C (374°F) and continue baking for about 40 minutes, or until the layers are evenly puffed, golden, and fully cooked through.
7. Cool and reserve:
Once baked, allow the puff pastry sheet to cool completely on a wire rack. Trim the edges carefully if needed. Store in an airtight container until ready to assemble the millefeuille.
Vanilla Mousseline Cream — Method
1. Infuse the milk:
In a medium saucepan, combine the whole milk, half the sugar, and the vanilla bean, split lengthwise and scraped. Place over medium heat and bring just to a simmer, allowing the vanilla to infuse its full aroma into the milk.
2. Prepare the egg mixture:
In a separate mixing bowl (preferably a stainless steel bowl or cul-de-poule), whisk together the egg yolks and the remaining sugar until pale and slightly thickened — this is called “blanchir.” Sift in the custard powder and whisk again until fully incorporated.
3. Temper the eggs:
Once the milk reaches a boil, remove it from the heat. Gradually pour a small amount of the hot milk into the egg mixture while whisking continuously to temper the yolks and prevent curdling. Then, pour the tempered mixture back into the saucepan with the remaining milk.
4. Cook the pastry cream:
Return the saucepan to medium heat and cook the mixture while whisking constantly. Once it begins to thicken and boil, continue cooking for 2 full minutes at a gentle simmer to ensure the custard is fully set and smooth. The cream should be glossy and thick.
5. Finish with butter:
Remove from the heat and immediately whisk in the first quantity of butter (60 g), cut into small pieces. Stir until completely melted and incorporated.
6. Chill the base cream:
Spread the hot pastry cream onto a tray lined with plastic wrap. Cover it directly with another layer of wrap (film it “au contact”) to prevent a skin from forming. Refrigerate until fully cooled.
7. Transform into mousseline:
Once cold, transfer the pastry cream to a mixing bowl. Using an electric mixer or stand mixer fitted with the paddle or whisk attachment, beat the cream until smooth and loosened. Gradually incorporate the softened butter (65 g) in small additions, beating until the mixture becomes light, fluffy, and perfectly emulsified.
The result is a silky, airy vanilla mousseline — stable, richly flavored, and perfect for layering in the millefeuille.
Vanilla Chantilly Cream — Method
In the bowl of a stand mixer fitted with the whisk attachment (or using a handheld electric mixer), whip the cold heavy cream until it begins to thicken. Add the sugar and the seeds of the vanilla beans, scraped and dispersed evenly.
Continue to whip just until soft, elegant peaks form. The texture should be smooth and airy, not overwhipped. Transfer the chantilly into a piping bag fitted with a Saint-Honoré tip, and reserve chilled until needed.
Assembly — Chocolate Millefeuille
1. Prepare the pastry base:
Trim the baked puff pastry sheet to create clean, even edges. Cut it into three equal-sized strips, each approximately 10 x 30 cm (or to fit your presentation format). Handle the layers gently to preserve their delicate flakiness.
2. Prepare the mousseline cream:
Remove the chilled mousseline cream from the refrigerator. Using a flexible spatula (maryse), gently loosen and smooth the cream. Transfer it into a piping bag fitted with a plain round tip.
3. Layer the millefeuille:
Place the first puff pastry strip on your work surface or serving board. Pipe an even cordon of mousseline cream along the entire length. Top with the second puff pastry strip and repeat the process, ensuring a neat and uniform finish. Finally, place the third strip of pastry on top to complete the layering.
4. Set the structure:
Refrigerate the assembled millefeuille for at least 30 minutes. This allows the cream to firm up and stabilizes the layers for clean slicing.
5. Portioning:
Using a serrated knife (bread knife), carefully cut the millefeuille into six equal portions. Saw gently to avoid compressing the layers.
6. Final decoration:
Stand each millefeuille piece upright on its side. Using the prepared piping bag with the Saint-Honoré tip, pipe elegant rosettes or ribbon-like waves of vanilla chantilly on the visible surface. The contrast between the creamy topping and crisp pastry will create a visually stunning, texturally refined finish.
Conclusion
The Chocolate Millefeuille is not just a dessert — it’s a celebration of contrast, technique, and elegance. From the shattering crispness of the inverted puff pastry to the silky lightness of the vanilla mousseline and the airy crown of chantilly, every element is designed to awaken the senses and honor classic French pâtisserie. This dessert demands time, precision, and respect for detail, but the reward is an exquisite creation that bridges tradition and modern refinement.
Whether served at an intimate dinner or as the centerpiece of a sophisticated gathering, this millefeuille offers both a visual spectacle and a delicate harmony of textures and flavors. It’s the kind of pastry that invites silence at the first bite and conversation long after the last crumb.
Let this millefeuille be more than a recipe — let it be a pastry ritual, a moment of pause, and a tribute to craft.Add depth with culinary context:
“Learn about the millefeuille’s origins from Larousse Gastronomique.”
Questions & Answers
Q: Can I make the components in advance?
A: Absolutely. The puff pastry can be baked and stored in an airtight container for up to 48 hours. The mousseline cream and chantilly can be prepared the day before, kept separately in the fridge, and assembled on the day of serving for optimal texture and freshness.
Q: What if I don’t have time to make inverted puff pastry from scratch?
A: While homemade inverted puff pastry yields the most refined result, high-quality all-butter puff pastry from a trusted bakery or gourmet store can be used in a pinch. Look for one with visible layering and no additives.
Q: How do I ensure clean cuts when slicing the millefeuille?
A: Use a serrated knife and a gentle sawing motion. Chilling the assembled pastry before slicing is crucial — it stabilizes the cream and prevents collapse. Clean the knife between each cut for sharp, professional edges.
Q: Can I flavor the mousseline differently?
A: Yes. While vanilla offers a classic base, you can infuse the milk with coffee beans, citrus zest, or even earl grey tea for a more personalized touch. Just be sure to strain well and balance the flavors carefully.
Q: Is this dessert suitable for summer service?
A: Definitely — its light creams and delicate layers make it perfect for warmer months. Serve well-chilled, and consider garnishing with fresh raspberries or edible flowers for a seasonal finish.