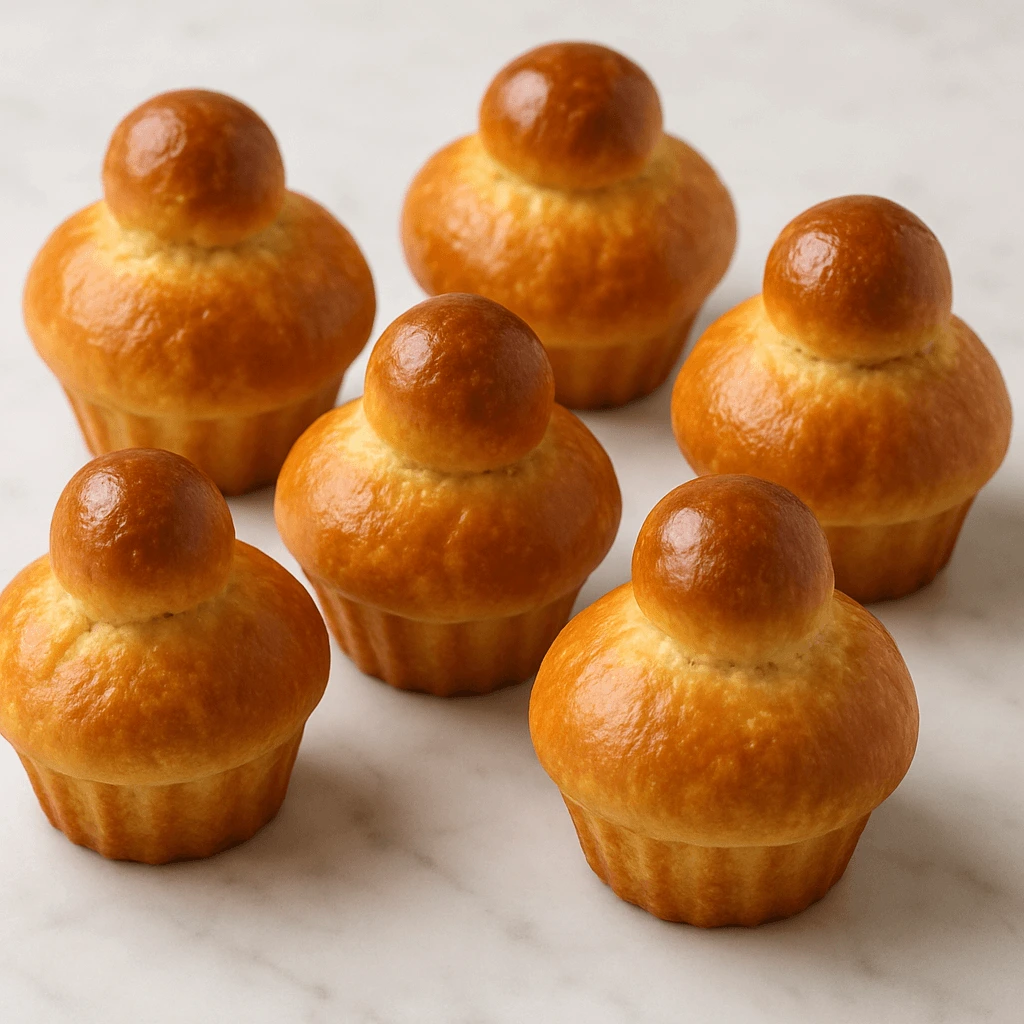
Small Brioches à Tête
Among the many treasures of the French boulangerie, few pastries evoke the same sense of nostalgia and refinement as the brioche à tête. These small, golden domes—named for the distinctive little “head” that crowns each one—are the embodiment of French morning elegance: rich, airy, and unmistakably luxurious.
The brioche à tête is more than a roll; it is a ritual. Traditionally served at breakfast or during a leisurely afternoon tea, it carries within its delicate crumb centuries of baking tradition. Its iconic silhouette, with a smooth, rounded base and a smaller, sculpted knob on top, is instantly recognizable and lovingly associated with Parisian pastry counters and country village bakeries alike.
What makes these brioches exceptional is their deeply nuanced texture: light as a feather, yet satisfyingly rich. Behind their glistening, golden crust lies a tender interior that pulls apart in soft, buttery strands. The flavor is subtle and balanced—never overly sweet—allowing the quality of the dough and the craftsmanship to shine through.
To shape a true brioche à tête is to engage in a delicate dance of technique and touch. The dough is enriched, slow-fermented, and handled with patience and care. Shaping the head—traditionally by pinching and twisting a small portion of dough—is a skill passed from one baker to the next, often learned by hand rather than by instruction.
Despite their apparent simplicity, these brioches require precision. Every detail—from the proofing time to the exact oven humidity—plays a role in achieving their flawless rise and burnished sheen. And yet, when done right, the result feels effortlessly elegant.
Whether enjoyed plain, still warm from the oven, or with a touch of jam, honey, or fresh butter, petites brioches à tête are a timeless indulgence. They speak of Sundays, of café counters, of quiet mornings spent savoring something made with intention. In a world that often rushes, they remind us to slow down—and to delight in the artistry of simplicity.Brioche – Wikipedia
SMALL BRIOCHES:
Yields: 6 small brioches or 1 large brioche for 4 people
Timings
- Preparation: 40 minutes
- First proof (pointage): 30 minutes
- Chilling time: Minimum 2 hours
- Final proof (pousse): 1 hour 30 minutes
- Baking time:
– 8 minutes for small brioches
– 20 minutes for larger versions - Storage: Up to 48 hours
Ingredients for 240 to 300 g of Brioche Dough
- 125 g gruau flour (strong bread flour)
- 62 g eggs (roughly 1 large egg + a teaspoon)
- 12 g whole milk
- 12 g sugar
- 2.5 g fine salt
- 4 g fresh baker’s yeast
- 25 g crème fraîche
- 60 g softened butter
INGREDIENTS FOR small brioches
- 240 to 300 g cold brioche dough (either 6 portions of 40 g for individual brioches or 300 g for a large brioche)
Egg Wash
- 25 g whole egg
- 20 g egg yolk
- 25 g whole milk
Equipment
- Stand mixer
- Bench scraper (or corne)
- Dough cutter (coupe-pâte)
- Pastry brush (pinceau)
- 6 individual brioche à tête molds (6 cm diameter) or 1 large brioche à tête mold (16 cm diameter)
Method for Small Brioches à Tête
- Divide and Shape:
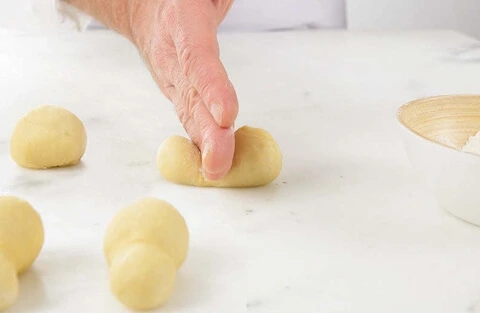
Divide the dough into six equal portions, each about 40 g. Shape them into small balls and refrigerate for 15 minutes before shaping. - Forming the Brioche:
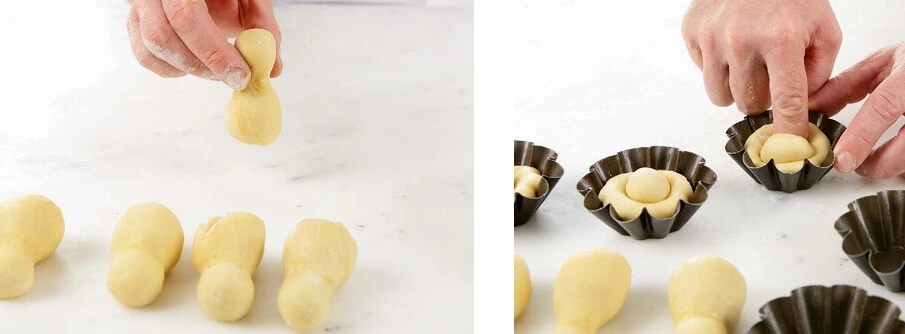
Roll each portion into a small log. Using the edge of your hand, create a slight indentation about two-thirds of the way down the dough, creating a constriction between the “head” and the “body” of the brioche without twisting. Pinch the “head” tightly and insert it into the bottom of a lightly buttered brioche mold.
- Shaping the Head:
Lightly flour your finger and gently lift the “head” away from the body, forming a hook-like shape. This creates the signature brioche à tête look. - Egg Wash:
Using a pastry brush, delicately apply the egg wash to the surface of each brioche. - Proofing:
Let the dough rise in a warm, humid environment (around 26°C / 79°F) for approximately 1 hour 30 minutes. If using an oven, place a bowl of boiling water inside the oven to maintain humidity.
- Final Egg Wash and Baking:
Apply a second coat of egg wash and bake on a hot baking sheet at 220°C (428°F / Gas Mark 7-8) for about 8 minutes, or until the brioches are golden and have risen beautifully. - Unmolding:
Immediately after removing the brioches from the oven, unmold them to allow the steam to escape, ensuring they stay light and fluffy.
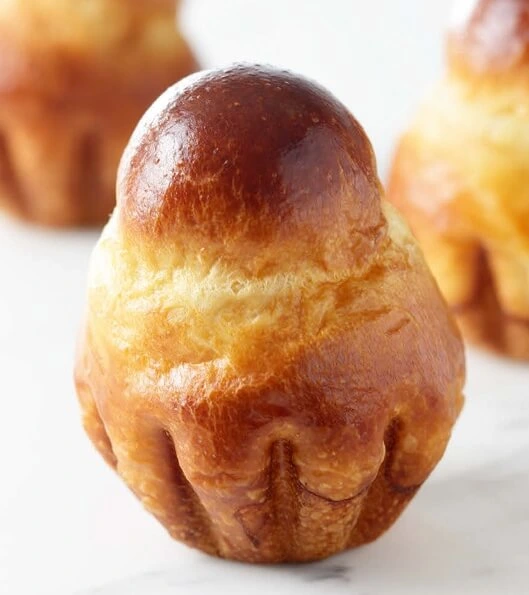
hef’s Tip: The Secret to a Perfect Brioche “Head”
To achieve a perfectly formed “head” that is well detached from the body of the brioche, avoid pressing too hard when creating the indentation with your hand. The goal is to create gentle tension between the head and the body without forcing it. A light touch is all that’s needed to define the separation effectively.
Another tip: Before shaping the brioches, ensure the dough is cold. This makes it easier to handle and results in brioches that keep their shape during baking without excessive spreading. If you’re working in a warm kitchen, you can also let the dough rest in the fridge between each step to maintain an optimal texture
Conclusion: Mastering the Art of Petites Brioches à Tête
Creating Petites Brioches à Tête is a delightful journey into the world of French pastry. While the process may seem intricate, the result is worth every minute of patience and attention to detail. From the soft, buttery dough to the delicate shaping and golden, glossy finish, these brioches embody the true spirit of French craftsmanship.
The unique “head” formation, achieved through a simple yet effective technique, adds an unmistakable charm to each piece. Whether served as a breakfast treat or a light afternoon snack, these brioches elevate any occasion with their elegance and depth of flavor.
And with the added benefit of being able to refrigerate and store them for up to 48 hours, these brioches become the perfect make-ahead option for busy mornings or special gatherings. Once you master the technique, you’ll find yourself enjoying the simple joy of freshly baked brioche whenever you please.
Baking, much like any art form, is about repetition, patience, and refinement. The more you practice, the closer you get to the perfect brioche. So, don’t hesitate to embrace the process, make adjustments as needed, and enjoy the rewards of your efforts.How to Shape the Perfect Brioche à Tête
Frequently Asked Questions (FAQ)
Q1: How can I make sure my brioches rise properly?
A: Ensure that your dough is kept in a warm, humid environment during proofing. If your kitchen is cold, you can place a bowl of boiling water in the oven with the dough to help maintain warmth and moisture. Also, don’t rush the proofing time—patience is key to getting that beautiful rise.
Q2: Can I freeze the dough or the brioches?
A: Yes, both the dough and the finished brioches can be frozen. For dough, shape it into balls, wrap it tightly in plastic, and freeze. For baked brioches, let them cool completely before wrapping and freezing them. To bake frozen dough, let it thaw in the refrigerator overnight and then allow it to rise before baking.
Q3: My brioches came out dense. What went wrong?
A: Dense brioches are usually a result of under-proofing or not having enough fat in the dough. Ensure that your dough has had enough time to rise and that you’re incorporating the butter fully. A good tip is to make sure the dough feels light and airy before shaping.
Q4: How can I get the “head” of my brioche to stand out more?
A: When shaping the dough, make sure you create a distinct constriction between the head and the body without twisting. Pinch the top tightly and insert it firmly into the mold. Applying the egg wash twice before baking will also help achieve a beautiful golden finish that highlights the “head” beautifully.
Q5: What’s the best way to serve these brioches?
A: These brioches are perfect as a breakfast treat, but you can also serve them as an elegant snack with jam, honey, or a light dusting of powdered sugar. Pair them with a hot drink like coffee or tea to enhance their light, buttery flavor.