Easy Cake Vanille in 10 Minutes – Sweet Perfection in No Time

Slice of golden vanilla sponge cake with soft, airy crumb on a white plate, decorated with light dusting of powdered sugar.

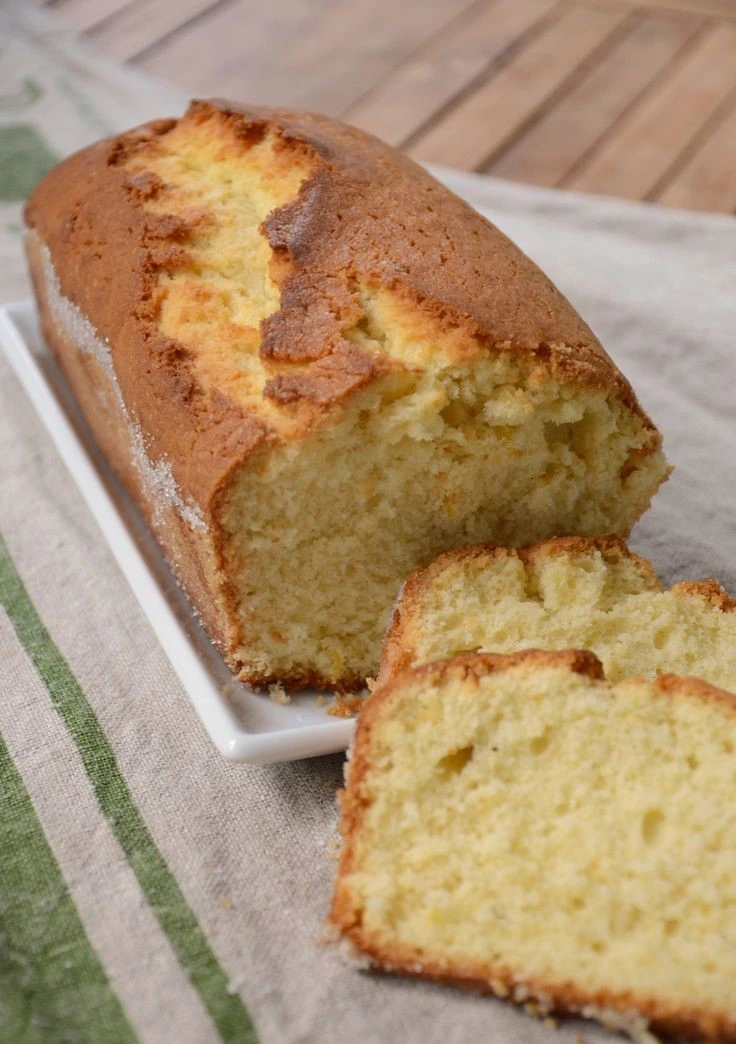
Few desserts can rival the charm of a perfectly baked vanilla sponge cake.

With its golden surface, delicate aroma, and pillow-soft texture, it’s the kind of treat that feels both comforting and refined.

Every bite melts in your mouth, carrying just the right balance of sweetness and that unmistakable warmth of pure vanilla.

This cake is the very definition of simplicity done right. It’s quick to prepare, fuss-free, and turns out beautifully every single time.

The method is straightforward: gentle mixing, careful folding, and precise baking to create a light, airy crumb that stays moist and tender.

Its versatility makes it a true kitchen hero —

serve it as a humble tea-time companion, dress it up with fresh fruit and cream for a sophisticated dessert, or layer it into an elegant celebration cake.

The texture is so light that it pairs effortlessly with almost any filling or topping, from tangy citrus curds to rich chocolate ganache.

Baking this cake fills your kitchen with the nostalgic scent of home, a fragrance that instantly invites smiles and anticipation.

It’s a recipe you’ll turn to again and again — not just for its flavor, but for the joy it brings to anyone who shares a slice.

Golden, fluffy, and endlessly adaptable, the vanilla sponge cake proves that sometimes, the simplest things are the most unforgettable.

Vanilla Sponge Cake – Professional Bakery Recipe

Ingredients (for a large batch):

  • 1 kg icing sugar (sucre glace)
  • 1 kg butter, softened
  • 1 kg 200 g whole eggs
  • 1 kg 400 g sifted flour
  • 24 g baking powder

Method:

  1. Preheat the oven to 170 °C (340 °F). Prepare your cake tins by greasing and lining them with baking paper.
  2. Cream the butter and icing sugar together in a mixing bowl until light and fluffy. This step incorporates air, giving your sponge its signature lightness.
  3. Add the eggs gradually, mixing well between each addition to prevent curdling.
  4. Sift the flour and baking powder together. Gently fold them into the mixture, taking care not to overmix.
  5. Pour the batter evenly into prepared tins and smooth the surface.
  6. Bake for about 35–45 minutes, depending on tin size
  7. until the cakes are golden and a skewer inserted in the center comes out clean.
  8. Cool in the tin for 10 minutes before transferring to a wire rack.

Chef’s Tip: For a professional bakery finish, chill the cooled cakes before trimming and layering — this makes handling much easier and prevents crumbling.

In the world of fine pâtisserie

Few creations embody refinement as perfectly as the classic vanilla sponge.

Every detail of this recipe has been orchestrated with precision. It balances the silken richness of pure butter with the delicate sweetness of finely milled icing sugar.

The result is a cake that rises with effortless grace. Its crumb is light as air yet has a depth of flavor that lingers delicately on the palate.

The magic begins with the meticulous creaming of butter and sugar. They transform into a pale, cloud-like texture infused with countless tiny air pockets.

Fresh whole eggs are then introduced slowly. Each addition enriches the batter while preserving its airy structure.

A blend of sifted flour and a whisper of leavening ensures a tender crumb. It yields to the touch yet holds its shape with quiet confidence.

Baked to a warm golden hue, the sponge releases a soft fragrance of vanilla. The aroma drifts through the kitchen like a gentle promise.

It is a versatile canvas for the pastry chef’s imagination. Layer it with whipped cream and seasonal fruit for a delicate tea-time indulgence. Dress it in fondant and intricate decorations for an opulent wedding centerpiece. Or serve it simply with a dusting of sugar to let its purity shine.

This is not just a cake. It is an expression of craftsmanship, where balance, texture, and flavor unite in a timeless creation.

One slice is enough to understand why the vanilla sponge has held its place as a jewel of classic French baking for generations.

Conclusion

The vanilla sponge cake is more than a recipe — it is a testament to the art of balance and precision in baking.

Every element, from the gentle aeration of butter and sugar to the delicate folding of sifted flour, contributes to its flawless texture and refined flavor.

It is a cake that embodies both simplicity and sophistication, making it as suitable for an intimate afternoon tea as it is for the grandest of celebrations.

Its golden surface hides a crumb so light it seems to vanish on the tongue, leaving behind the warm, comforting essence of vanilla.

This quiet elegance is what has secured its place in the repertoire of master pâtissiers across the world.

In professional kitchens, it serves as a versatile base for endless variations; in the home, it becomes a signature treat that brings joy to every gathering.

Ultimately, the vanilla sponge cake proves that true indulgence does not always require extravagance — only the finest ingredients.

a touch of skill, and the patience to let each step unfold with care.

It is the kind of creation that doesn’t just satisfy

the appetite, but stirs fond memories, elevates occasions, and reminds us why the classics endure.How to Bake a Moist Sponge Cakehttps://www.bbcgoodfood.com/howto/guide/spongy-cake-tips

Frequently Asked Questions – Vanilla Sponge Cake

Q: What makes this vanilla sponge cake so light and airy?
A: The secret lies in the careful creaming of butter and sugar,

followed by the gradual incorporation of eggs. This method traps tiny air bubbles, which expand during baking to create a soft, fluffy texture.

Q: Can I use this sponge as a base for layered cakes?
A: Absolutely.

Its fine crumb and stable structure make it ideal for multi-layer creations, from wedding cakes dressed in fondant to fresh cream and fruit-filled celebrations.

Q: How can I keep the sponge moist for several days?
A: Once cooled, wrap the cake tightly in plastic wrap or store it in an airtight container.

For longer storage, you can refrigerate it for up to five days or freeze it for up to three months without compromising its quality.

Q: Is it possible to add flavors or infusions to the batter?
A: Yes — while the classic recipe celebrates pure vanilla,

you can incorporate citrus zest, almond essence, or even delicate floral infusions like lavender for a unique twist.

Q: Why is sifting the flour important?
A: Sifting aerates the flour, removes any lumps, and ensures even mixing with the baking powder, resulting in a smoother batter and a lighter crumb.

Cream Filling for Sponge Cakeshttps://briochechic.com/french-quatre-quarts-cake-secret/

Secrets of Perfect Puff: A Chef’s Chicken and Leek Pastry You Can Make at Home

Chicken and leek puff pastry baked to golden perfection

chicken and leek puff pastry

Golden, crisp, and delicately layered on the outside, meltingly tender and flavorful on the inside — the chicken puff pastry is a timeless classic that brings together rustic comfort and culinary finesse. It’s the kind of dish that feels at home on any table, from elegant dinners to casual lunches, combining rich tradition with modern versatility.

At the heart of its appeal lies contrast. The flaky, buttery pastry offers a satisfying crunch that yields to a warm, savory filling — usually made with gently cooked chicken enveloped in a creamy, seasoned base. Each bite is a play of texture and temperature: lightness from the puff, depth from the filling, and a harmonious balance of flavors that lingers just long enough.

Visually, it’s stunning.

Whether shaped as individual parcels, braided logs, or large rustic pies, chicken puff pastries command attention with their golden hue and artisan folds. A gentle brush of glaze, a scattering of seeds or herbs, and they become as beautiful as they are delicious.

This dish is more than a recipe — it’s a canvas. It welcomes variations with open arms: a touch of spice for warmth, a hint of citrus for brightness, or a blend of vegetables for added depth. It adapts to seasons, to leftovers, to bold creativity or refined simplicity. You can serve it fresh from the oven, paired with a crisp salad, or enjoy it gently warmed for a cozy lunch.

But perhaps most of all, the chicken feuilleté is a story of comfort wrapped in craft. It’s a celebration of care — of folding, filling, and baking — that turns humble ingredients into something truly satisfying. Whether made ahead for guests or pulled from the oven on a quiet evening, it delivers warmth, flavor, and a touch of French charm in every slice.

Chicken and Leek Puff Pastry

A flaky golden crust filled with creamy chicken and leek — a French classic reinvented with elegance.


Dough Preparation: Classic Puff Pastry (Pâte Feuilletée)

Quantities for large production (adjust as needed)

Ingredients for the détrempe (base dough):

  • 2 kg all-purpose flour (preferably T55)
  • 500 g unsalted butter (softened, for mixing)
  • 60 g fine sea salt
  • 900 g cold water

For the beurrage (laminating fat):

  • 1.5 kg pastry margarine or dry tourage butter

Method:

  1. Make the détrempe (base dough):
    • In a stand mixer or by hand, combine the flour, softened butter, and salt dissolved in the cold water.
    • Mix just until a homogeneous dough forms. Do not overwork.
    • Flatten into a square, wrap in plastic, and refrigerate for at least 2 hours.
  2. Prepare the beurrage:
    • Flatten the 1.5 kg of margarine or dry butter between two sheets of parchment to form a square roughly two-thirds the size of the détrempe.
    • Chill until the butter and dough are at similar firmness.
  3. Enclose the butter:
    • Roll out the détrempe into a large rectangle. Place the beurrage in the center and fold the dough over it to fully enclose the fat. Seal the edges.
  4. Lamination (folding turns):
    • Perform 5 single turns (folds in 3) or 4 double turns (book folds), resting the dough in the refrigerator for 30–45 minutes between each turn.
    • Always roll in the same direction and keep the dough cool and evenly floured.

Filling: Creamy Chicken and Leek

Ingredients (adjust for batch size):

  • Cooked chicken breast or thigh (poached, roasted, or sautéed), cut into small cubes
  • Fresh leeks, washed, trimmed, and finely sliced
  • Butter or oil for cooking
  • Flour (for thickening)
  • Milk or cream (for béchamel-style sauce)
  • Salt, pepper, nutmeg to taste
  • Optional: grated cheese (e.g., Comté or Emmental), herbs (thyme, parsley)

Method:

  1. Sauté the leeks in butter until soft and translucent.
  2. Add a spoonful of flour to make a light roux, then gradually add milk or cream to create a thick, smooth sauce.
  3. Season with salt, pepper, and a pinch of nutmeg.
  4. Fold in the cooked chicken and stir until well coated and warmed through.
  5. Optional: Add chopped herbs or a handful of grated cheese for extra richness.
  6. Let the filling cool completely before using.

Assembly & Baking

  1. Roll out the puff pastry to 3–4 mm thickness. Cut into squares or rectangles depending on the shape desired (triangles, parcels, or logs).
  2. Place a spoonful of filling in the center of each piece. Fold and seal using water or egg wash on the edges. Crimp with a fork or press gently.
  3. Chill the assembled pastries for 30 minutes before baking to maintain the shape.
  4. Brush with egg wash (1 egg yolk + splash of water or milk) for a golden finish.
  5. Bake in a preheated oven at 190–200°C (375–390°F) for 20–30 minutes, or until puffed and golden brown.
  6. Serve hot or warm, ideally with a crisp salad or seasonal garnish.

Storage Tips

  • Unbaked pastries can be frozen and baked directly from frozen (add a few extra minutes).
  • Baked pastries can be reheated in a hot oven (180°C) for 8–10 minutes to revive crispiness.

Conclusion

The chicken and leek puff pastry is a brilliant showcase of how classic French technique can elevate even the most humble ingredients. Beneath its golden, flaky layers lies a creamy, savory filling — warm, aromatic, and deeply satisfying. It’s a dish that brings together texture, temperature, and taste in perfect harmony.

What makes it so special is its versatility. It can be served at an elegant dinner or packed for a picnic. take the form of delicate individual puffs, generous family-style parcels, or even canapé-sized bites for a refined cocktail hour. It works just as beautifully as a main course, a comforting lunch, or a festive appetizer.

Crafting this dish is also a rewarding experience. From the careful lamination of the dough to the gentle cooking of the leeks and the assembly of each parcel, every step invites the cook to take their time and treat each component with care. The result is a creation that feels homemade yet refined — the kind of dish that earns compliments at the table and leaves guests asking for seconds.

Whether you make it entirely from scratch or use quality shortcuts, the chicken and leek puff pastry delivers — with elegance, flavor, and soul. It’s not just food; it’s craftsmanship.


Questions & Answers

Can I use store-bought puff pastry?
Yes, for convenience, high-quality store-bought puff pastry works well. Just ensure it’s made with real butter if possible for the best flavor and layering.

How far in advance can I make this?
You can prepare the filling and shape the pastries up to 24 hours in advance. Keep them refrigerated and bake fresh for the best result. Alternatively, freeze them unbaked and bake straight from frozen.

reheat them without losing crispiness?
Reheat baked pastries in a preheated oven at 180°C (350°F) for about 8–10 minutes. Avoid the microwave — it will make the crust soggy.

Can I make a vegetarian version?
Absolutely. Replace the chicken with sautéed mushrooms, spinach, or a mix of root vegetables. Add cheese or béchamel for richness.

side dishes go well with this pastry?
A crisp green salad with mustard vinaigrette is a perfect pairing. Roasted vegetables or a creamy soup can also complement the dish beautifully.

What if my puff pastry doesn’t rise well?
Make sure your dough and filling are cold before baking, and your oven is properly preheated. Avoid overworking the dough, and always give it time to rest between folds.

use leftover roast chicken?
Yes, this is a great way to use up roast chicken. Just ensure it’s moist and cut into small pieces to mix evenly with the leek and sauce.Ready in 3 Minutes: Elegant Gorgonzola, Pear & Almond Crackers – briochechic/

Link to reputable sources such as:

Secrets of a Perfect Milk Chocolate Tart on Cocoa Crust – Pastry Chef’s Favorite

Overhead view of a glossy milk chocolate tart set in a cocoa pastry crust, resting on a marble surface

milk chocolate tart

Refined, intense, and irresistibly indulgent, the chocolate tart stands as a true icon of French pâtisserie. With its perfect balance between crispness and creaminess, bitterness and sweetness, it has captivated chocolate lovers for generations.

Behind its seemingly simple appearance lies a pastry masterpiece. A delicate, golden crust cradles a smooth, silky ganache that reveals all the depth and complexity of fine chocolate. Each bite is a journey — a harmony of textures and flavors that lingers on the palate and awakens the senses.

What makes the chocolate tart truly special is its versatility. It’s a canvas for creativity, welcoming all sorts of variations: crisp praline layers, hints of spice, salted caramel swirls, or glossy mirror glazes. Whether rustic or refined, minimalist or extravagant, it can easily adapt to any style — from a cozy homemade dessert to a sophisticated finale in a gourmet restaurant.

Yet its charm lies not only in its taste or aesthetics, but in the memories it evokes. A chocolate tart can recall childhood afternoons, shared moments, comforting flavors. It also carries the elegance of an after-dinner treat, served with a glass of wine or a strong espresso. It’s nostalgic and modern all at once — a dessert that speaks to the heart as much as to the palate.

Though it requires precision and care, the chocolate tart remains accessible to anyone who wishes to explore the art of pâtisserie. It’s a celebration of chocolate in its purest form — rich, expressive, and endlessly satisfying.

Milk Chocolate Tart on Cocoa Sweet Pastry

A refined and indulgent dessert with a delicate texture and rich chocolate flavor


Preparation Time

  • Active preparation: 30 minutes
  • Baking time: 20 to 25 minutes
  • Chilling time: Minimum 2 hours
  • Total time: Approximately 3 hours

Equipment Needed

  • Stand mixer or hand mixer
  • Mixing bowls
  • Rubber spatula and whisk
  • Saucepan
  • Rolling pin
  • Tart ring or tart tin (28 cm diameter recommended)
  • Sieve or fine strainer
  • Baking paper and baking weights (or dry beans)

Ingredients

For the Milk Chocolate Ganache Filling

  • 1 liter heavy cream (full-fat)
  • 12 egg yolks
  • 900 grams milk chocolate (preferably 35% cocoa solids)

For the Cocoa Sweet Pastry (yields enough for multiple tart shells)

  • 1 kilogram icing sugar (confectioners’ sugar)
  • 1 kilogram unsalted butter, softened
  • 10 whole eggs
  • 1850 grams all-purpose flour (T55 or equivalent)
  • 150 grams unsweetened cocoa powder
  • 7 grams baking powder

Note: This quantity of dough is suitable for several tart bases. You may freeze the unused dough for later use.


Step-by-Step Instructions

1. Preparing the Cocoa Sweet Pastry Dough

  1. In a large mixing bowl or the bowl of a stand mixer, cream the softened butter with the icing sugar until pale and fluffy.
  2. Add the eggs one at a time, mixing well between each addition.
  3. Sift together the flour, cocoa powder, and baking powder, then add to the mixture.
  4. Mix just until the dough comes together. Avoid overworking.
  5. Divide and flatten the dough into discs. Wrap in plastic wrap and refrigerate for at least 2 hours.

2. Lining and Pre-Baking the Tart Shell

  1. Roll the chilled dough out to 3 mm thickness on a lightly floured surface.
  2. Line a tart tin or tart ring with the dough. Trim the edges neatly and prick the base with a fork.
  3. Place in the refrigerator for 30 minutes to firm up.
  4. Preheat the oven to 180°C (356°F).
  5. Line the tart shell with baking paper and fill with baking weights or dry beans.
  6. Bake blind for 20 to 25 minutes or until the pastry is fully cooked and lightly crisp.
  7. Remove the weights and let the shell cool completely.

3. Making the Milk Chocolate Ganache

  1. Chop the milk chocolate finely and place it in a heatproof bowl.
  2. In a saucepan, bring the cream just to a simmer. Do not boil.
  3. Gradually pour the hot cream over the chocolate in three additions, stirring gently with a spatula after each addition to create a smooth emulsion.
  4. Once the chocolate is melted and fully combined, incorporate the egg yolks gently. Do not whisk, as you want to avoid incorporating air.
  5. Let the ganache cool slightly before pouring it into the baked tart shell.

4. Assembly and Chilling

  1. Pour the warm ganache filling into the cooled tart shell, smoothing the surface with a spatula if necessary.
  2. Carefully transfer the tart to the refrigerator and let it set for at least 2 hours.
  3. Once set, you may garnish the tart with chocolate shavings, cocoa nibs, or a light dusting of cocoa powder, depending on your presentation style.

Tips and Variations

  • For added texture, you can spread a thin layer of crispy hazelnut praline at the bottom of the tart shell before pouring the ganache.
  • To balance the sweetness of the milk chocolate, you may substitute 30% of it with a good quality dark chocolate.
  • This tart pairs beautifully with lightly whipped cream, crème fraîche, or a scoop of vanilla bean ice cream.
  • The sweet pastry dough can be made in advance and kept in the fridge for up to 3 days or frozen for up to 2 months.

Conclusion

The milk chocolate tart is more than just a dessert — it is a timeless indulgence, a celebration of texture, technique, and deep, comforting flavors. At first glance, it might seem simple, even understated. But one slice reveals the care behind every step: a crisp, balanced cocoa pastry that gives way to an irresistibly smooth ganache, rich with the velvety softness of milk chocolate and the warmth of egg yolk.

What makes this tart truly exceptional is the harmony it achieves. Neither too sweet nor too bitter, it strikes the perfect note between accessibility and sophistication. It is equally at home as a family dessert or as a refined centerpiece on a dinner party table. Its clean finish and glossy surface offer a touch of elegance, while the familiar flavor of milk chocolate evokes nostalgia, childhood, and comfort.

Moreover, this tart invites personalization. You can elevate it with the addition of spices, a touch of fleur de sel, or a layer of praline. You may serve it as is, or paired with fresh berries, a quenelle of crème fraîche, or a drizzle of caramel. In every case, the milk chocolate tart delivers — it satisfies the eye, the palate, and the heart.

Making it requires care and patience, but no extravagant skill. It is a dessert for anyone who respects the process, loves honest ingredients, and appreciates the quiet luxury of a well-crafted slice.


Questions & Answers

Can I prepare this tart in advance?
Yes. The tart can be made up to 48 hours in advance. It actually benefits from resting in the refrigerator, as this allows the ganache to fully set and the flavors to develop. Keep it covered to avoid absorbing any odors.

Can I freeze the tart?
You can freeze the tart base once it’s baked, but it is not recommended to freeze the ganache once poured. The texture of the ganache may suffer after thawing. For best results, assemble and chill the tart fresh.

What kind of chocolate should I use?
Use high-quality couverture milk chocolate, ideally with 35–40% cocoa solids. Avoid overly sweet or low-quality chocolate bars, as they can make the ganache greasy or too sweet. Brands like Valrhona, Callebaut, or Cacao Barry work beautifully.

Can I use dark chocolate instead of milk chocolate?
Yes, but you must adjust the recipe slightly. Dark chocolate contains less sugar and more cocoa solids, which affects the texture and sweetness. For a darker version, use about 750 g of dark chocolate and consider increasing the cream slightly to keep the filling soft.

Is it possible to make this tart gluten-free?
Absolutely. Replace the all-purpose flour in the pastry with a gluten-free flour blend suitable for baking. Be sure the blend includes a binding agent (such as xanthan gum) for structure. The ganache itself is naturally gluten-free.

How should I store leftovers?
Store the tart in an airtight container in the refrigerator. It will keep well for 3 to 4 days. Let it sit at room temperature for 10–15 minutes before serving to bring out the full flavor and texture of the ganache.

What can I serve with this tart?
It pairs well with lightly whipped cream, vanilla bean ice cream, raspberry coulis, or even a spoonful of salted caramel. For drinks, consider espresso, strong black tea, or a glass of port or dessert wine.How to Make Easy Classic French Biscuits — 3 Styles, 3 Textures – briochechic .Ganache Science & Technique

Serious Eats – Understanding Ganache
An excellent breakdown of how ganache works chemically:
https://www.seriouseats.com/how-to-make-ganache

You’ll Never Buy Burger Buns Again After This Recipe

Homemade hamburger buns with golden crust on a wooden table

homemade hamburger buns

Soft, golden, and irresistibly fluffy — this hamburger bun is the perfect base for any gourmet burger. Its smooth, tender crumb melts in your mouth, while the light crust adds just the right amount of structure without overpowering the filling. Whether lightly toasted or served fresh, it holds together beautifully, even with juicy toppings and generous sauces.

Its subtle flavor enhances every bite, complementing meats, vegetables, and condiments alike. This bun is not just a carrier — it’s a vital part of the burger experience. From the first warm touch to the final satisfying chew, it brings comfort, elegance, and that unmistakable artisan quality to your table.

Perfect for backyard barbecues, homemade creations, or restaurant-level burgers, it elevates even the simplest ingredients into something memorable. Once you try this bun, no other will do — it’s the soft, pillowy crown your burger deserves.
Ingredients for Hamburger Buns

(Yields approx. 15–20 medium buns)

IngredientExact QuantityFunction & Notes
All-purpose flour (T45/T55)1 kgThe structure of the dough. Choose a flour with moderate-to-high gluten content for a soft yet strong bun.
Fine salt20 gEnhances flavor and regulates yeast activity. Do not mix directly with the yeast.
Fresh baker’s yeast30 gLeavens the dough and adds volume. If using dry yeast, reduce to approx. 10 g.
Water (lukewarm)400 gHydrates the dough. Ideally between 25–30°C to help activate the yeast without killing it.
Granulated sugar100 gAdds sweetness, feeds the yeast, and promotes browning during baking.
Whole eggs100 g (~2 eggs)Contribute richness, tenderness, and color. Bind the dough and enhance flavor.
Unsalted butter100 gAdds softness, a rich mouthfeel, and a light brioche flavor. Should be added cold or slightly softened at the end of kneading.

Pro Chef Tips:

Baking: Preheat oven to 180°C (356°F) and bake for 15–20 minutes depending on size, until deeply golden.

Mixing: Start slow, then knead at medium speed until the dough is smooth and elastic. Gluten development is key.

Butter incorporation: Add butter after the dough is well-formed, so it doesn’t hinder gluten structure. Add it in small chunks.

First rise (bulk fermentation): Let the dough rise at room temperature for 1.5 to 2 hours, or until doubled in size.

Shaping: Divide into balls of 80–100 g each for standard buns. Keep the tops smooth.

Second rise (proofing): Let the shaped buns rise for another 45 minutes to 1 hour.

Egg wash: Brush with beaten egg before baking for a shiny, golden finish.

Complete Hamburger Bun Recipe (Brioche Style)

Total Time: ~3.5 to 4 hours

Active time: 45 mins | Resting & proofing: ~3 hours
Baking time: 15–20 minutes


1. Prepare the Dough

In a stand mixer bowl (or large mixing bowl):

  1. Add 1 kg flour.
  2. Add 100 g sugar and 20 g salt on opposite sides of the bowl.
  3. Crumble 30 g fresh yeast (or 10 g dry yeast) into the center.
  4. Pour in 400 g lukewarm water (25–30°C).
  5. Add 100 g whole eggs (about 2 large eggs).

Mix on low speed for 4–5 minutes until a rough dough forms.


🧈 2. Add Butter (Final Kneading)

  1. Cut 100 g unsalted butter into small pieces (cold or soft).
  2. Add the butter slowly while kneading on medium speed.
  3. Continue kneading for 10–15 minutes, until the dough is smooth, stretchy, and not sticky.
    You should be able to stretch it gently without tearing (windowpane test).

3. First Rise (Bulk Fermentation)

  1. Cover the dough with a clean cloth or plastic wrap.
  2. Let it rise at room temperature for 1.5 to 2 hours, or until doubled in size.
    (Optional: Place in a slightly warm oven – 28–30°C – to speed up rising.)

4. Shaping the Buns

  1. Punch down the dough gently to remove excess gas.
  2. Divide into 80–100 g portions (for standard burger size).
  3. Shape into tight, smooth balls by folding the edges underneath.
  4. Place them on a tray lined with parchment paper, spacing them apart.

5. Final Proofing (Second Rise)

  1. Cover the buns lightly with a cloth.
  2. Let them rise again for 45 minutes to 1 hour, or until puffy and light.

6. Egg Wash + Optional Toppings

  1. Brush each bun gently with beaten egg (1 egg + pinch of salt).
  2. Optional: Sprinkle with sesame seeds, poppy seeds, or oats for decoration.

7. Baking

  1. Preheat oven to 180°C (356°F).
  2. Bake the buns for 15 to 20 minutes, or until golden brown on top and hollow-sounding when tapped underneath.
  3. Let cool on a rack before slicing.

Storage Tips

  • Store in an airtight container for up to 3 days at room temperature.
  • Can be frozen up to 2 months — wrap individually and reheat slightly before serving.

Conclusion

Making your own hamburger buns is more than just baking — it’s elevating your burgers from ordinary to unforgettable. These soft, golden, brioche-style buns offer the perfect balance of texture, flavor, and structure. Whether you’re hosting a BBQ, building a gourmet burger, or simply craving bakery-quality bread at home, this recipe delivers every time.

Once you taste the result, you’ll never go back to store-bought buns again. Soft inside, slightly crisp on the outside, and full of rich flavor — your burgers deserve nothing less.


Frequently Asked Questions (Q&A)

Q: Can I use dry yeast instead of fresh yeast?

A: Yes! Use about 10–11 g of dry yeast in place of 30 g of fresh yeast. Mix it directly with the flour.


Q: Can I use milk instead of water?

A: Absolutely. Milk will make the crumb even softer and slightly sweeter. Use the same amount (400 g).


Q: How do I make the buns shinier on top?

A: Brush them with egg wash before baking. For an extra glossy look, apply a second layer halfway through baking.


Q: Can I make the dough ahead of time?

A: Yes! After kneading, cover and refrigerate the dough overnight. Let it warm up 30–60 minutes before shaping.


Q: How long can I freeze them?

A: Once baked and cooled, freeze buns for up to 2 months. Reheat slightly before serving for best texture.

https://briochechic.com/perfect-homemade-donuts/. What is Gluten and Why It Matters in Baking – King Arthur Baking

Melt-in-Your-Mouth Magic: How to Make Real Marshmallows at Home

"Homemade vanilla marshmallows cut into cubes and dusted with powdered sugar on a tray"

how to make marshmallows

Soft, airy, and delightfully melt-in-the-mouth — marshmallows are more than just candy. They’re a sensory experience, a nostalgic memory, and a comforting bite of pure sweetness. With their delicate fluffiness and subtle flavor, marshmallows instantly transport us — to childhood afternoons, cozy bonfires, or festive dessert tables.

Yet behind their innocent appearance lies a fascinating story. Marshmallows have come a long way from their origins. Originally crafted from the root of the marshmallow plant — a medicinal herb used in ancient times — this treat has evolved into a beloved confection enjoyed around the world. From pillowy cubes dusted in sugar to high-end gourmet variations infused with vanilla, fruit, or exotic spices, marshmallows are constantly being reimagined.

Whether enjoyed on their own, melted into a mug of hot chocolate, toasted golden over an open flame, or layered into elegant pastries, marshmallows adapt to every occasion. Their irresistible texture — somewhere between a foam and a chew — makes them one of the most playful elements in modern sweets. Pastry chefs love to elevate them, kids can’t get enough of them, and even adults secretly sneak a few from the jar.

In this article, we’ll take you behind the scenes of homemade marshmallows: the magic of their texture, what makes them so unique, and how you can create your own version at home. It’s a recipe that balances precision with creativity, yielding a result that’s as fun to make as it is to eat.

Homemade Marshmallow (French Style) – Step-by-Step Recipe

Ingredients

  • 260 g granulated sugar
  • 100 g water
  • 160 g trimoline (invert sugar) – for the cooked syrup
  • 120 g glucose syrup
  • 170 g trimoline – to be added to the bowl
  • 36 g gelatin (sheets or powder), pre-soaked in cold water
  • Optional: natural flavoring (vanilla, fruit purée), food coloring, or coating mix (cornstarch + icing sugar)

Cook the syrup to exactly 126 °C (259°F) for the perfect texture.


Equipment You’ll Need

  • Stand mixer with whisk attachment
  • Saucepan
  • Sugar thermometer
  • Silicone spatula
  • 20×20 cm mold (or flexible frame)
  • Parchment paper or greased plastic sheet
  • Sieve for coating
  • Optional: piping bag for shaping

Step-by-Step Instructions

1. Prepare the Gelatin

Soak the gelatin in very cold water for about 10 minutes until softened. If using powder, bloom it in five times its weight in cold water.

2. Start the Syrup

In a saucepan, combine:

  • 260 g sugar
  • 100 g water
  • 160 g trimoline

Heat on medium heat. Once it reaches 110 °C, add the 120 g of glucose syrup.

Keep cooking the mixture until it reaches 126 °C. Do not stir after 110 °C to avoid crystallization.

Pro tip: Use a clean, wet brush to wipe down the inner walls of the pan to prevent sugar crystals.

3. Set Up the Mixer

In the stand mixer bowl, place:

  • The remaining 170 g trimoline
  • The drained gelatin

Start mixing gently at low speed just to combine.

4. Cooked Sugar Meets Gelatin

Once your syrup reaches 126 °C, immediately pour it in a thin stream into the mixing bowl while whipping on medium-high speed.

Continue to whip until the mixture becomes thick, glossy, and lukewarm (about 35–40 °C). This may take 8–10 minutes.

Don’t overwhip! The mixture must stay pourable. If it gets too stiff, it’ll be hard to mold.

5. Mold or Pipe

Quickly pour the mixture into a prepared mold lined with parchment or greased plastic. Smooth the top with an oiled spatula if needed.
Alternatively, use a piping bag to make shapes or ropes.

Let set at room temperature for 8 to 12 hours, uncovered.


Final Touch: Coating

Once set, unmold and cut into cubes or desired shapes using a sharp knife or scissors lightly oiled.

Toss pieces in a 1:1 mix of cornstarch and icing sugar to prevent sticking. Sift off excess.


Variations and Tips

  • Add natural vanilla, rosewater, or raspberry purée for flavor.
  • Use gel food coloring for swirls or pastel tones.
  • Dip in melted chocolate or use marshmallows in layered desserts, hot drinks, or homemade s’mores.

Storage

Keep marshmallows in an airtight container at room temperature for up to 2 weeks. Avoid humidity.

Do not refrigerate — moisture will ruin the texture.

Conclusion – More Than Just Fluff: Rediscovering the Magic of Marshmallows

Homemade marshmallows are more than a sweet treat — they’re a craft. A blend of precision, timing, and creativity that brings an airy texture and fresh flavor you simply can’t get from store-bought versions. Whether you want to recreate a childhood memory or surprise your guests with something unique and melt-in-your-mouth delicious, this recipe opens the door to a whole new world of confectionery.

What makes homemade marshmallows truly special is their versatility. You can personalize them with natural flavors, colors, even shapes. They’re just as at home in a cup of hot chocolate as they are on a dessert platter or nestled inside a gift box. And once you’ve tried them, there’s no going back — you’ll understand why pastry chefs and home bakers alike are so passionate about making them from scratch.

More than a recipe, making marshmallows is an experience: it teaches patience, attention to detail, and the joy of transforming simple elements into something enchanting.Link to storage and preservation tips section (internal anchor): “Read more on how to store your marshmallows properly.”Link to a culinary glossary for terms like glucose, blooming, or soft ball stage


FAQ – Your Marshmallow Questions Answered

Q: My marshmallows turned out sticky or too soft — what went wrong?
A: This usually means the syrup wasn’t cooked to the correct temperature. Make sure you reach exactly 126°C (259°F). A reliable sugar thermometer is essential.

Q: Can I use honey or maple syrup instead of trimoline or glucose?
A: These alternatives can work for flavor but may affect texture. Glucose and trimoline are used for their anti-crystallization properties and elasticity. If replacing, adjust expectations accordingly.

Q: How do I store homemade marshmallows properly?
A: Keep them in an airtight container at room temperature, ideally in a dry place. Don’t refrigerate them — humidity will ruin their light, fluffy texture.

Q: Can I make a vegan version?
A: Yes — you can use agar-agar, but the process and texture will be different. It’s a more advanced version that needs precise ratios and fast setting.

Q: Are marshmallows hard to make for beginners?
A: Not at all — as long as you follow the steps carefully and respect the sugar temperature, success is within reach. It’s a great entry point into candy making.

How to Make Easy Classic French Biscuits — 3 Styles, 3 Textures

Freshly baked ladyfinger biscuits on a cooling rack

how to make biscuits

In the delicate world of pâtisserie, biscuits are more than layers in a dessert—they are expressions of texture, craftsmanship, and emotion. Today, I present five distinct biscuit styles, each crafted with a unique intention, without listing ingredients or names. Let their textures, colors, and personalities paint the picture.

A Deep, Intense Creation
Dark and rich in tone, this biscuit exudes confidence. Its bold color hints at an indulgent character, offering a firm bite and a lingering finish. Perfect as a foundation or star element, it carries depth and elegance in equal measure.

The Pale Beauty
Subtly soft with a snowy appearance, this biscuit is all about lightness and gentleness. It brings a tender texture and a whisper of sweetness, balancing beautifully in layered desserts or served on its own as a refined delight.

The Airy Classic
Featherlight and full of bounce, this biscuit stands out for its sponge-like structure and ethereal texture. It soaks up accompanying flavors with grace and is the unsung hero in many timeless confections.

The Nutty Elegance
With a slightly crisp edge and a chewy heart, this biscuit reveals layers of finesse. Its texture is as inviting as its visual appeal, offering an experience that feels both rustic and refined. A true celebration of balance.

The Flourless Marvel
Unexpected and bold, this biscuit breaks conventions with its dense yet tender body. It delivers a rich, almost creamy bite that captivates the senses. With a surface that may crack ever so slightly, it tells a story of daring simplicity.

Chocolate Biscuit

Ingredients:

  • 40 eggs
  • 1 kg granulated sugar
  • 850 g flour
  • 150 g cocoa powder
  • 7 g baking powder

Required Equipment:

  • Stand mixer with whisk
  • Flexible spatula
  • Sieve
  • Baking trays
  • Parchment paper
  • Precision scale

Preparation:

  1. Preheat the oven to 180°C (fan-assisted).
  2. In a stand mixer, beat the eggs and sugar until the mixture becomes pale and fluffy, reaching the ribbon stage.
  3. Sift together the flour, cocoa powder, and baking powder.
  4. Gently fold the dry mixture into the egg mixture using a spatula, keeping the batter light and airy.
  5. Spread the batter evenly onto baking trays lined with parchment paper, in the desired shape.
  6. Bake for 10 to 12 minutes, depending on the thickness. The biscuit should be cooked through but still soft to the touch.
  7. Let it cool before unmolding or cutting as needed.

Ladyfinger Biscuit

Ingredients:

  • 400 g egg yolks
  • 350 g sugar
  • 500 g flour
  • 10 g vanilla
  • 600 g egg whites
  • 150 g sugar

Preparation:

  1. Preheat the oven to 180°C (350°F).
  2. Whisk the egg yolks with 350 g sugar and vanilla until pale and creamy.
  3. Beat the egg whites with 150 g sugar until stiff peaks form.
  4. Gently fold the egg whites into the yolk mixture.
  5. Sift in the flour and fold carefully to keep the batter light.
  6. Pipe the batter onto parchment-lined trays, dust with powdered sugar.
  7. Bake for 10 to 12 minutes. Let cool before use.

Almond Dacquoise Biscuit

Ingredients:

  • 300 g egg whites
  • 300 g sugar
  • 240 g almond powder
  • 200 g powdered sugar
  • 60 g flour

Preparation:

  1. Preheat the oven to 170°C (340°F).
  2. Whip the egg whites with sugar until firm meringue forms.
  3. Sift together almond powder, powdered sugar, and flour.
  4. Fold the dry ingredients gently into the meringue.
  5. Pipe the batter onto parchment-lined trays as desired.
  6. Bake for 15 to 18 minutes. Let cool before handling.

Flourless Chocolate Biscuit

Ingredients:

  • 600 g egg whites
  • 625 g granulated sugar
  • 400 g egg yolks
  • 170 g cocoa powder

Preparation:

  1. Preheat the oven to 180°C (350°F).
  2. Whip the egg whites with sugar until stiff peaks form.
  3. Gradually add the egg yolks while whisking briefly.
  4. Gently fold in the sifted cocoa powder.
  5. Spread the batter evenly on parchment-lined trays.
  6. Bake for about 12 minutes. Let cool before cutting.

Conclusion

The biscuits we’ve explored are far more than simple cake bases—they are true works of pastry art, each boasting its own unique texture, flavor, and personality. Whether it’s the airy lightness of the ladyfinger biscuit, the tender crunch of the almond dacquoise, or the rich intensity of the flourless chocolate biscuit, every recipe showcases the finesse of technique and depth of taste. Mastering these biscuits opens the door to endless creative possibilities—from elegant entremets to festive cakes and modern classics.

Beyond technique, it’s also a sensory and creative journey. Every step, every ingredient, every careful fold matters to achieve the perfect harmony of flavors and textures. These details transform a simple pastry into a moment of sharing and emotion.Link to your Opéra Cake recipe:
“These sponge bases pair perfectly with layered desserts like the classic Opéra Cake.”A link to La Cuisine de Référence or Escoffier’s guide

Questions & Answers

Q1: Can these biscuits be prepared in advance?
Yes, all of these biscuits keep well for several days in an airtight container at room temperature, and can also be frozen for longer storage if properly wrapped.

Q2: What molds or trays should I use for these biscuits?
For ladyfingers and dacquoise, baking trays lined with parchment paper and a piping bag for shaping are ideal. The flourless chocolate biscuit is spread directly onto a baking tray. Round, square, or ring molds work well for cutting into shapes.

Q3: Can ingredients be substituted?
These biscuits rely on classic ingredients for specific textures and flavors. For example, almond powder in dacquoise can be replaced with other nut powders but will change the final result. It’s best to stick to the recipes for optimal outcomes.

Q4: How do I achieve a light and airy texture?
The key lies in properly whipping the eggs (whites or yolks) and gently folding in the dry ingredients. Using an electric whisk to get stiff peaks and folding with a spatula preserves the airiness in the batter.

Q5: What are the best uses for each biscuit?

  • Ladyfinger biscuits are perfect for charlottes or tiramisus.
  • Dacquoise pairs beautifully with mousses and creams in layered desserts.
  • Flourless chocolate biscuit is ideal for rich desserts like chocolate cakes or yule logs.

Whispers of Spice: The Chef’s Signature Black Sesame Tuiles

“Black sesame and gingerbread tuiles on parchment paper”

Black sesame tuiles

These black sesame and gingerbread tuiles are not mere garnishes — they are a poetic expression of contrast and balance, tradition and boldness. With their ultra-thin structure and graceful curve, they whisper elegance at first glance, before unfolding a full sensory journey on the palate.

The texture is crisp and whisper-light, offering a refined snap that gives way to a surprising depth of flavor. The warming, nostalgic notes of gingerbread evoke festive kitchens, winter spices, and golden warmth. But then comes the unexpected: the deep, toasty, slightly bitter allure of black sesame, adding intensity and intrigue. Together, they form a surprising harmony — comforting yet complex, familiar yet boldly modern.

Visually stunning with their lace-like silhouette and subtle sheen, these tuiles are as much a feast for the eyes as for the senses. They elevate a plated dessert with texture and finesse, pair perfectly with a scoop of sorbet or a silky mousse, and can even stand alone as a statement of culinary artistry.

Far more than a crisp cookie, each tuile tells a story. It’s a story of refined technique meeting emotional resonance — of French pastry traditions embracing faraway flavors. It’s about giving voice to simplicity, letting texture and aroma do the talking, and transforming a small bite into a lasting impression.

Whether part of a refined dessert course or served alongside an afternoon tea, these tuiles bring elegance, personality, and a spark of the unexpected — making them an unforgettable touch in any pastry chef’s repertoire.

A Pastry with Character

There’s a delicate moment in pâtisserie when simplicity meets elegance — and this recipe captures that very instant. These tuiles, infused with the toasty depth of black sesame and the comforting warmth of gingerbread, offer a texture-driven experience that seduces from the very first bite.

Designed to yield around 20 crisp, lacy rounds, the process begins with a quiet transformation: a slice of gingerbread, once soft and spongy, is finely ground and dried in a low oven. This step, though seemingly modest, is what gives the final result its soulful complexity. The dried crumb becomes aromatic powder — concentrated in flavor, with hints of honey, clove, and anise that bloom in the heat of baking.

Tuiles au sésame noir et au pain d’épices Black sesame tuiles

Quantité : 20 tuiles
Préparation : 20 minutes
Repos (facultatif) : 30 minutes
Cuisson : 3 minutes


Ingrédients

Pour la poudre de pain d’épices séchée :

  • 1 tranche de pain d’épice (permet d’obtenir environ 1 cuillère à café de poudre)

Pour la pâte à tuile :

  • 2 blancs d’œufs (env. 60 g)
  • 4 gros œufs entiers (env. 210 g)
  • 65 g de beurre
  • 60 g de farine (type 45)
  • 130 g de sucre glace
  • 130 g de sucre vergeoise brune
  • 1 cuillère à café rase d’épices à pain d’épice (ou cannelle)
  • 130 g de sésame noir

Finition :

  • Quelques graines de sésame noir supplémentaires
  • Quelques grains de fleur de se

The Art of Tuile Batter

Creating the perfect tuile batter is about balance: moisture, fat, and the right blend of sugars. In this recipe, egg whites and whole eggs come together, offering both structure and fluidity. Melted butter — added while still warm — binds the batter into a supple, semi-liquid mixture, while flour provides just enough body without compromising the desired thinness.

But it’s the use of two types of sugar that truly elevates this recipe: icing sugar ensures the batter dissolves smoothly, giving a fine-grain texture that disappears once baked, while dark brown vergeoise brings depth and a hint of molasses-like richness. This duo not only creates a beautifully even caramelization during baking, but also allows the tuile to be worked with immediately — no graininess, no waiting time.

The dry mix — flour, sugars, ground gingerbread, black sesame, and warming spice — forms the aromatic backbone. A touch of gingerbread spice mix (or simply cinnamon, in a pinch) reawakens the notes of winter pastry traditions, while the black sesame brings bold contrast: visually striking, slightly bitter, with a roasted undertone that plays beautifully against the sweetness.

The Bake: Thin, Crisp, Elegant

Shaping the tuiles is a tactile pleasure. Using fingers, the chilled batter is spread onto parchment-lined trays in thin, round circles roughly 5 cm across. The key is achieving a thickness of 1 to 2 mm — thin enough to turn crisp, thick enough to hold their shape. A few extra black sesame seeds and a sprinkle of fleur de sel finish each one, enhancing not just texture but also that magical tension between sweet and savory.

Baking takes just 3 minutes at 180°C. The transformation is fast: the batter melts, spreads slightly, and caramelizes to a light amber with deep specks of sesame throughout.

And here comes the crucial moment — the shaping. Straight from the oven, the tuiles are still flexible. This is your chance to give them their signature curved form. Draped gently over a rolling pin, a bottle, or shaped by hand, they firm up within minutes as they cool, retaining that perfect, crisp arch.

A Few Words on Taste and Technique

Why use both icing sugar and vergeoise in this recipe?
Each serves a distinct role. Vergeoise provides complexity and a caramel backbone, while icing sugar ensures finesse — it melts into the batter seamlessly and guarantees a smooth, refined finish. Combined, they yield a tuile that’s both flavorful and delicate — no graininess, no crunch from undissolved sugar.

Serving Ideas

These tuiles are astonishingly versatile. Serve them as a crunchy counterpoint to a creamy dessert — a scoop of black sesame ice cream, a quenelle of mascarpone chantilly, or a dark chocolate mousse. They’re equally at home alongside a fruit-based dessert (poached pears, spiced plums) or as an elevated garnish for plated desserts in a professional setting.

Even alone, with a cup of tea or coffee, they offer a deeply satisfying bite: nostalgic, textured, aromatic.


Chef’s Tip

If you want your tuiles to retain maximum crispness, store them in an airtight container as soon as they’ve cooled. They’re best enjoyed within 24–48 hours for optimal snap and aroma.

Conclusion

Light as a whisper and bold in flavor, these black sesame and gingerbread tuiles are proof that finesse doesn’t require complexity. In just a few minutes, they offer texture, aroma, and a spark of originality that elevates any dessert plate. Whether paired with a mousse, a sorbet, or enjoyed simply with tea, they bring that magical contrast between crunch and warmth.

Now it’s your turn to create the perfect snap — and let every bite tell a story.


Questions & Answers

Can I replace black sesame seeds?

Yes — you can substitute with white sesame for a milder flavor or even poppy seeds. However, black sesame offers a unique nutty bitterness and deep color that’s hard to replicate.

What if I don’t have gingerbread?

You can blend a spiced biscuit (like speculoos) or use fine breadcrumbs mixed with a pinch of warm spices (cinnamon, nutmeg, clove). While not identical, the spirit of the recipe will remain intact.

Can I make them ahead of time?

Absolutely. Once baked and cooled, these tuiles keep well for 2 to 3 days in an airtight container. Make sure to store them away from moisture and never leave them exposed to air, or they’ll lose their crispness.

Why do my tuiles come out soft?

Usually, this is due to a batter that’s too thick or a bake that’s too short. Spread the batter very thinly (1 to 2 mm) and bake until the edges are visibly golden.

Can I prepare the batter in advance?

Yes. In fact, letting the batter rest in the fridge for a few hours (or overnight) improves the texture. Just give it a gentle stir before using.Tarte au citron haute couture
👉 “These tuiles are perfect alongside a tangy lemon cream — like our Ultimate Lemon Tart RecipeÀ insérer discrètement mais stratégiquement (1–3 suffisent) :

Qu’est-ce que la vergeoise ?
👉 “Learn more about vergeoise sugar here
(Site Delifrance ou un dictionnaire culinaire sérieux)

Unlock the Secrets of Entremet Racine — A Symphony of Roots and Rich Flavors

Pouring vanilla crémeux layer on Entremet Racine sponge cake

entremet racine

The Entremet Racine is a stunning tribute to the natural beauty and depth of root vegetables, transformed into a refined and delicate dessert that captivates both the eyes and the palate. This modern French entremet embodies the perfect harmony between rustic ingredients and haute pâtisserie techniques, showcasing how humble roots can elevate a dessert to an art form.

At its core, the Entremet Racine celebrates the subtle sweetness and earthy nuances of carefully selected roots—often including ingredients such as beetroot, carrot, or ginger—infused into velvety mousses, silky creams, and moist sponge layers. These layers are meticulously assembled to offer a complex texture profile: the soft crumb of a tender biscuit, the light and airy texture of mousse, and the occasional crunch of praline or crumble.

Each component is crafted with precision to balance flavors: the natural earthiness of the roots is complemented by hints of citrus zest or warm spices, while a delicate glaze or mirror finish adds a sophisticated shine, making this dessert as visually mesmerizing as it is flavorful.

More than just a dessert, the Entremet Racine is an experience—an invitation to rediscover the richness hidden beneath the soil, transformed into a feast of elegance and subtlety. It’s perfect for those who appreciate desserts that tell a story, combining innovation, tradition, and nature’s bounty in every bite.

Whether served at a fine dining event, a seasonal celebration, or a special occasion, the Entremet Racine offers a unique journey that lingers in memory long after the last forkful.

Gelatin Mass for Entremet Racine

For 2 cakes, 18 cm diameter
Total weight: 175 g

IngredientWeightBaker’s %
Powdered gelatin (200 Bloom)25 g14%
Cold water150 g86%

Method

  1. Bloom the Gelatin:
    Place the powdered gelatin into a clean container. Add the cold water gently, and stir with a spoon until evenly mixed.
  2. Rest in Fridge:
    Refrigerate the mixture for 10–15 minutes to allow the gelatin to swell and fully bloom. The gelatin mass is now ready for use.
  3. Storage Tip:
    You can prepare the gelatin mass in advance and keep it refrigerated for up to 2 days before using.

Neutral Glaze

Total weight: 102 g

IngredientWeightBaker’s %
Water45 g44%
Sugar (1)38 g37%
Sugar (2)6 g6%
Pectin NH2 g2%
Glucose / Corn syrup11 g11%
Citric acid powder0.1 g<1%

Method

  1. Pour the water into a saucepan. Add the glucose syrup and Sugar (1).
  2. Heat the mixture gently to 30 °C (86 °F).
  3. In a separate bowl, mix Sugar (2) with the pectin NH until evenly combined.
  4. Add the pectin-sugar mixture to the saucepan containing water, glucose, and Sugar (1).
  5. Bring the entire mixture to a boil, stirring constantly.
  6. Add the citric acid powder (or substitute with 1 g lemon juice if unavailable) and mix well.
  7. Let the glaze simmer over medium heat for about 3 minutes.
  8. Strain the glaze through a fine sieve into a clean container to remove any lumps.
  9. Refrigerate the glaze at 4 °C (39 °F) for at least 6 hours to allow it to fully stabilize before use.

Entremet Racine — Components

1. Sacher Sponge

Total weight: 479 g (100%)

IngredientWeight%
Almond paste 70%150 g31%
Sugar (1)17 g4%
Egg yolks37 g8%
Odorless oil25 g5%
All-purpose flour30 g6%
Egg whites (1)100 g21%
Egg whites (2)40 g8%
Sugar (2)30 g6%
Dark chocolate Valrhona Guanaja 70%50 g11%

Method – Sacher Sponge

  1. Place almond paste and sugar (1) in the mixer bowl. Add egg yolks and egg whites (2).
  2. Mix with whisk attachment until combined, then whip until ribbon stage.
  3. Melt chocolate to 40–45 °C (104–113 °F) and set aside.
  4. Whip egg whites (1) with sugar (2) gradually until stiff peaks form.
  5. Mix a small portion of whipped egg whites with melted chocolate and oil to obtain a smooth airy mass.
  6. Add almond paste mixture to chocolate mixture and stir until smooth.
  7. Fold in sifted flour carefully.
  8. Gently fold in the remaining whipped egg whites.
  9. Divide batter into two 16 cm cake rings (230 g per ring). Smooth surface with offset spatula.
  10. Bake at 170 °C (338 °F) for 10–15 minutes.
  11. Let cool at room temperature for about 1 hour without unmolding.

2. Crème Anglaise

Total weight: 193 g (100%)

IngredientWeight%
Milk 3.2%110 g57%
Whipping cream 35%45 g23%
Egg yolks35 g18%
Sugar3 g2%
Vanilla pod1 pod<1%

Method – Crème Anglaise

  1. Mix milk, cream, and vanilla seeds in a saucepan. Bring to a boil.
  2. Beat egg yolks and sugar in a bowl. Slowly add hot milk mixture, then return to saucepan.
  3. Cook while stirring constantly with a whisk until temperature reaches 83–85 °C (181–185 °F).
  4. Use immediately.

3. Intense Vanilla Opalys Crémeux

Total weight: 315 g (100%)

IngredientWeight%
Crème anglaise160 g51%
Gelatin mass15 g5%
White chocolate Valrhona Opalys 33%140 g44%

Method – Crémeux

  1. Place white chocolate in a measuring cup. Strain hot crème anglaise over it.
  2. Add gelatin mass and stir with spatula until gelatin dissolves.
  3. Blend with hand blender for perfect emulsion.
  4. Pour crémeux into cake rings on top of the sponge (150 g per ring).
  5. Freeze until fully set.

Entremet Racine

For 2 cakes, 18 cm diameter


1. Crunchy Base

Total weight: 225 g

IngredientWeightBaker’s %
Milk chocolate Valrhona Jivara 40%55 g24%
Crunchy almond-hazelnut praliné Valrhona130 g58%
Crispy wheat flakes cereal20 g9%
Cocoa nibs20 g9%

Method – Crunchy Base

  1. Grind cocoa nibs into powder using a food processor and transfer to a clean bowl.
  2. Add the praliné and crispy wheat flakes.
  3. Melt the milk chocolate and pour it into the cocoa nibs and praliné mixture. Stir with a silicone spatula until smooth.
  4. Place two 16 cm cake rings on a tray lined with a silicone mat. Spread the crunchy mixture evenly inside the rings and smooth with an offset spatula. Freeze until hardened.

Tip: Alternatively, spread the mixture on a silicone mat, freeze, and cut discs with a 16 cm ring once hardened.


2. Dark Chocolate and Cocoa Nibs Mousse

Total weight: 893 g

IngredientWeightBaker’s %
Whipping cream 35% (1)225 g25%
Cocoa nibs40 g5%
Glucose / corn syrup37 g4%
Dark chocolate Valrhona Illanka 63%230 g36%
Milk chocolate Valrhona Jivara 40%37 g4%
Whipping cream 35% (2)324 g36%

Method – Mousse

  1. Heat cream (1) with cocoa nibs to just below boiling. Remove from heat, cover, and infuse for 30 minutes.
  2. Strain and weigh the infused cream; add extra cream if needed to return to original weight (225 g).
  3. Heat infused cream with glucose syrup to 60 °C (140 °F).
  4. Melt the milk and dark chocolates together.
  5. Pour warm cream mixture over chocolate and blend until smooth. Cover with cling film touching surface and cool to 35 °C (95 °F).
  6. Whip cream (2) to soft peaks.
  7. Fold whipped cream gently into chocolate mixture to form mousse.

3. Assembly

IngredientWeight
Dark chocolate and cocoa nibs mousseUse 200 g per ring
Frozen crunchy basesFrozen
Frozen sponge and crémeux layersFrozen

Assembly Method

  1. Prepare two 18 cm metal rings lined with acetate strips and place on a tray.
  2. Pipe half the mousse (200 g) into each ring.
  3. Place frozen sponge and crémeux layers on top, sponge side up. Press lightly so sponge sinks slightly into mousse.
  4. Fill molds with remaining mousse and smooth surface.
  5. Place crunchy base on top, clean excess mousse. Freeze at least 8 hours.

4. Chocolate Glaze

Total weight: 1210 g

IngredientWeightBaker’s %
Whipping cream 35%250 g21%
Cocoa powder100 g8%
Water130 g11%
Sugar350 g29%
Glucose / corn syrup120 g10%
Neutral glaze100 g8%
Gelatin mass160 g13%

Method – Chocolate Glaze

  1. Mix whipping cream and cocoa powder in a saucepan. Heat to 40 °C (104 °F) while whisking.
  2. Heat water, sugar, and glucose syrup to 110 °C (230 °F).
  3. Combine cream mixture with syrup, add neutral glaze and gelatin mass, blend until smooth.
  4. Cover with cling film touching surface, chill at 4 °C (39 °F) until stable.

5. Unmolding, Coating, and Decorating

IngredientWeight
Frozen assembled cakes
Stabilized chocolate glaze40 g
Cocoa nibs

Final Steps

  1. Remove cakes from molds, place on wire racks.
  2. Pour chocolate glaze (at 27 °C / 80 °F) evenly over cakes; let excess drip off. Repeat for second cake.
  3. Transfer cakes to serving plates with offset spatulas. Decorate with cocoa nibs.
  4. Refrigerate to defrost for a couple of hours before serving.

Conclusion

The Entremet Racine is much more than a dessert—it’s a celebration of textures, flavors, and the artistry of French pastry. From the crunchy almond-hazelnut base to the silky vanilla crémeux and the intense dark chocolate mousse infused with cocoa nibs, every layer is thoughtfully crafted to deliver a harmonious balance of earthiness, sweetness, and indulgence. This entremet showcases how classic techniques combine with creative ingredient pairings to create a stunning centerpiece perfect for special occasions or elevating any dessert table.

Although it requires patience and precision, the rewarding process and breathtaking result make the effort worthwhile. Whether you’re an experienced pâtissier or an ambitious home baker, mastering the Entremet Racine will undoubtedly enrich your baking repertoire and impress any guest lucky enough to taste it.Link to related techniques you’ve covered like “How to Make Perfect Mousse” or “Gelatin Blooming Tips.”
Example: “For tips on working with gelatin, see our detailed guide here.”


Frequently Asked Questions (FAQ)

Q1: Can I prepare parts of the entremet in advance?
A: Absolutely! Many components like the crunchy base, sponge, and crémeux can be made ahead and frozen. This makes assembly easier and allows flavors to develop beautifully.

Q2: What if I don’t have cocoa nibs?
A: Cocoa nibs add crunch and a slightly bitter depth. You can substitute with finely chopped toasted nuts like hazelnuts or almonds, though the flavor profile will vary slightly.

Q3: How should I store the finished entremet?
A: Store it in the refrigerator, covered, for up to 3 days. Bring it to room temperature for about 30 minutes before serving for optimal taste and texture.

Q4: Can I make this entremet dairy-free or vegan?
A: This recipe relies heavily on dairy and gelatin, but you could experiment with plant-based creams and agar-agar as a gelatin substitute. However, texture and taste will differ from the original.

Q5: How do I know when the glaze is ready to pour?
A: The glaze should be around 27 °C (80 °F) for the perfect pour consistency — warm enough to flow smoothly but cool enough to set quickly on the cake.Valrhona official website — link to their chocolate product pages or recipe section.
Example: “For the finest quality chocolate, we recommend using Valrhona chocolates.”

The Chef’s Secret to Ultra-Soft Chocolate Babka with a Beautiful Glaze

Babka dough rolled with chocolate hazelnut spread

chocolate hazelnut babka

Babka is a rich, sweet, and beautifully twisted yeast cake that has captured the hearts of pastry lovers around the world. Originally from Eastern Europe, particularly Poland and Ukraine, this brioche-like bread was traditionally baked for festive occasions and family gatherings.

What makes Babka truly irresistible is its intricate swirls of filling—most often chocolate, cinnamon, or nut pastes—woven into soft, buttery layers. Its distinctive braided shape not only looks stunning but also ensures every bite is laced with flavor.

Today, Babka has evolved beyond its traditional form, inspiring modern bakers to experiment with creative fillings, glazes, and toppings. Whether enjoyed for breakfast, dessert, or an afternoon treat, Babka is more than just a pastry—it’s a celebration of culture, craftsmanship, and indulgence.

Babka Dough Recipe

Total dough weight: 500 g

Ingredients (Baker’s Percentages)

  • All-purpose flour (13–15% protein): 115 g – 23%
  • Flour: 115 g – 23%
  • Sugar: 35 g – 7%
  • Salt: 6 g – 1%
  • Fresh yeast: 13 g – 2%
  • Milk (2.5% fat): 46 g – 9%
  • Whole eggs: 77 g – 16%
  • Butter (82% fat): 93 g – 19%

Tip: Place all ingredients in the refrigerator the night before preparation.


Method

  1. Initial Mixing:
    In the bowl of a stand mixer fitted with a dough hook, combine the sifted flour, sugar, salt, milk, eggs, and fresh yeast. Mix on low speed for 5 minutes until a rough dough forms.
  2. Kneading:
    Increase the speed and knead the dough for 12 to 15 minutes until it becomes smooth and elastic. The final dough temperature should be 24–25 °C (75–77 °F).
  3. Incorporate Butter:
    Cut the chilled butter into small cubes and gradually add it to the dough. Continue kneading until all the butter is fully incorporated.
  4. Shape:
    Transfer the dough onto a silicone mat or lightly floured surface. Shape it into a square using your hands.
  5. Fermentation:
    Cover the dough with cling film, ensuring it touches the surface to prevent skin formation. Place in the refrigerator for 12 hours to ferment slowly.

Chocolate–Hazelnut Spread

Total weight: 150 g

Ingredients (Equal Parts – 33% Each)

  • Hazelnuts: 50 g
  • Icing sugar: 50 g
  • Dark chocolate (Valrhona Caraïbe 66%): 50 g

Method

  1. Toast the Hazelnuts:
    Preheat a convection oven to 150 °C (302 °F). Spread the hazelnuts on a tray and toast for 15 minutes. Let them cool completely.
  2. Make the Nut Paste:
    Place the cooled hazelnuts and icing sugar in a food processor. Blend until the mixture becomes a smooth paste — this may take a few minutes depending on your processor’s power.
  3. Melt the Chocolate:
    Gently melt the dark chocolate to 45 °C (113 °F), either over a bain-marie or in short bursts in the microwave.
  4. Combine:
    Pour the melted chocolate into the hazelnut paste and blend again until fully combined and silky smooth.
  5. Storage:
    Transfer the spread to an airtight container and refrigerate. It will keep well for up to 7 days.

Arabic Gum Glaze

Total weight: 147 g

Ingredients (Baker’s Percentages)

  • Water: 56 g – 38%
  • Brown sugar: 56 g – 38%
  • Glucose or corn syrup: 25 g – 17%
  • Arabic gum: 10 g – 7%

Method

  1. Heat the Mixture:
    In a small saucepan, combine the glucose (or corn syrup), water, brown sugar, and Arabic gum. Place over medium heat and stir continuously with a spatula until everything is fully dissolved.
  2. Blend the Glaze:
    Remove the pan from the heat and transfer the mixture to a measuring cup. Use a hand blender to process until smooth and homogeneous.
  3. Strain and Cool:
    Pass the glaze through a fine sieve into a clean bowl. Let it cool to room temperature.
  4. Storage:
    Cover with cling film directly touching the surface and keep at room temperature until ready to use.

Assembly & Glazing of the Babka

Ingredients for Assembly

  • Stabilized babka dough (prepared and rested overnight)
  • Chocolate–hazelnut spread: 40 g
  • Arabic gum glaze: 30 g
  • Butter (82% fat): for greasing the mold (approx. 10 g)
  • Chopped hazelnuts: as needed
  • Dark chocolate callets (Valrhona Caraïbe 66%): as needed

Method

  1. Warm the Filling:
    Gently heat the chocolate–hazelnut spread to 35 °C (95 °F) so it becomes easy to spread.
  2. Roll Out the Dough:
    Take the chilled dough out of the fridge and roll it between two sheets of parchment paper into a rectangle approximately 3 mm thick and 30 cm wide.
  3. Spread & Sprinkle:
    Remove the top sheet of parchment. Using an offset spatula, spread the chocolate–hazelnut filling evenly across the dough. Sprinkle with chopped hazelnuts and dark chocolate callets.
  4. Roll the Dough:
    Starting from the long edge, carefully roll the dough into a tight log, peeling it gently away from the parchment paper.
  5. Cut & Braid:
    With a sharp knife, cut the roll lengthwise into two long halves. With the cut sides facing upward, twist the two strands together, starting from the center. Be gentle to avoid overstretching the dough.
  6. Prepare the Mold:
    Grease a loaf pan (size: 8 × 23 × 8 cm) with butter. Place the braided dough into the mold.
  7. Proof:
    Cover the dough loosely with cling film and proof in a warm place or proofer at 26 °C (79 °F) for 2.5 to 3 hours, until puffed.
  8. Bake:
    Preheat a convection oven to 155 °C (311 °F). Remove the cling film and bake for about 35 minutes, turning the pan halfway through (after 20 minutes) for even coloring.
  9. Glaze While Hot:
    Carefully unmold the baked babka and immediately brush it with Arabic gum glaze while still hot for a beautiful shine.
  10. Cool & Serve:
    Allow the babka to cool at room temperature. It is best served the same day, when the texture and flavor are at their peak.

Braiding chocolate babka step by step
Warning: This Chocolate Babka Is Dangerously Addictive (You’ve Been Warned!)

Conclusion: The Beauty of Babka, Layer by Layer

There’s something undeniably captivating about Babka. From the moment you roll out the dough to the final brush of glossy Arabic gum glaze, this pastry embodies both technique and indulgence. Every layer tells a story: of warm hazelnuts, silky chocolate, and a dough so tender it practically melts on the tongue.

Baking Babka isn’t just about the result — it’s about the process. The overnight fermentation, the careful braiding, the rich filling — each step is an invitation to slow down and appreciate the craft of baking. Whether you’re making it for a holiday, a family gathering, or just to celebrate a quiet morning at home, this Babka promises both elegance and comfort.

So the next time you want to impress, surprise, or simply treat yourself — let Babka be your signature bake.


Questions & Answers: Your Babka, Perfected

Q: Can I make the dough ahead of time?
A: Yes! In fact, this recipe is designed for it. The dough is refrigerated overnight to develop flavor and structure, making it easier to work with and richer in taste.

Q: What if I don’t have Valrhona chocolate?
A: You can use any high-quality dark chocolate, ideally around 66–70% cocoa. The key is to choose a chocolate that melts smoothly and balances sweetness with a deep cocoa flavor.

Q: Can I swap the hazelnuts for another nut?
A: Absolutely. Almonds, pecans, or even pistachios work wonderfully. Just toast them and chop coarsely before adding them to the filling.

Q: How do I know when my Babka is fully baked?
A: Look for a deep golden color and a slightly firm top. You can also insert a skewer in the center — it should come out clean or with just a few moist crumbs.

Q: Can I freeze Babka?
A: Yes, once baked and completely cooled, wrap it tightly in cling film and freeze for up to one month. Thaw at room temperature and rewarm slightly before serving.

Q: What does the Arabic gum glaze add?
A: It gives the Babka a professional finish — a glossy sheen and a lightly tacky surface that enhances both look and texture, without overwhelming the flavor.Link to: [Your brioche recipe post or glossary of baking terms]Valrhona Caraïbe 66% – Official Page
👉 https://www.valrhona-chocolate.com/en/our-products/caraibe-66

How to Serve Perfect Cheese Soufflés with Silky Chicken Liver Mousse Every Time

Elegant appetizer plate featuring crispy cheese soufflés paired with creamy chicken liver mousse, garnished with fresh herbs and served on a refined slate platter.

Cheese soufflés chicken liver mousse

A cold platter is more than just an arrangement—it’s an edible tableau, a celebration of textures, colors, and contrasts designed to awaken the senses. Chilled and meticulously curated, each element finds its place with intention, inviting the eye before it seduces the palate. Silken, creamy, crisp, or cured—every bite brings a new sensation.

Crafted to strike the perfect balance between elegance and comfort, this platter offers a harmonious interplay of savory richness and refreshing lightness. Whether served at a sophisticated gathering or an intimate brunch, it encourages slow enjoyment, conversation, and connection.

A composition of refinement and restraint, the cold platter thrives on quality and precision. It’s not just food—it’s atmosphere. Cool to the touch, generous in spirit, and designed for sharing, it invites guests to savor not just taste, but the moment In the realm of fine cuisine, certain creations transcend the plate to become symbols of mastery, elegance, and timeless refinement. Among these, the soufflé, the mille-feuille, and the foie mousse stand as icons of French culinary artistry—each one offering a unique journey through texture, flavor, and sensory pleasure.

The Soufflé: Airborne Elegance

Few dishes command as much admiration as the soufflé. Rising gently in the oven with its golden crown and ethereal structure, it is a fleeting marvel—delicate, tender, and full of anticipation. Whether served at the start of a meal or as a final sweet note, it captures a moment of perfect balance: light yet rich, structured yet melting. A soufflé is not just served—it is unveiled.

The Mille-Feuille: Layers of Precision and Pleasure

Structured in rhythmic repetition, the mille-feuille is a study in contrast. Its crisp, golden layers yield under the fork to reveal a creamy heart, offering a refined crunch-and-cream experience that plays on both texture and balance. Visually striking and meticulously assembled, it is a pastry that demands craftsmanship and rewards the senses with every bite. A mille-feuille doesn’t whisper—it speaks with crisp authority.

The Foie Mousse: Velvet Sophistication

Smooth, cool, and deeply luxurious, foie mousse is a dish of pure finesse. Silky and light, it glides across the palate with a depth of character that is at once subtle and lingering. Presented in elegant portions or spooned generously over toast, it evokes a quiet opulence—something meant to be savored slowly, thoughtfully, and always with reverence

Cheese Soufflé Bites & Chicken Liver Mousse: A Sophisticated Yet Effortless Starter

Serves: 4 people


Ingredients:

  • 1 package of cheese soufflé bites (light, airy savory pastries – typically store-bought)
  • 1 portion of chicken liver mousse (homemade or delicatessen-quality)

Step-by-Step Preparation:

1. Preparation & Mise en Place

Begin by removing the chicken liver mousse from the refrigerator about 10 minutes before serving. This allows it to soften slightly, making it easier to shape and serve, while still keeping its structure intact.

Carefully arrange the cheese soufflé bites on a large serving platter or board. Handle them gently to avoid breaking their delicate texture. For a visually pleasing effect, try forming a circle, wave, or floral arrangement around where the mousse will be placed.

2. Shaping & Plating the Mousse

Using a warm spoon or a piping bag fitted with a star tip, create small quenelles or rosettes of the chicken liver mousse directly onto a plate, toast rounds, or appetizer spoons. For a finer touch, you can pipe the mousse into mini verrines or small ramekins.

To elevate the visual appeal, place the mousse over a bed of finely chopped herbs such as chives or parsley, or on a thin slice of toasted brioche for added elegance.

3. Finishing Touches & Serving

Right before serving, add a final garnish. A few drops of aged balsamic reduction, crushed roasted hazelnuts, or a hint of freshly grated lemon zest can add a delightful complexity and enhance the overall balance of the dish.

Surround the mousse with the cheese soufflé bites, allowing guests to scoop or spread the mousse as they please.

Serve immediately to preserve the crisp texture of the soufflés and the creamy mouthfeel of the mousse.


Chef’s Tip:

Pair this dish with a chilled glass of white wine—something fresh and aromatic. A Loire Valley Chenin Blanc or a lightly sweet Gewürztraminer will beautifully complement the richness of the mousse while balancing the savory cheese notes.

Conclusion: A Simple Gesture of Gourmet Refinement

What makes this dish truly special is the contrast it offers—the crisp airiness of the soufflés against the velvety depth of the mousse. It’s an elegant starter that feels luxurious, yet remains approachable, with minimal preparation and maximum impact. Whether you’re hosting a dinner party or curating a sophisticated cold buffet, this pairing brings instant charm to the table.

Served as part of a festive spread or as an elegant amuse-bouche, it invites conversation and appreciation, reminding us that culinary excellence lies not only in complex preparations, but also in how thoughtfully ingredients are combined and presented.

It’s a dish that doesn’t shout—but rather whispers of elegance, restraint, and a deep respect for flavor and texture.Autres entrées chic et rapides
👉 Wrapped & Ready: Parma Cheese Wafers in Just 2 Minutes


Questions & Answers

Can I prepare the mousse and soufflés in advance?

Yes! The mousse of chicken liver can be prepared or portioned several hours ahead and kept chilled. However, soufflé bites should only be arranged just before serving to maintain their crunch and structure.


Can I replace cheese soufflés with something else?

Absolutely. If unavailable, you can use crisp cheese puffs, gougères, or toasted brioche rounds as a base. The goal is to pair a light, airy texture with the richness of the mousse.


Is the mousse suitable for all palates?

Chicken liver mousse is delicate and smooth, but its flavor is rich and savory. To balance its intensity, you can serve it with a touch of sweetness—fig jam, onion chutney, or fruit purée pair beautifully.


What drinks pair best with this dish?

A dry white wine, such as a Chenin Blanc, Riesling, or even a Champagne, works wonders. For a non-alcoholic option, try a chilled white grape juice with citrus zest.


How can I elevate the plating?

Use a large slate board or marble plate, and add microgreens, edible flowers, or finishing salts. A drizzle of balsamic glaze or a streak of berry coulis can also add elegance and visual drama.Histoire du soufflé au fromage
👉 https://www.tasteatlas.com/cheese-souffle
(TasteAtlas – Origine et tradition du soufflé au fromage)